Hello, in this tutorial you will be learning how to create PlaybackLoudness lights or particle effects.
Have you ever wondered how Roblox clubs like Club Iris and many others have particle effects/lights/moving objects reacting to the music that is being played?
There seems to be not a lot of documentation about PlaybackLoudness, so some new - mid developers might be confused.
Tutorial:
First, you’re going to need a sound. PlaybackLoudness is a property of a sound that can be read.
Insert a sound into Workspace.
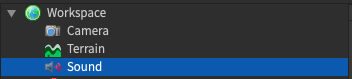
You can customize this object however you please by going into its properties.
For this tutorial, please turn on “Playing,” and fill out the SoundID.
Secondly, you’re going to insert a local script into the StarterGui service. This is because PlaybackLoudness can only be read from the client. You can name this script whatever you want.
![]()
Thirdly, we’re going to create this script. I’m going to go step by step in case some people are not experienced with Lua.
- First, create your variable. This variable will be referencing where the part you want to change color is located.
local ColorPart = game.Workspace.NAME_OF_YOUR_PART_GOES_HERE
- Second, create a loop that will fire every .1 seconds. This is needed because we are going to check the sound’s PlaybackLoudness very often. Add a variable inside this loop that contains your sound’s PlaybackLoudness property.
local ColorPart = game.Workspace.NAME_OF_YOUR_PART_GOES_HERE
while wait(.1) do
local loudness = game.Workspace.YOUR_SOUND_NAME_HERE.PlaybackLoudness

end
- Third, check the loudness with an if statement. In the script, I am checking if the loudness is greater than or equal to 200. You can of course customize this number. If the songs you play are mellow in volume, I would go with a lower number than 200, vice versa. Play around with the number until you find what you want.
local ColorPart = game.Workspace.NAME_OF_YOUR_PART_GOES_HERE
while wait(.1) do
local loudness = game.Workspace.YOUR_SOUND_NAME_HERE.PlaybackLoudness
	if loudness >= 200 then

	else

	end

end
Fourth, change the colors of the part depending on the loudness. Please replace the RGB values with your own values. This is what an RGB value looks like:
![]()
local ColorPart = game.Workspace.NAME_OF_YOUR_PART_GOES_HERE
while wait(.1) do
local loudness = game.Workspace.YOUR_SOUND_NAME_HERE.PlaybackLoudness
	if loudness >= 200 then
		ColorPart.Color = Color3.fromRGB(YOUR_RGB_VALUE_HERE)
	else
		ColorPart.Color = Color3.fromRGB(ORIGINAL_PART_RGB_VALUE_HERE)
	end

end
Last, we are going to put a wait at the end of this loop to ensure that the light does not flicker, but instead stays the same color for half a second or so.
local ColorPart = game.Workspace.NAME_OF_YOUR_PART_GOES_HERE
while wait(.1) do
local loudness = game.Workspace.YOUR_SOUND_NAME_HERE.PlaybackLoudness
	if loudness >= 200 then
		ColorPart.Color = Color3.fromRGB(YOUR_RGB_VALUE_HERE)
	else
		ColorPart.Color = Color3.fromRGB(ORIGINAL_PART_RGB_VALUE_HERE)
	end
wait(.3)
end
You can customize this basic script however you would like. For example, instead of changing a part’s color, you can turn a particle emitter on and off by using the Enable property of the particle.
Have any questions about this tutorial? Ask me in the comments.
I hope you found this tutorial useful.
