
Hello! I'm unidentifiedchris, this is my first Community Tutorial! I hope it has a nice approach. I am unaware of any other tutorials regarding increasing performance of CSG (Unions, meshes, etc.) So I will walk you step by step into how to increase your games performance by changing the CSG of your unions and meshes. In a part two of this I will also walk you into improving performance of meshes with your 3d modeling software. I will make these drop down menus so you can choose whatever you wish to have! I hope this is good enough for you all to understand, so here we go!
![]()
Triangles
Every single part, union and meshes are composed of triangles, in fact, all pieces of geometry in Roblox are conformed by triangles, unions and meshes tend to have a high amount of triangles, unlike parts, this is due to its complexity. This makes it so if you have a high amount of triangles it will require more GPU power from the player.
Loading Unions
All unions and meshes have to be drawn and loaded in by the client, I will explain this later on when we have a way to see what needs to be loaded in, the data from a union is based of it’s mesh data, this tells it how it looks and how it interacts with its enviroment (if it collides with something or if it has to have physics.) This may also cause data leaks if, for example, a union goes through two separate parts of the map away from eachother, this can be a common error and can crash your games, this is due to the fact that if a union is far away the player will still have to load it! So let’s say the union is 5000 studs away for some reason, the player will have to load all of those 5000 studs because the client says there is something in there.
Physics
Unions and meshes also lag because of their physics, if a union or mesh is constantly touched by a player, let’s say the floor is a union that will take a lot
To first understand how CSG can affect performance in your game we first need to understand it.
Constructive solid geometry, or CSG is what unions are, whenever you make a union you make a complex shape, this shape has several different parts, this all depending on the complexity of your union. There are two supported kinds of CSG by Roblox, unions and negates, there is a third kind of CSG which Roblox doesn’t support which is intersection. We can deconstruct CSG in binary trees, for example, if you grab a Part and a NegativePart, you will have 2 parts, you can de-construct these in a tree the components of these being:

With this image in mind you will have a further understanding into how unions may lag your game, as more complex your union gets the more leaves this tree will have, picture each leave as something that the player has to load in every time the game starts, this is the same case with meshes, but we will be covering them later on this tutorial. So if you really want to increase your performance it all goes down into the quality of your CSG, if your CSG is poorly made then it will lag your game, if there is no room for simplifying your unions even more, follow the next steps.
![]()
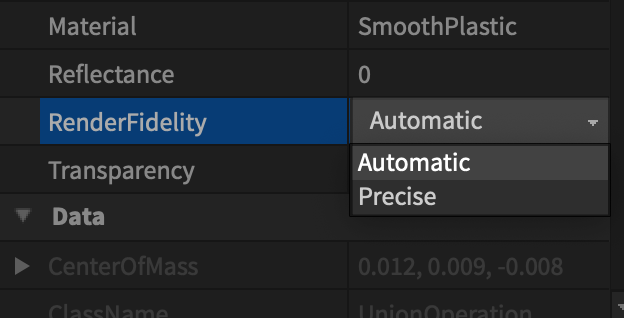
You can locate this property on RenderFidelity, the default for this is Precise, but if you want to increase performance make it Automatic. What happens when you set it to automatic is that whenever you get far away it won’t have the same amount of detail as it does when it’s close. So for example, a mesh may be 100 triangles, but if you get very far away it will go down to 10, this is why I only recommend to change the RenderFidelity property in cases where you don’t really need the mesh/union to be visible or if it’s a very unimportant detail, specially if your game contains a lot of these.

You can also decrease the LoD of meshes in Blender, I will be walking you through this in the part two of this tutorial
![]()
Apart from rendering, collisions are another very important feature if you’d like to improve your game performance, for this I recommend activating the ShowDescompositionGeometry setting in the settings tab, although another way to do this is to get @Maximum_ADHD’s plugin Show Descomposition Geometry which can change this setting with a single click. This setting toggles the physics model of your unions and meshes, every single colored square is a collision that the client has to load in, like we talked about in the first section about loading in and physics. Roblox currently supports 4 types of collisions.
You can locate these in the property CollisionFidelity in your properties tab under behavior.

- Default, normal collisions, these are already set automatically they try to replicate the shape of the Mesh.

- PrecisionConvexDecomposition, this was recently added into studio, while not 100% precise it is way more precise than the Default is, this will generate a lot more lag, but is better if you require of a very precise collision. This can be laggy and it cannot, it all goes down into what you’re applying it to, in the following picture we can see that both of these have the same collision, yet the simple union doesn’t have as colors as the complex Mesh. I suggest using this in unions or meshes like doors, or very small details that need to be collidable.

- Hull, I recommend this to meshes and unions that don’t require a precise collision, hull tries to replicate the shape of the mesh/union but only makes it a single collision, this is ideal since it makes the GPU power required to load it in much less, as it is only one collision.

- Box, this is the less precise collision, this just creates a box collision around your mesh or union, I only suggest using this collision for something that won’t need a collision at all, or for example a wall.

Thank you all so much for reading, try to give me feedback into how my tutorial was, in what I can improve, or just your opinion since it’s my first tutorial, all feedback is appreciated. I will make a part two of this tutorial depending on the feedback generated by it. If this tutorial helped you please leave a like!