I know this is kind of weird and i hope this can answer the problem, since i know a bit on Motor6D, but I know Motor6D most well on R15, however R6 is just slightly different but that is in terms of naming.
You most likely already gone on Roblox API reference for Motor6D, so i’ll give you the way i learned Motor6D, and that was through reading devfourm questions.
Here are some great articles answering motor6d questions and problems, and i took these so i could make a script where r15 arms and head followed the mouse cursor.
Links here:
sorry i’m a little bit new here, but i learned a bit about Motor6D from here, hope this helped.
If you wanted to directly adapt my tutorial you could just modify the solve function to not include any angles and only return the planeCF. The right shoulder on an R6 rig is the same as on an R15 one so you’d just set the shoulder based on the planeCF and exclude the additional angle setting the R15 version would require.
It’d look pretty rough but it would work. I’d recommend coming up with a way to lower the shoulder position based on how close the target is to try and mimic some kind of elbow bend. There is a lot of stylistic choice here with how you want to adapt that.
As far as a Motor6D tl;dr goes:
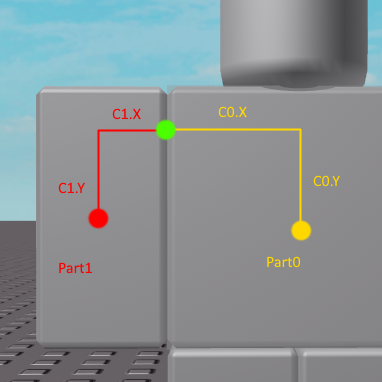
Part0 is the “base” part of the joint
Part1 is the “attached” part of the joint
C0 is the CFrame offset from the orientation of Part0
C1 is the CFrame offset from the orientation of Part1
A very common way of using the C0 and C1 value is to think of them as:
C1 is a hard offset from a rotation point
C0 is rotation point or “home” position
Our shoulder should rotate around that green dot. In order to set where that green dot should be we’d set the C0 cframe since it’s what will anchor us to the Torso/Part0. We just move it up and over.
Now without any C1 set the center of our Part1 is where that green dot would be. To fix that we offset the Part1 with the C1 property to put it into the position we want. Moving it down and over.
What you end up with is a stable “anchor point” as your C0 allowing you to rotate it around the point as like:
local shoulderC0Save = shoulderMotor6D.C0

while wait() do
	-- start with our base, add the transformation (a spin in this example)
	shoulderMotor6D.C0 = shoulderC0Save * CFrame.Angles(tick(), 0, 0)
end
Been a while since I worked with R6 but I remember now that it has some funky rotations attached to the joints. Because of those rotations they end up throwing off the shoulder CF for the Ik solve.
The IK solve is fine though, but since it’s R6 is can be simplified a little more.
local Ik = {}

function Ik:solveIK(originCF, targetPos, armLength)

	local localized = originCF:pointToObjectSpace(targetPos)
	local localizedUnit = localized.unit
	local l3 = localized.magnitude

	local axis = Vector3.new(0, 0, -1):Cross(localizedUnit)
	local angle = math.acos(-localizedUnit.Z)
	local planeCF = originCF * CFrame.fromAxisAngle(axis, angle)

	if l3 < armLength then
		return planeCF * CFrame.new(0, 0, armLength - l3)
	else
		return planeCF
	end
end

return Ik
and the only changed I made to that main script are some of the run time code
local function cleanRotation(joint)
	joint.C0 = CFrame.new(joint.C0.p)
	joint.C1 = CFrame.new(joint.C1.p)
end

cleanRotation(rightShoulder)

----

local SHOULDER_C0_CACHE		= rightShoulder.C0
local ARM_LENGTH			= RightArm.Size.Y - 0.5

----

runService.Heartbeat:Connect(function()
	local shoulderCFrame = Torso.CFrame * SHOULDER_C0_CACHE
	local goalPosition = goalPart.Position

	local planeCF = solveIK:solveIK(shoulderCFrame, goalPosition, ARM_LENGTH)
	local correction = CFrame.Angles(math.pi/2, 0, 0)

	rightShoulder.C0 = Torso.CFrame:toObjectSpace(planeCF * correction)
end)

runService.Stepped:Connect(function()
	rightShoulder.Transform = CFrame.new()
end)
but that should work better. The IK is designed to have the “front” face of the part aim towards the goal and since we want the bottom (the hand) to face it then you just need that added rotation.