
You can create a seamless skybox from the environment of your game in Studio.
This involves making square screenshots in 6 exact directions and with 90° field of vision.
At the top right of the viewport is an icon with a phone and a tablet. Click it.
This is Device Emulation, which lets you emulate a device’s screen size and technical constraints.
We’re interested in making the screen square, so click the device selection dropdown, go to the bottom and click Manage Devices.
Device Emulation can also be accessed from the Test tab of the ribbon.

Create a new device with the green plus at the bottom left. Set Width and Height to the same value, so that the viewport is square. I recommend setting them to 512 or 1024. *

Now you can go back to the dropdown and choose your new device, then click the device emulation button at the top right again to go back to a normal view.
Position your camera in whatever position you like.
If you have any GUIs visible, then hide them with the green eye icon beside the Device Emulation button.
If you have the View Selector visible (the cube with Front, Back etc. labeled), then hide it with the View Selector button in the View tab.
If you’d like, you can go to Studio Settings (Alt+S or File > Studio Settings), search for Quality and max out Edit Quality Level. (That option is also in the Rendering list)
Locate the Screen Shot button in the View tab of the ribbon (near the View selector). Clicking it should make a screenshot and make a message in the output that you can click to go to the screenshots folder. Get familiar with it.
Re-enable Device Emulation and run this code in the command bar:
local camera = workspace.CurrentCamera
local basecf = CFrame.new(camera.CFrame.Position)
local LogService = game:GetService("LogService")

local values = {
	"CameraType",      Enum.CameraType.Scriptable,
	"FieldOfViewMode", Enum.FieldOfViewMode.Vertical,
	"FieldOfView",     90,
	"Focus",           CFrame.new(),
	"CFrame",          CFrame.new(),
}

-- store camera properties and replace with necessary values
for i = 1, #values, 2 do
	values[i+1], camera[values[i]] = camera[values[i]], values[i+1]
end

-- turns two direction enums into a cframe direction
function direction(front, top)
	front = Vector3.fromNormalId(Enum.NormalId[front])
	top = Vector3.fromNormalId(Enum.NormalId[top])
	return basecf * CFrame.fromMatrix(Vector3.new(), front:Cross(top), top, -front)
end

for _,cf in ipairs({
	direction("Front" , "Top"),   -- ft
	direction("Right" , "Top"),   -- lf
	direction("Back"  , "Top"),   -- bk
	direction("Left"  , "Top"),   -- rt
	direction("Top"   , "Right"), -- up
	direction("Bottom", "Left"),  -- dn
}) do
	camera.CFrame = cf
	-- wait(1)
	LogService.MessageOut:Wait() -- wait for any output message, most likely the screenshot success message
end

-- restore camera properties
for i = 1, #values, 2 do
	values[i+1], camera[values[i]] = camera[values[i]], values[i+1]
end
It will move your camera. Take screenshots until the camera has moved back to where you initially had it. The script will patiently wait for you to take screenshots.
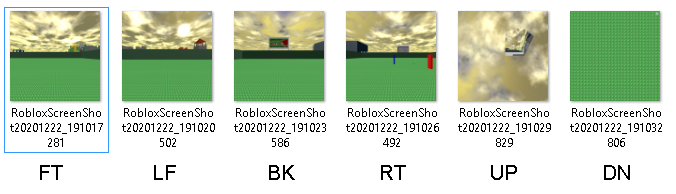
The Screenshots folder should now have the six faces of your skybox.
It’s not really clear which images are which faces of the skybox (other than top and bottom), so rename the screenshots.
The faces are saved in this order: front, left, back, right, up, down.
You may now upload these images to Roblox and use them as a skybox.
If you want to confirm that the skybox looks just right, you can preview it locally this way:
Previewing decals locally
Open the directory that Studio is in. Usually you can right-click the Studio shortcut and Open File Location.
Go to the latest version folder (by date modified) that has Studio in it.
Go to the content folder.
Make a new folder in here. Put the images in that folder.
You can now address these images with rbxasset://. If your folder is named asdf and one of the images is named front.png, then that image is rbxasset://asdf/front.png.
If you use an image and it loads, but isn’t satisfactory and needs some changes, then updating the file does nothing. Studio aggressively caches rbxasset:// and rbxassetid:// downloads and will not let go of them until it is restarted.
Rename your images first or save to a new name, then use that new file as a texture, otherwise it will not update.
ROBLOX might’ve implemented an official, more streamlined way to do that by the time you’re reading this.
Here are scripts that can turn a directory with sky faces into a skybox:
-- Generate skybox
local ChangeHistoryService = game:GetService("ChangeHistoryService")
local asset = "rbxasset://asdf/%s.png"
local faces = {"ft", "lf", "bk", "rt", "up", "dn"}

ChangeHistoryService:SetWaypoint("Creating skybox")
for _,v in ipairs(game.Lighting:GetChildren()) do if v:IsA("Sky") then v:Destroy() end end
local skybox = Instance.new("Sky", game.Lighting)
skybox.CelestialBodiesShown = false
for _,face in ipairs(faces) do
	skybox["Skybox" .. face:sub(1, 1):upper() .. face:sub(2, 2)] = asset:format(face)
end
ChangeHistoryService:SetWaypoint("Created skybox")
-- Generate physical box
-- As long as the camera stays in the center of the box (or the box is centered around the camera), the decals don't get shaded and the box doesn't cast shadows, the skybox remains believable
local ChangeHistoryService = game:GetService("ChangeHistoryService")
local asset = "rbxasset://asdf/%s.png"
local faces = {"ft", "lf", "bk", "rt", "up", "dn"}
local basecf = CFrame.new(workspace.CurrentCamera.CFrame.Position)
local size = 64
local thickness = 1

-- turns two direction enums into a cframe direction
function direction(front, top)
	front = Vector3.fromNormalId(Enum.NormalId[front])
	top = Vector3.fromNormalId(Enum.NormalId[top])
	return basecf * CFrame.fromMatrix(Vector3.new(), front:Cross(top), top, -front)
end

ChangeHistoryService:SetWaypoint("Creating skybox")
local model = Instance.new("Model", workspace)
model.Name = "Skybox"

for i,cf in ipairs({
	direction("Front" , "Top"),   -- ft
	direction("Right" , "Top"),   -- lf
	direction("Back"  , "Top"),   -- bk
	direction("Left"  , "Top"),   -- rt
	direction("Top"   , "Right"), -- up
	direction("Bottom", "Left"),  -- dn
}) do
	local part = Instance.new("Part")
	part.Anchored = true
	part.Transparency = 1
	part.CFrame = cf + cf.LookVector * (size + thickness) / 2
	part.Size = Vector3.new(size, size, thickness)
	part.Name = faces[i]
	-- local decal = Instance.new("Decal", part)
	-- decal.Texture = asset:format(faces[i])
	-- decal.Face = Enum.NormalId.Back
	local gui = Instance.new("SurfaceGui")
	gui.LightInfluence = 0 -- the one reason to use a SurfaceGui
	gui.Active = false
	gui.Face = Enum.NormalId.Back
	local image = Instance.new("ImageLabel")
	image.BorderSizePixel = 0
	image.BackgroundTransparency = 1
	image.Size = UDim2.new(1, 0, 1, 0)
	image.Image = asset:format(faces[i])
	image.Parent = gui
	gui.Parent = part
	part.Parent = model
end

ChangeHistoryService:SetWaypoint("Created skybox")
You can change basecf in the camera movement script to get a rotated or even tilted skybox, or just have the skybox face a certain favorable way.
Set it to camera.CFrame and make the camera face a certain way with the View Selector to ensure the sky is in just the right position.
If you make the camera face down or up (i.e. not perfectly horizontally), then the skybox will be tilted. This looks very strange.
You can set basecf to a specific Part’s CFrame if you want to fine-tune the sky and need a reproducible position.
If you regret running the script and want it to restore the camera immediately, spam stuff in the command bar. The script waits for the output box to get printed into before continuing, and the screenshot button prints a message into the output box when it’s done saving.
* 512x512 is kind of a low resolution for a skybox like this. You can do 2048x (the highest resolution that’s a power of two and lower than 2160) and upload it as-is or scale it down to get an anti-aliased skybox. If you want an anti-aliased 2048x2048 skybox, it’s possible to make four or nine or sixteen etc. screenshots with halved, quartered etc. FoV, then stitch them together to get one face of the skybox in super high resolution, which can then be scaled down for antialiasing.