This is NOT the easiest way to go about doing this, it’s intended to help you understand blender and moving models from Roblox to Blender.
This is something that I have seen twice today in my Roblox Help support browsing which strangely has turned into a small hobby, so I decided to make this quick tutorial talking about the very BASICS of importing a Roblox character into Blender and rigging it to your needs.
This is for R6 as I believe it looks better.
Requirements:
- Blender 2.8+ (2.79 works as well ill provide keybinds for both versions by default)
- Roblox Studio (Duh)
- A basic knowledge of how to use Blender.
- Some spare time and a bit of dedication.
Alright, let’s get started, first let me clarify I am using Blender 2.82, If some of my keybinds are wrong please let me know so I can fix it!
Step #1 | Setting up studio.
Let’s get started by opening our programs Blender & Roblox Studio.
Then we will create a Roblox Studio baseplate or you can use a pre-existing world.
Click on the Game Settings cog located in the HOME Tab located inside the ribbon.

Publish your game if you haven’t already, Name it if you’d like, and click create!
Then click the Game Settings button once again.
Click on Avatar → R6 → Save
Click yes if it wants you to shut current games down.

Step #2 | Exporting your character.
Now that studio is setup lets export your character.
Start by pressing play then clicking the dropdown arrow for Workspace, Then right click your username, finally click Export Selection.

At this point Roblox Studio will want to save a .OBJ file to your computer, choose a place you will remember to save it to, name it and click save.
If you want to change the clothing you are currently wearing, select the Shirt object inside of your username and change the ShirtTemplate to that of the ID in the catalog, This applies for pants aswell.
If you want other accessories you can just import them from the toolbox and export them like we did the player model and then in the future on blender place it on the model and group it to your head by pressing CTRL+J
Now move on to the next step 
Step #3 | Importing to Blender.
Now that we have a .OBJ file you may be wondering what other files Roblox dumped onto your computer are and the .OBJ contains actual information retaining to the shape of the object or mesh and the .MTL contains texture information or color and it also exports a .PNG which is the texture we can use and apply that in blender if needed.
Open up blender create a new project. Press A two times and delete EVERYTHING in the scene by pressing the Delete key.
Now we are going to import the .OBJ file Roblox gave us.
In the top left click File → Import → .OBJ

Navigate to the directory in which you saved your .OBJ from step #2. Then click the .OBJ file and click the blue Import OBJ button.
At this point, you should see your character in Blender, without color.
If you do not see your model!!
-
Don’t worry it probably imported, but you may have moved around in your world before clicking export in studio which transfers to blender.
-
So when you first import your model do these steps.
-
CTRL+SHIFT+C Will pull up a dialog if not press the SPACE BAR and then type in “Set Origin” and select “Origin to geometry.”
-
Then click on the center of your screen a small crosshair should appear
-

Then press SHIFT + S and select “Selection to Cursor (Keep offset)” again if this does not work press Space and search “Snap Selection to Cursor”
Hopefully, this fixes your problem.
Move to the next step and we will add color and prepare it for rigging.
Step #4 | Setting up your model.
Now click on the Material mode on blender located in the top right of the view port
It should make your model colored.

If your model is still not colored
-
Click on the shading tab on the top of Blender and select your object.
-
Sometimes when you import an OBJ the textures don’t transfer so we need to add them manually.
-
Drag your .PNG file from the exported file you got in Step #2
-
At this point a window should appear in this box area called the node editor.
-
select the first box you dragged in and press SHIFT+D to duplicate it and drag it down a bit.
-
It should look like this:
-

-
Then make the settings in the boxes you have look like mine.
-
Top one:
-
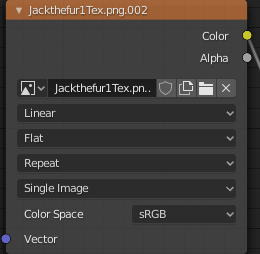
-
Bottom One:
-

-
Now Drag the TOP BOX yellow dot to the Base Color in the Principled BSDF.
-
And the bottom box yellow dot the the Alpha gray dot in the Principled BSDF
-
It should look like this in the end.


Now that you have color to your model let’s get the arms, legs, and head separated from the torso.
Start by pressing TAB or clicking the Top left button labeled Object Mode and select Edit Mode

A bunch of lines and dots will appear don’t worry though this is just the mesh of the object.
Please watch this short clip where I show you how to select an arm in edit mode, this applies to all body parts.
Now we can subdivide the arm and make it look good.
While selecting the arm you have grouped on its own press TAB and select all verts by double tapping A, then press W and click Subdivide, or press space and search for subdivide, do this about 3-4 times don’t go any higher though.
I will also note to experienced modelers this is not the most efficient way to do this but its a tutorial that I believe will teach people how to do weight painting and that will help in future endeavors whenever they may have a an issue with their current rig, and absolutely you can use a pre-made rig but this is just how I do it and what I suggest you do aswell as it helps you get faster at modeling and understand your tools better.
Now it’ll look a little weird

But that’s okay because we can fix it by disabling a feature called Auto Smooth doing this.

Now your model is prepared for rigging!!!.
Step #5 | Rigging.
You now have your arm, leg, torso subdivided and auto smooth is turned off since the same system applies for all body parts I will only show you how to do the arm, I have disabled the rest of the body to make it easier to understand.
Orthographic view is basically removing depth from your model its really great for what we will be doing.
So start by pressing 5 on the numpad to toggle Orthographic on/off then press Num3 or 1 depending on which direction your model is facing, then press Shift+A and select Armature press R then X and type 180 which rotates the armature 180 Degrees.
We will then position the armature in the center of the arm from the views Num3 and Num1
Since you probably can’t see the model once its inside the arm you can set it to InFront by following this picture.

At this point you should have something like this

Then press TAB while selecting the armature you added and move the bottom Dot up to about the center part of the arm. once you are done then press E and move the second ball down to the bottom of the arm. Press G then Z to move it perfectly down.
It should now look like this:

Now go to object mode by Pressing Tab again, or selecting in the top left. Select your Model and then while holding shift select your Armature.
Then press CTRL+P and select With automatic Weights.
You can now pose your mesh! To do this select your Armature in Object mode then In the top left where you normally click to Switch from Object to Edit mode click on the POSE option then select the lines and rotate them!
However, you may notice a problem D:

So lets clean this up I made another video showing you how to do this as its a lot easier than reading.
In this video im basically using the Weight paint to remove the constraints from the arms that are not controlling areas that should not be getting controlled.
I know this may be a bit confusing so id love to help.
You have reached the end!
I wanted to clarify once again this is not the best technique at all and honestly the best way is:
But this really obscure way of importing your model and rigging it yourself gives you the opportunity to use Textures, Rigs, And meshes!!! And as a beginner, there is nothing more important than practice and doing the same thing over and over learning new techniques.
If you ever need help feel free to DM me I’ll try my best to respond, hopefully, this was helpful.