Hello fellow Developers!
In this post I’ll be showing you how you can use Roblox-Ts as well as using Flamework, a Framework for Roblox-Ts that provides you many features that we’ll be getting into in this tutorial!
This tutorial is primarily for Flamework however you can get snippets of what I’ll explain here and use it for your Roblox-Ts project that doesn’t use Flamework. Let’s get started!
Creating/Building your Project
Creating/Building your Project
Firstly to get started you must Create and Build your Project File, so let’s do that!

Here I’ve created a Empty Folder on my Desktop called “MyTSProject” this can be named whatever you’d like, depending on the operating system you’re using you can access this file and right click it and click the powershell option.
and by right clicking the file you’ll see the button “Powershell”, click that.

After accessing powershell we now need to install the flamework template that we’ll be using!
You could simply reference the documentation here if you wish to create your own Template for your game’s workspace, https://fireboltofdeath.dev/docs/flamework/installation/ however for now we’ll be using a already made template that’s also stored in the same documentation!
In your powershell type,
npx degit rbxts-flamework/template

then
npm i

This will create your template, however now we must Build your project file!
Type, npm run build in your powershell.

It should say the following above once it’s finished building.
Now we can access Visual Studio Code! You can either open VSC and choose the File from your desktop OR you can simply type code . in your powershell to open VSC with the File that will automatically open for you.
Installing Rojo
To install Rojo we must install it on both Roblox and VSC, firstly let’s download it on VSC.
Click on the Extensions button on the left

and type, Rojo.

Click install and wait for it to finish.
Once done go to roblox studio and click the toolbox then click the Plugins category and type Rojo.


You will be prompted with some options, choose the most updated option which is Rojo 7, using any other version will not allow you to connect to Rojo on VSC. Make sure you keep up to-date with the updates Rojo makes, it’s not very often so don’t worry about constantly checking.
After successfully installing Rojo on both Roblox Studio and VSC now you must connect it to your Studio.
Head back to VSC and on the bottom right click Rojo.

You’ll be prompted with this

https://gyazo.com/4b01536802144c2f88cae81b35c19f25
Click install Rojo now and you should now have this

Click
default.project.json to listen for any connections to it. This is your build file that we built earlier, you can create different paths for more folders with this if desired, that’ll be a thing for the future to talk about.
After clicking your json file you can now head back to Roblox Studio and go to Plugins and click Rojo 7.2 (Depending on the version for the future) and click Connect

Last step here is just to go into your terminal and type npm run watch

^ Click new terminal and access the powershell

This will watch your code for errors live, having errors will stop the compilation and present you with what the error is to fix it. Easy for debugging.
Singletons
Singletons in simpler terms is just a ServerScript or LocalScript in Roblox Studio, there’s much more to it as an explanation however for now we’ll just stick with it referencing a ServerScript and LocalScript.
Inside a Singleton we can create either a Service or Controller, the Service is for Server Handling and Controller is for Client Handling, extremely important to understand the differences between these two.
In flamework, these Singletons do not require you creating a Tag for it to attach to that Instance the Tag is attached to making it quite easy to learn which is why we’ll be doing this first.
Let’s start off by creating a Service Singleton

Inside our Src folder let’s head into the Server folder and then the Services folder to create our script, let’s call it
PlayerInitialize.ts, it’s important to type .ts at the end to tell VSC we’re creating a typescript file.

Inside our script let’s create a service class, while typing service, roblox-ts will present you a template for a service, this goes for Components and Controllers aswell.
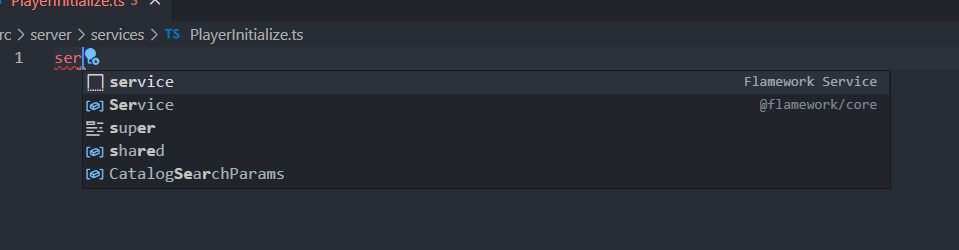
Click tab on the empty box one to create the template for Service, doing so will look like this:

Considering you’ve no experience in TypeScript, import is technically like roblox’s require() however what it does is imports the LifecycleEvents that @flamework/core script has which is Service, OnStart and OnInit, so we get those Events and implement it into our own class which is named PlayerInitialize.
To create our class we first must define what Singleton we wish to create which of that being a Service so we’ll type @Service({}) to tell Flamework that we wish to create a Service Singleton that will handle our Server sided things.
After so we’ll then create our class by doing, export class MYCLASSESNAME {} however we wish to implement Flamework’s core features which are it’s LifecycleEvents.
Lifecycle events allow you to listen into events provided by Flamework. This page will cover all the ones provided by default. In the case of singletons, these are called based off each singleton’s loadOrder. (Snagged from the Flamework documentation that you can find here, https://fireboltofdeath.dev/docs/flamework/guides/lifecycle-events)
So we want to implement those LifecycleEvents into our class (Please note that you DO NOT have to do this however it’s good practice to use if you’re using Flamework!) so after our class name export class MYCLASSESNAME {} we do export class MYCLASSESNAME implements OnStart, OnInit {}
You’ll get some errors after doing that since we haven’t created the functions in our Class, so let’s do so!

onInit() {} and onStart() {} are directly linked to the OnStart and OnInit Lifecycle’s that we implemented into our Class, naming them anything else will give you an error and also not function the script correctly!
To understand what each LifecycleEvent does please take a look at this wonderful great documentation for Flamework! https://fireboltofdeath.dev/docs/flamework/guides/lifecycle-events
Now this may seem confusing to those who’re only LuaU programmers… So, how can we use onStart() and onInit()? onStart and onInit are basically functions that are linked to the LifecycleEvents we’ve implemented.
In LuaU we write our functions like this:
function myName()
end
however in TypeScript we write our functions like this:
myFunction() {}
It is good to know that TypeScript does allow you to create a function using the name function but you won’t be using that as much in Flamework depending on what you’re working on.
Connecting Events to a function is similar to this in TypeScript:
Touched.Connect((touchedPart) => {
   print(touchedPart)
})
just remember!
So why did we create the PlayerInitialize script? Well… We wish to attach a Tag to the Player when they join by using CollectionService, attaching a Tag to a Player will allow us to attach our Component to the Tag and read the Instance based off what the Tag is attached to.
So let’s firstly install the services package provided to us!
Go to your terminal and type npm i @rbxts/services this may disconnect Rojo, just connect it back!
After doing so we can go back into our script and type:

This acts as game:GetService("Players") and game:GetService("CollectionService") technically,
In our onStart() {} function we can then connect the PlayerAdded event to a function and set our tag we want to the Player’s Instance:

Inside our Parameters you can see that I defined Player as Player, now you technically don’t have to do that for an Event that is already defining their arguments however it’s good practice since you’ll be doing that A LOT in TypeScript. TypeScript is Type Oriented unlike LuaU which is Non-Type Oriented, what this means is that TypeScript requires to mostly define everything you wish to either use or change/set, however do not fear as it’s actually pretty easy and not as scary as you think…
Before we move on-to Components note that you can add more functions to this service and call each of those functions however you’d like:

I did this to make an example of Types, as you can see in the playerAdded function I created, I have a parameter called Player and I defined it as a Player, the reason for this is so that TypeScript can read what the Instance is and give me the list of properties it has, such as Kick(). That’s the main purpose with Types in TypeScript and not defining your Instances can result in either some errors or not seeing the list of properties you wish to have while programming.
Components
Now that we got through Singletons, let’s get into Components!
A component is a class which is attached to a Roblox instance. It’s able to access lifecycle events, as well as use constructor DI. A component is useful for representing objects inside of your game world, for example a door, a vehicle or a weapon. (Snagged from the Flamework Documentation that you could read here, https://fireboltofdeath.dev/docs/flamework/additional-modules/components/creating-a-component)
Components can be created either on the Client or Server, however for this tutorial we’ll be creating our Component on the Server:

Doing the same as the Service Singleton, we’ve just typed Component and allowed it to create us a Template for our Component!
You can see it gives us a number of things, we’ve a import for OnStart, a import for Component and BaseComponent and a Interface for our Attributes.
Firstly, what’s a Interface?
One of TypeScript’s core principles is that type checking focuses on the shape that values have. This is sometimes called “duck typing” or “structural subtyping”. In TypeScript, interfaces fill the role of naming these types, and are a powerful way of defining contracts within your code as well as contracts with code outside of your project. (https://www.typescriptlang.org/docs/handbook/interfaces.html)
So now that we understand what a Interface is let’s move onto what the @Component({}) is for!
@Component({}) allows us to define the Tag we wish to attach our Component to and give our attribute default values for our typings we’ve made in our Interface, so let’s start by setting our Tag and Default values:

Inside our Component({}) config we define the tag we wish for our Component to attach to and creating a defaults table that I’ll explain later on what that does.
Inside our class we’ve extends BaseComponent<Attributes> this simply allows us to access our Attributes and our Instance interface, let’s first create our Instance Interface so that we can get the Instance our Tag was attached to which was the Player.

So we create our Instance Interface that defines our Player so we can grab that Instance the player is attached to! We extend our Instance Interface into our BaseComponent in the second argument, the first argument will always be the Attributes Argument and the Second will be our Instance, the cool thing about our Instance Interface is that we can also define the services we’ve under our Player, such as the Backpack or PlayerGui!

With this we can now access the Player’s Backpack easily!
Let’s get back to the Attributes, I’ll be creating a simple attribute called isLoaded:

You can see that I defined my isLoaded variable as a Boolean in my Attributes Interface and in my Defaults table I’ll set my isLoaded value defaulted to false (It can be set to true if you’d like).
So now doing that let’s go into our onStart() {} function and check if our instance is valid and if it is then set isLoaded to true:

this acts as self in LuaU, doing this.instance will reference our Player Instance that we’ve our component attached to, doing this.instance.Backpack would reference our Player’s backpack, simple 'ay? The if statement is more C#/C++ like than LuaU like, {} acts as the then in LuaU and you must have whatever you’re comparing or checking in the if statment in-between brackets. this.attributes.isLoaded is self-explanatory, basically just grabs our isLoaded variable from the attributes interface that we’ve created. You can add more functions to this Component like we did with the Service Singleton, for now this is all you need to know to get you started in TypeScript!
WANT A PART 2?