i believe project based learning, so let’s do some of that!
i found it pretty hard to transition to file based scripting (or whatever you call it), so today we’re just gonna do some tomfoolery and learn how to get to a fancier toolchain through trying to have a DMCA speedrun world record
tl;dr
this is supposed to teach the reader how to use rojo and vscode (and a few other tools) to script roblox games through making a project
i find a lack of tutorials about this topic, so i wanted to make one myself!
this tutorial is split into two parts
- how to install your new workflow and how to setup your new project
- how to actually use your new workflow
basically yer gonna learn how to use
vscode
yeah we’re installing this cute lil puppy because its one of the biggest reasons (imo [nerds dont come after me]) for using an external toolchain in the first place
“well isnt the default code editor good enough?” yeah yeah it is but sometimes youre just sick of going through the explorer for scripts and want some other quality of life changes to your editor
ok so there are two ways of installing this hunk o’ junk
you can either get the stinky microsoft telemetry version and let the government steal your information
or get the version with all the CIA spying stuff removed
both perform exactly the same, but the CIA version (the first one) has more plugins and the actually normal version (the second one) doesnt have spying
the plugin difference isnt enormous, and all the plugins we’re using should be in the open vsx registry, but do with this information what you will
this tutorial will be using the stinky microsoft version, since this is what everyone else uses and im a sheeple
anyways just scroll down either website and press the big fat install buttons you cant miss it


aftman
we’re installing the installer!!! confusing!! i know!!!
for you kids that dont know, aftman is a toolchain manager that lets you install certain programs in a project to project basis for easier team organization and letting you keep track of which programs youve installed so that your tiny peanut brain doesnt forget
install instructions:
- go to the github page
- press the releases button
- scroll down to assets and get whatever zip file has your operating system
- now go to the actual zip file and unzip it
- go into the unzipped file and open the terminal (i know scary)
- once youre in run
.\aftman.exe self-installand you shouldnt have any errors (yes you can totally run random terminal commands from a conspiracy theorist on the internet)


now your funny toolchain is set!
actually making the project
now that you installed at least 30 deadly viruses on your computer, its time to actually make the rojo project!
- go to your documents folder
- create a folder called
roblox-games,rojo-projects, or some other goofy stuff like that youll remember with your tiny peanut brain - go into that folder and create a folder named
pet-simor some other stuff like that… make sure its close enough to preston’s intellectual property so that he can sue you (because thats the end goal of this project [this tutorial is even more effective if youre a minor!]) - open vscode
- throw away your mouse
- press
Control + k(which will now be referred to asC-k) andControl + o(C-o) to open a folder - select your funny
pet-simfolder - now youre in!!!
so now you know how to create a file and open it in vscode… uhh… lets actually set it up now!
aftman initiation
since aftman is a command you can actually use now, open the terminal (i know scary) with C-` (or press control and the key on your keyboard with the funny squiggly [~]), enter aftman init and you should see a file called aftman.toml in the project


now before you touch your mouse! remember that you threw it away! press C-e (like a real man) and search for the file so that you dont have to search in the file tree (how convenient!)
now that you’re on aftman.toml it should look something like this

if you think it looks ugly (like me), then you can get an extension specifically for toml files in order to make them prettier!
we’re not installing from the website tho, so lets install from the editor itself!
-
go to the extensions tab
-
search for the extension
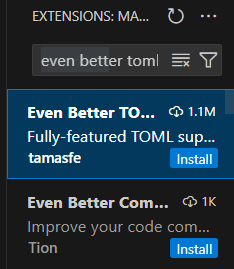
-
make sure its the right page, and then press the install button!


much better. and now you know how to install extensions yourself so i dont have to post one million screenshots!!!

ill still hold your hand and link you to the actual extensions so that you dont install anything suspicious/wrong
rojo
i wont go on a long winded explanation about both here, but tl;dr
rojo syncs computer files to roblox scripts
lets install it!
- go to the rojo github
- check for the latest version
- enter the input! it usually follows the template of
[name] = "[owner]/[name]@[version]"
since the name isrojo, the name isrojo-rbx, and the latest version is7.3.0, the inserted line should look like this:rojo = "rojo-rbx/rojo@7.3.0"

this is what it should look like in the file

so now you should know how to install other necessary programs when the time comes!
just run aftman install after saving the file, and after it does some magic (and doesnt show any red text), you should be able to run both commands!
if it asks you if you want to install a program youve never installed before, just say yes (press y) to shut the program up
rojo initiation
FINALLY!! we get some ACTUAL files working here!
run rojo init in the terminal, and watch as the terminal does your job for you

the file structure should look like this
make sure to change the file extension from lua to luau so that you can take advantage of roblox’s type system and utilize some of the plugins that will be used below!
but! before we get into scripting! we need to get a few extensions first to get a crispy environment going
ESSENTIAL plugins you need are
but if you wanna have some fun, i wont blame you if you go crazy and install a bunch more plugins
some of my recommendations are vscode pets, material icons, and doom one theme
ok… but what are these plugins?
- luau language server gives you studio’s default autocompletion
- stylua automatically formats your code to make it prettier
- selene makes sure you dont make stupid mistakes
- roblox lua autocompletes gives useful snippets that youlll need later
- rojo for… rojo…
stylua needs some configuration though, so lets do it!
go to the settings.json file through
- going to the command pallete with (
Control Shift P[which is nowC-S-p]) - and choosing the option “Preferences: Open User Settings (JSON)”
you should be in a file called settings.json
now all you need to do is insert this line into your file to get formatting
"[luau]": {
    "editor.defaultFormatter": "JohnnyMorganz.stylua"
},
if you want automatic formatting, then you can enable editor.formatOnSave to format everytime you save the file
in the end, the file should look like this:

selene also needs some configuration
just create a selene.toml file and make sure the contents are std = "roblox"
it should look like this

oh yeah… almost forgot… we need to enable rojo
go to the command pallete again, select “Luau: Regenerate Rojo Sourcemap” (so that we can get autocomplete for our instances), open it again, and then select “Rojo: Open Menu”
you should see this menu

select “Install Roblox Studio Plugin,” reopen the menu, and then select “default.project.json” to start syncing
open studio, go to the plugins tab, open rojo, press connect, and your studio should look like this:

now its time to actually get on with the scripting now
wait… so what are we actually scripting again?
oh yeah! sorry for the long wait… remember how this was a two part tutorial? well thats covered in part two where we get to actually use our new workflow
but before fully diving into it, i want you to do some digging on your own specifically on vscode and how it can increase your productivity!
a good starting point is fireship’s video giving vscode tips: https://www.youtube.com/watch?v=ifTF3ags0XI&t
have a good day!