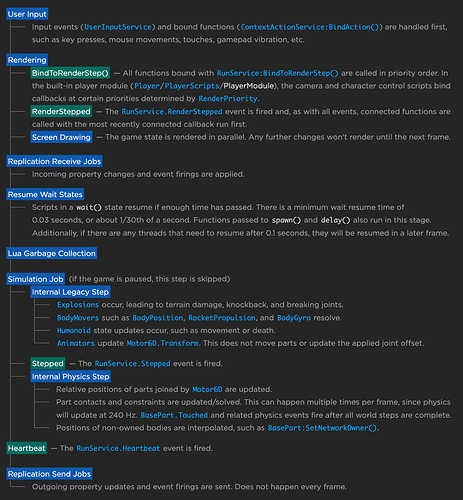
Roblox gives you many tools in Studio to monitor many aspects of your game while testing like how much memory it is using, how much bandwidth, and how much CPU time each scripts is using, etc. That’s great when you are doing a team test or testing solo, but in a public server you don’t have that luxury. If something is causing a CPU time overload in a public server, you aren’t there to see it or even know about until you start getting complaints from players. As far as I have been about to find in my research, Roblox does not provide any functions to get the “whole” server CPU load of your game while it is running. That is where this script becomes very useful.
This script uses clock measurements to calculate how fast your server is running and generate a rounded number between 0 and 100 to represent a percentage of how busy it is. This number is stored directly into the game as an attribute that can be accessed by any server or client script. Using that number, you can create your own monitoring system that can be used with throttling functions for example. The same data could be used to create a CPU graph of how busy your server is, another example. This is very useful information for developers trying to maximize their game speed as a whole or pinpoint situations that cause server crashing due to CPU usage overload.
How to setup for your Server:
First, create a script in your “ServerScriptService”, name is something that makes sense to you. I use “ServerCPUMonitor” for mine, but you can name it whatever you like. Put this code into in and save. Now you have real-time “whole” CPU server usage stored in an updating attribute that you can access from any server or client script.
Server CPU Load Measuring Script: [code updated to detect max FPS]
local runService = game:GetService("RunService")
local iFrameTicks
local iFrameStartTime
local iMaxFrames = 1
local iCPULoad
local iPhysicsLoad

while true do
	iFrameTicks = 0
	iFrameStartTime = os.clock()

	while os.clock() - iFrameStartTime < 1 do
		runService.Heartbeat:Wait()
		iFrameTicks += 1
	end

	if iFrameTicks > iMaxFrames then
		iMaxFrames = iFrameTicks
	end

	iCPULoad = math.round((1 - (iFrameTicks / iMaxFrames)) * 100)
	iPhysicsLoad = math.round(((1 - (workspace:GetRealPhysicsFPS()) / 60)) * 100)

	if iCPULoad + iPhysicsLoad < 1 then
		iCPULoad = 0
	elseif iCPULoad + iPhysicsLoad > 100 then
		iCPULoad = 100
	else
		iCPULoad += iPhysicsLoad
	end

	game.Workspace:SetAttribute("ServerCPULoad", iCPULoad)
end
How to setup for your Client:
First, create a LocalScript in your “StarterPlayerScripts” folder, name is something that makes sense to you. I use “ClientCPUMonitor” for mine, but you can name it whatever you like. Put this code into in and save. Now you have real-time “whole” CPU client usage stored in an updating attribute that you can access from client scripts only.
Client CPU Load Measuring Script: [code updated to detect max FPS]
local oLocalPlayer = game:GetService("Players").LocalPlayer
local runService = game:GetService("RunService")
local iFrameTicks
local iFrameStartTime
local iMaxFrames = 1
local iCPULoad
local iPhysicsLoad

while true do
	iFrameTicks = 0
	iFrameStartTime = os.clock()

	while os.clock() - iFrameStartTime < 1 do
		runService.Heartbeat:Wait()
		iFrameTicks += 1
	end

	if iFrameTicks > iMaxFrames then
		iMaxFrames = iFrameTicks
	end

	iCPULoad = math.round((1 - (iFrameTicks / iMaxFrames)) * 100)
	iPhysicsLoad = math.round(((1 - (workspace:GetRealPhysicsFPS()) / 60)) * 100)

	if iCPULoad + iPhysicsLoad < 1 then
		iCPULoad = 0
	elseif iCPULoad + iPhysicsLoad > 100 then
		iCPULoad = 100
	else
		iCPULoad += iPhysicsLoad
	end

	oLocalPlayer:SetAttribute("LocalClientCPULoad", iCPULoad)
end
Q&A
1. What performance hit does running this do to my game?
You can check the script analyzer yourself, should be near 0.000% usage most of the time.
2. Why did you do a loop within a loop?
It’s necessary to get accurate measurements and make it as efficient as possible.
3. Why does this work, is it magic?
It’s measuring how fast your server can generate frames. Anything less than measured max FPS is the result of the server becoming more busy. Knowing that, you can extrapolate a load reading and then scale it from 0 to 100. So if your server is running at 59 FPS when it’s max is 60 FPS, that would mean about 2% of it’s speed is going towards keeping your game running. I use rounded numbers for ease of use, but you can remove the rounding function if you want long, exact numbers instead.
4. Doesn’t Roblox Already Give You This With (insert function here)?
If it does, please share! ![]()
5. How do I access this information in real-time within my game?
A simple script print example:
local iCPULoad

while true do
	iCPULoad = workspace:GetAttribute("ServerCPULoad") or 0

	print("Server CPU: " .. tostring(iCPULoad) .. "%")
	task.wait(1)
end
Edit: VortextColor has shown me that workspace:GetRealPhysicsFPS() provides the Physics FPS and that it works independent from the rest of the server. After some testing, this also has an effect on server load and thus I’ve updated the script above to include it in the load calculations. Even though the two are calculated independently, if either one is maxed out, it still results in a server slowdown for the players.
Edit2: Only makes sense to post up the client code I use too. Basically works the same way, but gives you a client attribute that you can access from the client only. If you want to throttle functions that your client is processing for example. Useful for low end devices like phones and tablets if you don’t want to over-load them with too many client special fx as another example.
List of Tools & GUIs Made by Community Members:


