Plugin | Game | Design Guide | Technical Guide
This guide is for the following plugin:
This plugin was made to create maps for this game, though you can use it for whatever you want.
This is a general guide that will explain what is expected from a community-made map and what will give you the best chances of getting your map added to the game.
For a more specific guide on what everything in the plugin does and how to use it, here is the technical guide.
Use tiles/faces, not blocks

The plugin has a handful of useful tools for map-making but it is important to know which ones to use where. For the most part, you should make the majority of your map out of faces, and not blocks or planes.
Using blocks means that players standing on top of a surface such as a tower or a ledge or any other kind of high ground can simply keep the ground near the edge painted which will keep all enemies from getting up. It is better to use faces generally as it will allow the wall to be painted one color and the ground just on top of the ledge another.
Using planes and displacements is also not a good idea as it can cause “Z-fighting” issues on corners where two parts will be overlapping. Using faces instead completely prevents this.

The “make part” tool is another useful one that you need to be careful about where you use. All parts it is used to create are non-inkable which means players will not be able to paint them. This tool can also make larger parts to keep the total number of parts in a map down by clicking and dragging on the grids with it. These are especially useful for uninkable regions at the top of walls keeping players from getting out of bounds. If you decide to create any background elements, it would be best to not go too far with the detail and to use this tool.
You can also use this tool to make invisible barriers to keep players from getting on top of things or out of bounds and to create grating that players can walk on in kid form, but can pass through in squid form simply by changing the “Type to place as” setting.

The map should not be too small
Many community map creators make the mistake of making mini versions of maps. These maps are very cramped to play on and don’t offer much room to move around. If the map you are making is themed after a map from the official games, it would be best to make yours on a similar scale.


Ensure cover isn’t too small to hide behind, and take special note of the next two tips.
Keeping players out of specific areas
Many maps will have spawn regions that one team will spawn in and will usually drop out of to join the fight in the middle of the map, but many new map creators (myself included) might make the mistake of making these dropdowns only 2 tiles tall which players can somewhat easily find a way up. Make any obstacles or walls players are not intended to be able to get on top of without using squid-form at least 3 tiles tall.
Additionally, make sure the walls below these ledges are uninkable so that players cannot simply swim up them.

Accuracy and reference models
If you have the option, finding a map file from the official game and/or sourcing one yourself and using it as a reference can help a lot with this. If you do choose to take this approach, make sure the imported map is the correct size. Usually, these maps are measured in meters while Roblox uses feet so multiplying the scale of the imported map by 0.3048 will convert it if it looks too big.
When importing one of these reference maps, make sure to use “import with location” so the map gets placed in the middle of the world. Grouping all imported parts into one model (with CTRL+G) and then moving it into workspace.Map.Reference will allow you to adjust your reference’s transparency on and off as you work with the plugin. Just keep the model selected as you open the plugin, and then click the “Reference Model” button in the bottom-left to set the selected model to be your reference. Then, all you have to do is click and drag your mouse left or right on the Reference Transparency option to adjust the transparency of your reference model.

If you aren’t able to import one of these maps, finding a map screenshot or overhead view picture of the map can help a lot with getting the proportions and scale correct.


Whether you’re using gameplay footage, an overhead map, or a 3D model reference, it’s usually best to use the most recent version of the map. Using versions of maps from Splatoon 1 might not be a good idea if the map is also in the second game. Nintendo generally made vast improvements to maps between those two versions. As for the maps from Splatoon 1 that appear in the third game, I won’t blame you for wanting to focus on the earlier version of the map.
If you find that you’ve made a large portion of your map too small or offset in a way you’d like to fix, or otherwise would like to move a large portion of your map, you can use the “move mode” tool. After selecting this tool you’ll find an important option in the top-right. In “Individual” mode, you’ll have to click on each part you want to move one at a time to add it to your selection. If you change it to “3D Selection Box” this will create a box with resize handles on it in 3D space that you can use to select large numbers of parts all at once.
Materials and appearance
A bland, gray map isn’t super interesting to look at or play on. Try to make your map stand out with more materials. If your map is themed after a map from the official games, looking at screenshots and videos, or wandering around the map yourself and looking at what types of surfaces you can try to recreate the look of in the editor can help bring your map to life. The “Color painter” tool is your friend here.

Some map makers might make the whole map in gray and then go back and add materials, colors, and build structures like boxes and other props later. If you choose to do this, make sure each surface has been properly set to inkable or not as you go as this isn’t as easy to change later as changing its color and material is.
Glossy materials will often be understood by players to be uninkable while more mat materials can be inked. It is important that you match these expectations from players so they can intuitively understand how to navigate your map.
Using textures and decals can also add a lot of detail and texture to your map.

When applying textures, you can close the plugin, copy the decal, select all the parts you want to apply the texture to in Studio, and click “Paste Into”


Making parts uninkable
When making parts inkable or uninkable while placing tiles, use the “Inkable” setting to choose if they can or cannot be inked.

You can also use the Make Part Mode as all all parts it places are uninkable no matter what! This is useful for making large objects that cannot be inked. Simply click and drag on the grids with this tool selected to make larger parts.
DISPLACEMENTS CAN BE INKABLE OR NOT INKABLE! Don’t use them to make random surfaces. If you don’t intend to use the deforming functionality of displacements, you really shouldn’t be using them.
example of displacement being used properly with the displacement editor:

To choose if a displacement will be inkable or not, change the “Inkable” setting while the “Add Displacement” tool is selected.
Lighting and the skybox


You might want a custom skybox or atmosphere for your map. If you put these objects in
game.Lighting when you submit the map, I’ll use them. Alternatively, you can place them in a folder within the map called “Lighting” (case sensitive).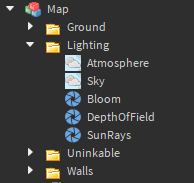
Try not to go too crazy with any effects. Try to keep any sort of color correction to a minimum.
Submitting a map
If you feel your map is ready to be added to the game, you can select file>publish to Roblox and disable Team Create! Then, on the game’s page on the website select the 3 dots in the top left and select “configure place”. Finally, navigate to the permissions tab and enable “Allow Copying”

I’ve had some users publish their map as a model and send me the link to that. This can work, but I strongly recommend against it. Publishing as a place makes things a lot easier for me. If you use a model, I can’t grab any lighting information and if you use any material variants in your map then those will be broken/lost.
Once your map is published and set up, contact me by messaging me here on the developer forum (@Noobot9k), on Roblox, or anywhere else and send me a link to your place.
I am somewhat picky about what will be added to the game so don’t be too let down if your map doesn’t get added to the game. I am very excited by what people have been making and can’t wait to see what else gets made!
For more information on how to use the plugin itself and what everything in it does, see the technical guide.