-
The “What’s New” button can at the top-right of studio can show you a quick summary of recent Studio / Lua API features and links to the dev forum announcement for each:

-
Also right next to that, there’s a button to collapse the ribbon bar:

When collapsed, only the ribbon bar tabs are visible by default, and you can click on of them to temporarily open the ribbon until you click away to something else:
You can also collapse the ribbon bar by double clicking on one of the ribbon bar tabs. -
You can print values by typing an = sign in front of an expression in the command bar. This is useful to avoid messing with wrapping a value in
print(...)as you inspect it via code:
-
The “Run Script” button in the Model tab lets you run an arbitrary Lua file at editing time without making it into a full fledged plugin. This can be useful for automating infrequent but important steps in your content pipeline:

-
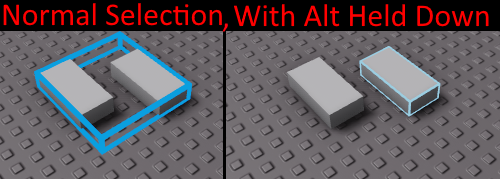
Holding down Alt lets you select individual parts within Models using the core draggers:

-
You can show what exactly the collision geometry of MeshParts in your level looks like by enabling the “Show Decomposition Geometry” toggle in the studio settings:
There’s also a good plugin to automatically toggle this setting for you with a toolbar button or shortcut called “Mesh Optimization”: Mesh Optimization Tools - Roblox. If you are working with a Mesh heavy place and want to keep it performant, this is basically a required plugin. -
You can set which way the split at the bottom of the screen happens. The default is Vertical even though many people may prefer Horizontal so that the command bar and output window “line up”:
-
This button exists, and lets you set whether the Color tool acts like a paintbrush or like selector for the color of the currently selected parts:

-
Clicking “Create → Weld” with multiple parts selected will automatically create a set of WeldConstraints connecting those parts together in a reasonable way:

-
Wireframe Rendering is awesome and extremely useful if you’re working with Terrain, it is very likely to show you terrain errors / oddities that are costing you triangle count for no benefit:

-
Pasting a decal will put you into a mode where you have the dragger selected dragging that decal. This lets you effectively “stamp” decals into your place by repeatedly pasting and clicking where you want the decal to go.
-
More on decals… clicking a second time on an object that you already have selected will select the decal in that object that your mouse is currently over. Useful if you need to do the opposite of the above and delete a lot of decals off of objects:

-
You can customize your shortcuts:

-
…and you can even customize the quick-access bar, the button is just a little bit hidden:

-
Not many people use the Transform tool… a lot more might if they knew that you can change which plane the Transform tool operates on:
Excellent guide! I will now add-on by sharing tips that I wish I knew when using studio, especially in the field of building.
-
Alt-click to select an individual part on a model. Control + Alt click to select multiple parts. This is so useful! Whereas before I just randomly picked parts in the Explorer, I can now directly select parts.
-
Click on “Select” to make the “highlight” cursor go away. This is excellent if you want to view your workspace clearly, or want to take a quick screenshot.

-
After copying anything (audio, textures, scripts) you can right-click the parent, then choose “Paste Into” in the dropdown. This saved me so much time, instead of clicking + dragging the selected thing!

-
Press “F” on a selected part in your Explorer to zoom to it. This is oh so useful when trying to figure out exactly where a part you placed is.
-
In View, you can deselect the View Selector. I see the selector all the time in screenshots and it drives me crazy! When I discovered I could deselect the tool I was so happy.
-
Control + Y to redo. It surprises me how many people have zero idea this exists.
-
Disable the UI on the top-right corner of your Workspace. I am stunned that so many people do not know you can disable UI this way.

-
Hold “Shift” while moving your camera to slow your camera down.
-
Go to File > Studio Settings to change how fast your camera moves. I can understate how useful this is. Sometimes I work big-scale terrain, sometimes I work detailed building- this saved me so much time and frustration of either moving too slow or too far.

-
Under File > Rendering, you can change the Edit Quality Level so that you lag less in studio. I have mine at 1 because my computer is not that good. You may be in the same situation, so I hope this helps you.

Okay. Hope these 10 tips helped anyone in some capacity!
- Use Ctrl+1, Ctrl+2, Ctrl+3, and Ctrl+4 to switch between selecting, moving, scaling, and transforming.
The 9th point will help me like crazy, big props.


