Salutations, Developers:
Let me first start off with that this is my first tutorial that I’ve made. I am going to do my best to be as intricate and as efficient with helping newer developers regarding building. Thus, I’m most certainly going to make some mistakes, whether it be I provide tips that I thought were exquisite, but could prove to be inefficient. So, to the more experienced builders possibly listening, do correct me on anything that could be bad for newer developers to learn. To the newer developers, I’ll try to fix anything when I can, but I’d recommend to read the replies from the more capable individuals.
So, my condolences for the disclaimer, but allow me to begin.
Welcome, fellow new developers. Before we get in, I’d recommend that you have a general knowledge on how to create a place and edit it. That way, we can start on the same page and get right to building. So, I’d recommend starting with a Classic Baseplate or a Baseplate. Once done, allow us to proceed to the first section.
Basic Tool Introductory
This category goes over the basics on your Explorer tab, your Properties tab, spawning a part (part, ball, wedge, and cylinder), rotating a part, moving a part, scaling a part, and selecting a part.
View
So, before we starting creating and editing parts, there is one task that I recommend to do. Firstly, go up to your tabs, and click View.
![]()
You’ll be met with dozens of options, but for this tutorial, I’d recommend that you activate: Explorer; Properties; Toolbox; View Sector.

These options will appear on your screen, and by clicking and holding, you can drag these wherever you desire. So, feel free to organize it to your liking.

So, before we explain each of these helpful tools, let us first go over the basics of building parts.
To summon a part, you’ll either need to go to the Home or Model tab.
![]()
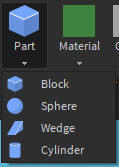
You’ll then need to find the Part tool. You can either click on the image itself to summon a part, or click on the arrow for a list of unique parts.

Before we start rotating and moving these parts, we need to make sure that we have certain settings at a reasonable level. If you weren’t in the Model already, do so now, and look at the Snap to Grid section.

Firstly, make sure that the checkmarks beside Rotate and Move are set to true. Now, this feature (which I like to call alignments), will determine the space in which how much studs or degrees your part will move.
I’d recommend starting with 15 degrees and 1 studs, though, later I will show you the magic of messing with this.
Now, let’s get to Selecting; Moving; Scaling; Rotating; Transforming (which is found in either the Model or Home tabs).

Firstly, to simply select an object, you will need to click Select, and simply select any object. If Select is not on, you will not be able to select any object.
Though, using your Explorer tab, you can find the service known as Workspace, and select your part here.

When you select something, your property tab will be filled with multiple tools and… well, properties.

This is essential for changing or checking properties of instances. More on this later.
Moving onto the Moving tool, simply select the icon (after you select the part you desire), and you will be greeted with simple arrows surrounding the selected part.

Simply click and hold one of these arrows, and you can drag it to your desired position. You can also edit the positioning via the Property tab.

When moving the position of an object, you have three axes. The X-Axis; Y-Axis; Z-Axis
The X-Axis positions an object Left to Right.
The Y-Axis positions an object Up to Down.
The Z-Axis positions an object Forward to Back.
A fairly simple premise, and it could be understood more clearly if you have a background knowledge of graphs. Yes, mathematics is going to be a part within building.
Next, the Rotate tool. The premise is fairly simple concept, and is mostly similar to positioning an object.

You can also edit the orientation via the Property tab once more.

The X-Axis rotates an object Left to Right.
The Y-Axis rotates an object Up to Down.
The Z-Axis rotates an object Forward to Back.
Now, we also have Scaling, a fairly significant tool. Subsequently, it’s essentially the same in axes as that of Moving and Rotating.

As one can envision, you can make parts big, small, slim, thin, and et cetera.

One more note regarding scaling, however, is that when you scale Spheres/Balls, Wedges, and Cylinders, compared to that of scaling normal parts, you’ll configurate these parts in interesting ways. Explaining it all would be a bit too much for me to explain in this tutorial, but overall, I’d recommend that in your own time that you mess around with it and learn.
Lastly, we have Transforming. Transforming isn’t that different from the rest of the tools, and that’s because it’s a combination of all the other tools. So, if you prefer to manage all of these properties at once, the Transforming configuration is a handy tool.

Now you know how to summon, position, scale, and rotate unique parts. Cool.
Deeper Dive within the Basic Tools
This category will go over some more basic, but useful tools. Such consist of colors, material, anchoring, decals, textures, colliding, transparency, modeling, unions, and more unique parts.
View
Alright, by now, you should at least know the very basics of building. So, let’s get a bit more elaborate.
Let’s say you scaled a part to be a floor. Cool, now you have a floor.

But it looks bland. No problem, that’s the job for Materials and Colors. To configurate either of these properties, all you need to simply do is select the part you wish to change, and find the Material or Color tab/property. You can change it either on the tool in your Home/Model tab, or by your Property tab.


Now, you can configurate with either two color configurations. Color or BrickColor.
BrickColor will provide you with with the image above, i.e, quite an abundant number of colors. But what if you want a very specific color? Then you can use the Color property, and find a very specific color using RGB - (Red; Green; Blue) values. Neat.


Now, I got a cool floor.

Now I have this wall here, and I tried putting some glass material to make it look nice, but it’s opaque. Well, to solve this, you can edit the Transparency property.

By setting it to 1, you’ll make the part entirely invisible. This could be used for invisible boundaries for maps and such. However, for our case, we want a fairly decent window that doesn’t look polluted. So, allow me to set the Transparency at 0.25.

Though, my window on my wall looks a bit too thick, and it looks odd without a frame. Though, when I add a frame with my current alignment, it also looks too thick. This is where messing with your Snap to Grid/alignment comes to play.
By setting your alignment to something smaller, you can make more smaller parts. However, you must be careful with this process because if you misalign something, your building will look funky. So, here is what I recommend. Use margins that can add itself up to 1.

So, for this instance, I’ll use 0.25 because 0.25 x 4 = 1. Therefore, it will look nice with my other parts. The main margins I use are 1, 0.5, 0.25, and 0.125.
Cool.

One thing I forgot to mention. Let’s say you test out your game, but then you join the server to see this:

A catastrophe has struck upon your building, and it’s because you forgot to anchor your parts. A fairly simple solution, however, is present.
First, select the workspace service on your Explorer tab.

Then, you’ll need to find the Anchor tool on your Home or Model tab. Simply click it, and your problems will be solved.

Lovely, now it doesn’t look like my wall has been hit by a natural disaster.

Overall, Anchoring simply locks instances into place. Though some parts you don’t want anchored, perhaps. Such as a ball that you can push around.
Look! I have a sweet pond here that I can- Wait… how am I standing on water?

Quite the conundrum indeed, however, we can simply turn the collision off.
To do this, simply Select the part, and find the CanCollide property.

Then, all you need to do is set the property to false, and your lovely water should let your legs submerge within.

Let’s say I have a decal on Roblox that I want to implement into my buildings. For this case, let’s just say it’s this image.

Firstly, make sure it’s a proper decal on Roblox, that way, your images can be moderated by Roblox (be careful about uploading decals, as Roblox Moderation has quite a record; which, I’d also recommend using an alt to upload them).
Secondly, you’ll need to insert an object. To do this, right click on the part you want to put your decal on.

Then simply search Decal and click on the object.
An orange outline will surround the part, and you’ll just need to click on the surface of where the decal is going to display itself at.

Great, but it’s blank. That’s because you need to specify the ID of the Decal. To do this, go to your Property tab, whilst your decal is selected.

To change it to your desired Decal, simply find the ID found within the image you created or found.

(You can also use your Toolbox tab to find the image as well, and simply just right click on the image to find the ID).

Simply paste your ID within the Texture property, and your image should appear.

Luckily, my decal worked well, but sometimes, this will happen:

Make sure the the part that has the Decal has a similar ratio to the image itself. Such as a square-like ratio that image shows to be.
Let’s look back to a floor, once more.

A nice floor, but I’m starting to get bored with the limited materials we have. That’s where Textures makes an appearance.
Similar to images, search or create a Texture for your desired output. For this instance, I’ll go with a wooden floor.
Before getting the ID, however, you also need to place the Texture instance on your desired part.
![]()
Now, let’s get the Texture.
Let’s use this one:
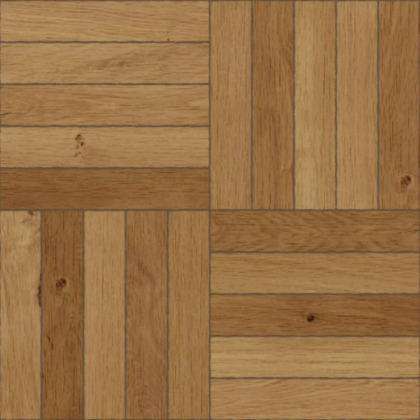
Now we apply it and- Oh, lord…

It doesn’t look proper, due to the excessive number of times it repeats itself. No problem, we simply need to adjust these properties: StudsPerTileV and StudsPerTileU.

Mess around with it until you get a result you like. Neat.

Now, let’s say I’m just building upon this floor, but my cursor keeps accidentally selecting the floor. Quite annoying, yes? Well, similar to our BasePlate, there’s a solution to this.
Simply set the Locked property to true. This way, your Select tool will now not select the part. The only way to select it is through the Explorer tab.
![]()
By now, I’ve created quite a bit in my Workspace. Let’s check it out!

Yeesh! That is quite a mess. It’s very unorganized. So, let’s learn about Folders and Models.
Let’s start with Models.
When you model something, you essentially lock parts into a group that be moved, scaled, and positioned precisely. Allow me to show you.
So, first, let’s take our wall once more as an example.

It’s lovely, but it’s a pain to move around because you have to select every single part. However, if you take your cursor, and click and drag your mouse, you’ll have a selection box.

Use this box to grab all of your parts, that you desire to be a part of the model, and then you’ll need to click the Group tool.


Your model should then appear in the Explorer as a parent to all of the parts that you have selected.

Now, for the sake of organization, you should name your parts so that you know which is which. You can either rename parts via pressing right click on the part in the Explorer tab, and clicking Rename, or simply editing the name through the Property tab.


Cool, now it’s way more organized.

Here’s a few tips when editing parts within Models. When you try to select a certain part in the Model, you’ll just select the entire Model itself (unless if using the Explorer tab). To select individual parts, you can hold Alt while clicking an individual part to select that individual part.
By holding Shift or Left Ctrl, you can select multiple parts at once.
When managing objects in your Explorer tab, similar tricks are present, but there’s a few differences. Such as, you can hold Left Ctrl and click multiple parts, but if you select a part, and hold Shift, you’ll select what I like to call a ‘range of parts’, which will make more sense once you mess with it. It essentially just starts at the object you picked, and grabs all of the object until it reaches the other object you selected.
Last tip is that if you have a very large Workspace, if you hold Left Ctrl while scrolling, the scrolling will be immensely faster.
Alright, cool. Now let me place a few walls on my floor here.


Hm… It looks quite a bit unorganized once more. Maybe if I model it all?

Looks organized, but now I can’t select each model without having to go to the Explorer tab. That’s quite annoying. But don’t worry. This is where Folders can come in.
Folder act as a parent, similar to models, but they don’t configurate how you select or change the children of the Folder.

Additionally, if I wanted to move all the models, or even hide them, I can just select the Folder in the Explorer tab, and I’ll essentially select all of the Models. Neat.

As I build my house, I want a door that is an open arch. But how would we make that? There’s generally two ways, which entail either using Wedges or Unions, but for this instance, I’ll show you Unions.
Firstly, we need to understand what is a Union. The premise is fairly simple. You can take multiple objects, and form them into a Union, or essentially they merge with each other.


Lovely tool, but how does this help our case? Well, the Negate tool should help us here.
By selecting an individual part, and clicking the Negate tool (which is right next to the Union tool`), you will then have your specific part turn red and slightly transparent.

You should then select your negated part, and the other part you wish to Union, and click the Union tool.

Quite neat. So, let’s use this for our arch.

To get the arch-like doorway, I’ll use a Cylinder here to get such. Then I’ll make it negated, and Union the parts.

Nice, but the material looks off. You can fix this by selecting the parts and hitting Union.

Lovely.
Now, there are a few more parts that are available, but oddly not within the Part tool. To get these parts, you need to insert an object, and search for Part.
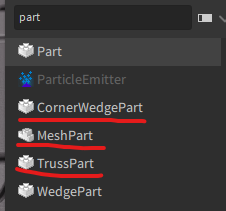

The CornerWedgePart is self-explanatory, but quite useful for its purpose.
The MeshPart is a part where you can insert external assets, such as trees from Blender.
The TrussPart is your generic Roblox ladder. If you don’t want people to be able to climb it, however, I’d recommend putting a thin, invisible wall around it.
Wow, you know a lot of things about building in Roblox now.
Building is a fun thing, at least for me. Imagination comes to life, and you’re able to create almost anything. With this tutorial, we got an output of this:

Sure, it’s fairly simple, and it could use some polishing, but that’s the best part. You can spend hours upon something to make it look great. There’s multiple styles of building, and all you need to do is to take some time to mess around and try out stuff.
Miscellaneous Tips for Building
This category will go over my own tips of building. It’s recommended to have knowledge of the previous sections before endulging yourself here.
View
Now, keep in mind, this section are my own personal recommendations. It’s not required, nor is it likely the best ones, but overall, it’s what has worked with me. So, allow me to begin.
When building maps, it’s common to have multiple different types of assets. Let’s use an example of mine:

A low-poly forest. An adequate map, I shall proclaim. Now, when I built this map, I didn’t create every single asset provided. In fact, I created multiple versions of each asset, and formed my own little toolbox.

Here then, I would recommend going throughout your map and placing your assets. Place them with different rotations, different sizes, and et cetera.
This process, generally, saves a lot of time on the builder’s hand, and it’s a common tactic. Though, it doesn’t mean hand-crafting some assets is necessarily a bad thing. Though, keep a decent ratio among such.

Now, I haven’t learned Blender much myself, and I’m technically a hypocrite to recommend this. Though, it’s still quite vital.
Learn how to use Blender.
Sit yourself down (when you have the time), and find an adequate tutorial on YouTube with Blender. In the long run, it will prove to be great to create individual assets, or maybe even entire maps with it.
Blender is more efficient in building more intricate models.
When building maps that are usually explorable, I recommend adding a few areas such as these:

Essentially, a closed off part of your map that you can see out to. It creates a more immersive part of your map, and gives the illusion that your map is larger than it portrays.

Sure, it’s odd to see this, and it’s a common cliche among games, but it could be great for storytelling, or providing lore to your maps.
Don’t be Afraid to use Free Models
Now, let me first start off with that there’s a difference between using a few free models for your game, then littering your map with them. The latter is simply lazy and not as creative.
But let’s say I was not good at making cars, and I wanted a basic model for such in my map. Search for one in your Toolbox. They’re free for a reason.
Now, obviously watch out for viruses, backdoors, et cetera. Additionally, if the free models are the main parts of your game, or you’re doing a commission and you put a free model within, that might also be some issues.
You don’t even need use the free models themselves. If you need to examine a free model to see how it was built, that’s also an efficient option. You could use a reference, if need be.
Overall, the morality of using free models only plummets because of young developers filling their game with them. We just have a different perspective on a developer who just uses them. I mean, if you technically think about it, if you grab an audio, texture, or decal on the catalog, that’s a free model in itself. I know plenty of developers, including myself, who use such.
Wedges are powerful.
Take a look at this example:

By placing wedges on these walls, you provide neat curvature that makes the walls look unique, and not just blocky.
This often is why wedges are my favorite parts within building.
They can make any block look like a unique shape, and their configurations via rotation and scaling provide unlimited potential with such.
When building maps, one should utilize a dummy or a model of a character as scale. This way, you can get an idea of how big your map should be, and if they can actually fit through your map. I generally use a plugin with my animation editors to gather a quick dummy, if need be.
Vital Keyboard Shortcuts
This category will simply go over some neat shortcuts on your keyboard that you can utilize for efficiency in building, such as copy and pasting.
View
LEFT CTRL + C - Copy
When selecting an object, and using this shortcut, you will copy the object.
LEFT CTRL + V - Paste
If you have something copied, that instance will be pasted.
LEFT CTRL + A - Select all
Everything will be automatically selected.
LEFT CTRL + D - Duplicate
Should you have an instance selected, it will be automatically duplicated.
SELECTED OBJECT + F - Teleport
When you have an object selected, along with this shortcut enabled, you will teleport to the object if not already there (this is for only physical instances).
ALT + SELECTING AN OBJECT - Selecting individual parts
This will select whatever part your cursor lies on, whether it’s a model or not.
LEFT CTRL/SHIFT + SELECTING AN OBJECT - Multiple selections
This will allow you to select multiple objects at a time, providing as long as you hold the shortcut.
LEFT CTRL + 1-5 - Building tools
1 = Select Tool
2 = Move Tool
3 = Scale Tool
4 = Rotate Tool
5 = Transform Tool
SELECTED OBJECT + BACKSPACE - Delete
Whilst selecting an object, usage of this shortcut will delete the object.
MOVING + SHIFT
When moving your camera in Roblox Studio, if you hold shift, your camera will move slower.
SCROLLING + LEFT CTRL
When scrolling, by holding LEFT CTRL, you will be able to scroll faster.
SCALING + LEFT CTRL
When scaling, your part will scale symmetrically towards the opposing side.
SCALING + SHIFT
When scaling, your part will scale in its entirety, rather than the side you scale from (the top and bottom scale handles will be more immense when scaling, and the left, right, back, and front handles will be more minor).
SELECTED OBJECTS + G
Your selected objects will be formed into a model.
SELECTED MODEL(S) + U
Your selected model(s) will be ungrouped.
ALT + L + SELECT OBJECT
The select object or objects will be locked.
