TreeAI
A Behavior Tree Implementation to create NPC AIs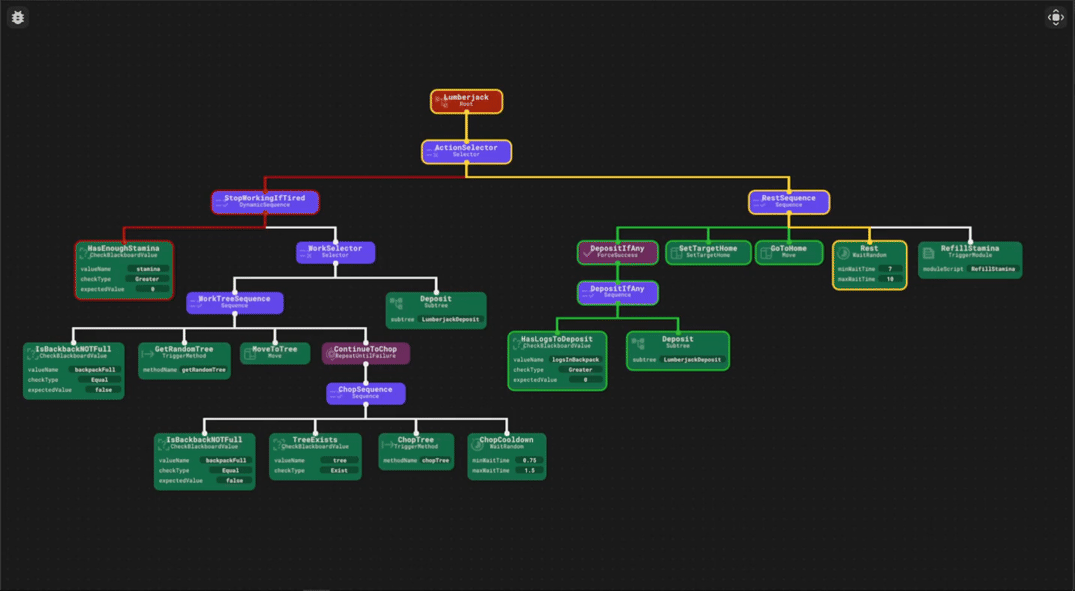
TreeAI is both a Module and a Plugin used to create any kind of AI following the Behavior Tree pattern. This system uses OOP, so if you are not familiar with what OOP is or what Behavior Trees are, I recommend you take a look at these two videos:
TreeAI, as said before, is composed of two parts: The TreeAI Editor Plugin and the TreeAICreator Module.
The TreeAI Editor Plugin is used to simplify the creation of Behavior Trees. It allows you to create trees by connecting tasks together. It makes creating Custom Tasks easier, automatically creating the Custom Task Class and the configurations with the click of a button. It contains documentations for each built-in task and instructions on how to use the system. Finally, it allows you to visually debug the tree.

The TreeAICreator Module is the core of the system. It is used to create the actual trees that will be used by your NPCs.
Note that the TreeAI Editor Plugin is not required to create Behavior Trees. Go to the usage section to see how you can create a tree without the plugin.
Features
- Tree creation from scratch or with the TreeAI Editor Plugin
- Easily build and visualize trees and actions
- In-plugin documentation
- Simple Custom Task creation to re-use tasks in your trees
- Running Trees Debugger
- Keybinds and tasks color customization in settings
-
One in a million chance for the plugin icon to become fih
Installation
For the complete system, install the Plugin. Once installed the plugin will prompt you to import the TreeAICreator Module.
If you don’t want to use the Editor Plugin, download only the TreeAI Creator Module.
Usage
Before you start, you need to understand how tasks work.
Each task is a class and there are three types of Task Classes: Composite, Decorator and Action Tasks.
The Composite Tasks specify the execution order of their children and can have multiple children.
Decorator Tasks alter the result of their child or change how it is processed. They must have one child.
Action Tasks are the one who perform the logic of the AI and cannot have any children.
Every task must return one of three results SUCCESS, FAILURE or RUNNING.
SUCCESS and FAILURE indicate the outcome of a task, while RUNNING is returned when a task requires more than one frame to complete its work.
An in-depth how to use and documentations for every task is available in the Editor Plugin.
To start creating your Behavior Tree, first create a script and require the TreeAI Creator Module.
A tree requires an Object and a Blackboard to work. Both the object and the blackboard are tables that contain data that will be used to interact with the Behavior Tree.
The blackboard should contain data that is used by the tree to perform checks, for example how much stamina the NPC has, or where it last see the player, etc.
The object should contain data that describes the NPC, if your NPC is created trough an NPC class, the object should be instance returned by the NPC class’ constructor. The data in the object can be the NPC’s model, the path created from the PathFindingService, and the actions that the NPCs can perform, like attack, find cover, etc.
You should have something like this:
local ReplicatedStorage = game:GetService("ReplicatedStorage")
local PathfindingService = game:GetService("PathfindingService")

local TreeAICreator = require(ReplicatedStorage.Packages.TreeAICreator)

local model = script.Parent
local humanoid = model:FindFirstChildWhichIsA("Humanoid")
local path = PathfindingService:CreatePath()

local object = {
    model = model,
    humanoid  = humanoid
    path = path,

    shootAtTarget = function(object, blackboard)
        -- shoot code
    end,

    findCover = function(object, blackboard)
        -- find cover code
    end,
}

local blackboard = {
    target = nil,
    ammo = 30
}
The next step is to create the Behavior Tree. You can do it in two ways
With the Editor Plugin
Select an instance in your project and click the Create new Tree button at the top-left corner of the Editor, a Configuration instance will be created under the previously selected instance. You can switch between trees simply by selecting the Configuration instances. If you want to unload a tree, go to settings and click Unload Current Tree.
Once you are happy with your tree, go back to the previous script.
Now you need to create the tree with the tree configuration made with the Editor Plugin
To do so, use the fromConfiguration function of the TreeAI Creator Module and pass the configuration instance, the blackboard and the object.
local tree = TreeAICreator.fromConfiguration(ServerScriptService.Trees.NPCTree, blackboard, object)
The last argument, debugEnabled, is true by default and it allows you to visually debug the tree in runtime. debugEnabled will be set to false automatically in a public game so that it doesn’t consume additional resources. But it is recommend that you set it to false if your project has a lot of NPCs with debugEnabled set to true. Or if you are sure that there is nothing wrong with the tree.
From scratch
If you don’t want to use the Editor Plugin, creating trees manually might be a bit more challenging. Additionally trees created from scratch can not be debugged using the Editor’s Debug system.
First create an empty tree with the TreeAI Creator’s new function.
Then you need to create each and every task you want your tree to have using TreeAICreator.Tasks.. Every task is listed here and calling the method returns a new instance of that task.
Once tasks are created you need to attach one task to the tree’s root. To do it call the tree’s method addChildToRoot and pass the task you want to connect.
To connect tasks to other tasks use the method addChild on the parent task, and pass the child task.
local forceFailure = TreeAICreator.Tasks.ForceFailure("Failure")

local print1 = TreeAICreator.Tasks.Print("Print1", "Value 1")
forceFailure:addChild(print1)
local print2 = TreeAICreator.Tasks.Print("Print2", "Value 2")

local selector = TreeAICreator.Tasks.Selector("Selector")
selector:addChild(forceFailure)
selector:addChild(print2)
local print3 = TreeAICreator.Tasks.Print("Print3", "Value 3")

local sequence = TreeAICreator.Tasks.Sequence("Sequence")
sequence:addChild(selector)
sequence:addChild(print3)

local tree = TreeAICreator.new(blackboard, object)
tree:addChildToRoot(sequence)
Another way you can create a tree is to create the tasks inside the addChild method:
local tree = TreeAICreator.new(blackboard, object)
tree:addChildToRoot(
    TreeAICreator.Tasks.Sequence("Sequence")
        :addChild(TreeAICreator.Tasks.Selector("Selector")
            :addChild(TreeAICreator.Tasks.ForceFailure("Failure")
                :addChild(TreeAICreator.Tasks.Print("Print1", "Value 1"))
            )
            :addChild(TreeAICreator.Tasks.Print("Print2", "Value 2"))
        )
        :addChild(TreeAICreator.Tasks.Print("Print3", "Value 3"))
)
Here you can better visualize the tree. An indented task means that it is a child of the previous one.
Finally you need to process the tree. You can use the method start to bind the tree’s process method to the RunService Heartbeat event. This will process the tree every frame.
If you don’t want to process the tree every frame, you can manually call the process method and pass the elapsed time since the last process call.
This will process the tree at 30 fps:
local processRate = 1 / 30
local delta = 0
RunService.Heartbeat:Connect(function(dt: number)
    delta += dt
    if delta < processRate then return end

    tree:process(delta)
    delta = 0
end)
And this will process the tree every 0.5 seconds:
while true do
    local delta = task.wait(.5)
    tree:process(delta)
end
Custom Tasks
Custom tasks are used to re-use functionality across multiple trees. To create a custom task, click the button at the top-right corner of the Editor Plugin, select a location where you want your task to be, and select what kind of task you want to create. Most Custom Tasks are Action tasks, but you can create any type of task you need.
Without the Editor Plugin
If you are not using the Editor Plugin, you can create a custom task by “inheriting” one of the three abstract classes in the TreeAI Creator Module. Inherit BaseTaskClass if you want to make an Action Task, CompositeTaskClass to make a Composite Task, and DecoratorTaskClass to make a Decorator Task.
To inherit a class follow the script below:
local ReplicatedStorage = game:GetService("ReplicatedStorage")

local BaseTaskClass = require(ReplicatedStorage.Packages.TreeAICreator.Tasks.AbstractClasses.BaseTaskClass)

local CustomTask = {}
CustomTask.__index = setmetatable(CustomTask, BaseTaskClass)

function CustomTask.new(name: string)
    local self = setmetatable(BaseTaskClass.new(name), CustomTask)

    return self
end

return CustomTask
Change the abstract class with the one you need.
Each task is required to have a process method like this:
function CustomTask.process(self, treeResult, deltaTime, blackboard, object, ...)
    return treeResult:resultRunning()
end
The parameters passed to the process method are:
treeResult: Used to return one of the three results SUCCESS, FAILURE or RUNNING. IfdebugEnabledis true, the results will be logged and displayed when debugging the treedeltaTime: The time passed since the last process callblackboard: The tree’s blackboardobject: The tree’s object...: Any additional variable you pass in the tree’s process method. Empty if you are processing the tree with thestartmethod
In addition, custom Action Tasks should override the reset method
function CustomTask.reset(self)
    -- Reset code or empty if you don't need to reset the task
end
This is used if you need to clean attributes of the task.
If you use the Editor Plugin, you’ll most likely want to view your new Custom Tasks in the editor.
To do this you need to setup some configuration to visualize the tasks exactly how you want them.
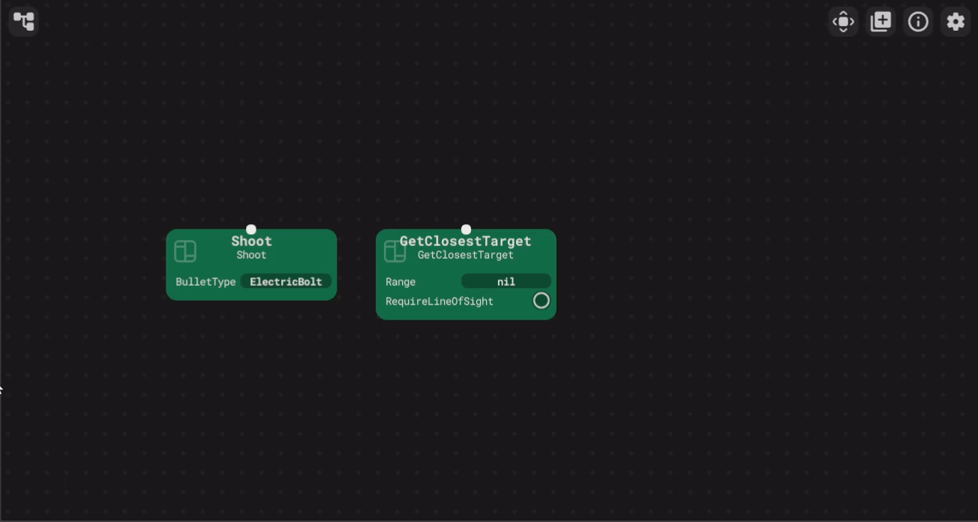
When you create a new task, other than the Custom Task class itself, a configuration module should have opened as well. If it didn’t open automatically, you can click on Highlight Custom Tasks Data in the editor’s settings. Or simply go to ServerStorage.CustomTasksData.
In there you need to write the configuration on how the task should look in the editor. This is how the three tasks above are configured:
return {
    {
        Name = "Shoot",
        Arguments = {
            {
                Name = "bulletType",
                Type = {"Fireball", "Missile", "ElectricBolt"}
            }
        }
    },

    {
        Name = "GetClosestTarget",
        Arguments = {
            {
                Name = "range",
                Type = "number"
            },
            {
                Name = "requireLineOfSight",
                Type = "boolean"
            }
        }
    },

    {
        Name = "Move"
    }
}
You can follow the custom task template at the bottom of the script to see all the different types of configurations you can set.
After a custom task is configured, you need to reload the Editor Plugin. To do so, click on Reload Custom Tasks and Editor in the Editor’s settings.
A Demo Project is available so feel free to check it out. It uses both OOP and normal scripting to create NPCs, tho it is written using a module loader / Single Script Architecture. The demo consists of 3 different AIs that work together.
The NoobPath module is used in the demo for the NPCs pathfinding.
If you find any issues or you want to leave suggestions such as adding new built-in tasks. Please let me know here or send me a private message. I’ll try to fix or update it in a reasonable amount of time.