This is a guide on how to use the following gamepass: Custom liveries/flags/ads - Roblox
How to upload a custom texture and put it into the game
For image requirements/templates check other categories
- Get the texture itself. Make sure it follows Roblox image guidelines (No links, no NSFW, no inappropriate text)
- On Roblox website open “Create” category, after that click “Decals” (Direct link: https://create.roblox.com/dashboard/creations?activeTab=Decal)
- Select image file on your pc and click “Upload”
- Click on uploaded image that appeared in the list
- Copy image ID from the URL:

- Paste image ID where the game asks you to
- If you see a blank image, that means it didn’t pass Roblox image moderation yet. You will have to wait for some time before your image will get approved
Currently maximum possible resolution is 1024x1024 (In game liveries have same size cap, as that is maximum image size Roblox allows). Previously, you needed to get an image ID in a specific way to ensure that you will get correct resolution, but now its not needed because TrP automatically parses image ID format into the one that allows maximum image resolution
Original text:
Warning: getting image ID using method above will result in your texture having size cap of 420x420, which is extremely blurry if your livery has more stuff than basic shapes. Below is information how to get image ID so size cap would be 1024x1024 instead (In game liveries have same size cap, as that is maximum image size Roblox allows)
1. Do everything from the list above up to step 3
2. After you uploaded your image, you have to open Roblox Studio and open “Baseplate”
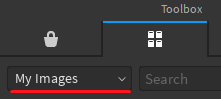
3. Open “Toolbox” (View → Toolbox) and then in toolbox go to “Inventory” tab, set asset type to “My images”
4. Insert the image that you uploaded
5. Click on “Decal” object that appeared in “Explorer” (View → Explorer) and get the ID from “Texture” property located in “Properties” (View → Properties)

6. Paste image ID where the game asks you to
- By doing this you get the reference to an actual image ID with size cap of 1024x1024 instead of 420x420 (Image that you see in toolbox is actually a fake image, that’s why you need to do these weird steps to get real image id)
Flags, side advertisements and inside advertisements image requirements
Do not forget to save your changes if you made any
How to set the texture?
- Open “Gamepass settings” menu category
- Put desired texture ID into one of the fields where you want your texture to appear
- “Side advertisements” texture appears with respect to “Enable side advertisements” setting, meaning if it is set to “Disabled”, custom advertisement will never appear
- When you set custom flags, they will always appear and override any flag settings you had (Flag selection will show “Custom”)
Aspect ratios and sizes:
(X/Y)
Flags:
Aspect ratio is 2:1
Recommended size is 200 x 100
Advertisements on vehicle side:
Aspect ratio is 2:1
Recommended size is 1000 x 500
Trolleybus inside advertisements:
Aspect ratio is 3:5
Recommended size is 300 x 500
Livery editor, livery image requirements and livery templates
Do not forget to save your changes if you made any
Livery itself:
What an in game livery consists out of:
- Setting values. They represent whether something will appear on the livery (AllowsSideAds, HasZiULogo)
- Texture values. They are the core part of any livery. Below there is additional information about textures
- Color values. They apply to stuff that can’t be altered by a texture. All color values must be set in respect to textures (For example: DoorColor, RoofColor, BumperColor)
- Offset values. They handle up/down offset of vehicle number text and have a cap of 200
Livery texture templates:
Be aware: texture templates have pretty big resolution, but Roblox will compress it to a smaller one. The more different details you have, the worse will be the compression
If these templates look confusing, below the templates are the images of actual in game liveries
Standard ZiU templates:
- Front + back
- Right side
- Left side


ZiU 6205 trailer templates:
- Right side (Do not remove blank part with text, its not visible anyways and texture must have this aspect ratio)
- Left side (Do not remove blank part with text, its not visible anyways and texture must have this aspect ratio)


ZiU 6205 and ZiU 682 EMU livery specifics:
- You can notice how livery editor has “TextureRight2” and “TextureLeft2”
- If you leave them empty, second car/trailer will use “TextureRight” and “TextureLeft” templates instead
- If you want second car/trailer to have its own texture, you have to set “TextureRight2” and “TextureLeft2”, that way game will know that it should apply different texture to a second car/trailer
- This feature is only intended to be used on ZiU 6205, but it does work on EMU too, just be aware that “TextureFront” and “TextureBack” are same for both cars
Example of in game livery templates:
"Zhytomyr1" livery (click to open)
- Front (Note: it has more color squares on the right than the template. That is because it uses older version of the template that had more color settings)
- Back (Note: it has more color squares on the right than the template. That is because it uses older version of the template that had more color settings)
- Right side
- Left side


"Zhytomyr3" livery (click to open)
- Front (Note: it has more color squares on the right than the template. That is because it uses older version of the template that had more color settings)
- Back (Note: it has more color squares on the right than the template. That is because it uses older version of the template that had more color settings)
- Right side
- Left side


Livery editor:
Opening livery editor:
- Click “Open livery editor” in “Gamepass settings” menu category
- Select desired slot
- If there are no liveries on that slot, you will be given a choice of vehicle type that your new livery will apply to (ZiU livery type applies to all ZiU vehicles)
Using livery on a vehicle:
- Select desired vehicle that you want to spawn
- Find “Custom livery override” setting
- If you have any custom liveries made with matching livery type, you will see them in the list
Deleting livery (in order to change vehicle type or just to get rid of the livery)
- Open slot of a livery you want to delete
- Scroll to the bottom
- Click “Delete livery”
- You will be shown livery type selection screen. Press “Back” to go to slot selection
Sharing livery data with other people:
- Open slot of a livery you want to share
- Scroll to the bottom, you will find instructions on how to get livery data string
- After getting livery data string, send it to a person with who you want to share that livery
- Person who got livery data string should open livery slot that they want to use, and it must be same livery type
- Person who got livery data string should now should scroll to the bottom and will find instructions on how to apply livery data string (Note: when the person will paste livery data string in, all livery data will instantly apply, while it wont show any text getting pasted as it gets instantly cleared up)