Alright so this is more for the people who suck at animation and rigging like me. This is just going to show you how to get the character and animation and put it into roblox.
Requirements
-
A computer that could handle about 5K triangles and a lot of calculating.
-
Blender - Free download at Download — blender.org or on microsoft store
-
A lot of patients as this could take a while depending on the animation
Getting Started
Alright so head over to mixamo.com and just sign up. Doesn’t take long and it’s free.
So now that you’ve done that you can simply just select an animation for this demo I’m just going to use this one

Easy as that
You get a choice
Option 1
Ok so here you could import this character into roblox studio with the 3d importer in the avatar tab

Then import the animation from the animation editor
However this could cause some issues e.g long time to load for the animation, character might not even load as it has over 21K triangles, animations get raised up
Option 2
You import it into blender
What you actually do in blender
Getting blender ready
Alright so when you load up blender it may look a bit confusing but what you need to do is go to Edit → Preferences

Then press addons on the pop up and in the top right of it search for fbx

If it isn’t ticked then tick it otherwise your all good ![]()
Actually importing
So now just go to File → Import → Fbx

After just find your model and double click it or press import on the pop up

Actually doing something useful and not boring*
*you may still get bored it is not a specific rule that you won’t
So when it is imported you should see your lovely character.

(If you can’t see it then press in the top left Object → Set Origin → Origin to 3d Cursor. Then Object → Set Origin → Geometry to origin. If you can’t see it after that then press the little weird dot button on the numpad next to 0. If you don’t have that then idk ![]() )
)
Looking at the statistic YAY
Alright so to view the count press the two circles in the top right to the right of the bow and arrow. Then just check the statistics box

And now there should be lovely confusing text on the screen

These just show how many triangles and stuff. Remember the max for a mesh currently is 21K. To see your meshes triangles just click on it so it has an orange box around it

Then just press Tab on your keyboard and it might look very confusing and orange.

This is fine all we need to do is check our triangle count and as you can see mine is at
28K so over the limit

Just exit out of edit mode for now by pressing Tab again
Reducing vertices
There are many ways to do this one of the simplest is just to press the spanner icon on the panel in the right

Then press add modifier then decimate

Where it says ratio now if you just lower that then you will see the triangle count go down so just do that until it’s far enough down so that it loses quite a lot of triangles but doesn’t turn it into a triangle. 0.5 was enough for me

So now to check press ctr + a hop back into edit mode with tab and check your triangles (if nothing is orange press a again) So now mine is 14K
![]()
which is way under the max. If yours is still over the max just press ctrl + z until your back with the slider again.
YOUR ALL DONE FOR THAT NOW SO WELL DONE FOR MAKING IT THIS FAR
Fixing any animation bugs
Alright so some mixamo animations seem to raise up a bit and you needed to manually lower each keyframes position in blender which took ages so instead I made a script which will do it for you ![]() you can applaud now
you can applaud now
Here it is:
import bpy


# Get the active action (the one currently selected in the Dope Sheet or Action Editor)


# Configuration
active_action = bpy.context.object.animation_data.action

active_action.name = "Animation"

# Get the name of the active action
action_name = active_action.name
bone_name = 'mixamorig:Hips'      # Change to the name of your bone
data_path = f'pose.bones["{bone_name}"].location'  # Target the Y-axis of your bone
keyframe_index = 1  # Assuming Y-axis is the second component (0 for X, 1 for Y, 2 for Z)

# Find the appropriate action
action = bpy.data.actions.get(action_name)

if action:
   # From this action, retrieve the appropriate F-Curve
   fcurve = action.fcurves.find(data_path, index=keyframe_index)  # Use index as a keyword argument

   Origin = fcurve.keyframe_points[0].co[1]

   if fcurve:
       # Iterate over all keyframes
       for kfp in fcurve.keyframe_points:

           Difference = Origin - kfp.co[1]

           # Set the Y-location (Y-axis) to 0
           kfp.co[1] = 0 - Difference
To use just press the scripting tab in the top of blender
![]()
Or press the Plus at the end → General → Scripting
Paste the code in and run it. MAKE SURE YOU SELECTED THE AMATURE YOU WANT NOT JUST THE MESH
![]()
To export all you need to do is like importing but press export instead. Make sure you do save it as a .fbx
These settings are recommended otherwise it could crash

Voila time to import
So hop into studio. Press the import 3d button in the avatar tab section bit then just import the character which is pretty easy so I’ll let you do that on your own.
Wonderful so for a minute stare into the soul of your character just to intimidate it into working. Professional thing I promise it’s what the pro’s don’t want you to know (I am not accountable if it doesn’t work)
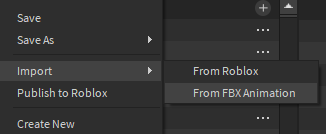
To import the animation just press the animation editor then go to import → Fbx Animation
Then select the same fbx you imported then if it ask you either fbx or selected just press selected unless it breaks it in which case re import it

The animation should scale with your character so long as your import the animation before I think.
And there you go amazing mixamo animations in roblox in only 10 steps the longest bit was probably this post so good job for reading at least some of it. ![]()

Thanks for reading hope this is useful ![]()
![]()
![]()
![]()
![]()


