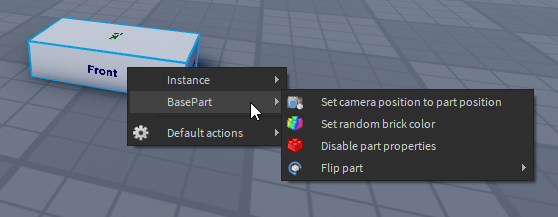
The Quick actions plugin allows you to make module scripts that you can run at any time, depending on what instance(s) you have selected. This allows you to create reusable actions to save your time.
Link: Quick actions - Roblox
Video:
How it works
When you activate the plugin, it will scan through all your selected instances.
It will also scan through all of the modules in the Menus folder.
If SelectedInstance:IsA(MenuName) then all the actions specified in that menu module will be added to a plugin dropdown menu.
Clicking on the buttons in the dropdown will require respective modules in the Actions folder.
These modules can do anything you want them to.
Plugin widget
This plugin creates a button in your PLUGINS tab on the ribbonbar.
If you click it, you will be met with a widget.
You can toggle Enabled to enable or disable the entire plugin.
You can toggle Icons to enable or disable the icons that show up in the dropdown menu (can improve performance)
You can toggle Class sorting to enable/disable class submenus. (Actions from any menu will be grouped into a submenu, with the menus name)
Select actions selects the “RGB_QuickActions” folder in ServerStorage
View action tree opens up the action tree, more info on it below.
Update built-in actions will replace all built-in actions with the most recent ones. (It will NOT add missing actions)
Add missing actions adds any menus or actions that are missing from your folder. It will NOT replace or remove existing ones.
Reset actions will completely reset all your actions and menus to the defaults.
Action tree
The action tree shows you all of your menus, submenus and actions in a list.
If you click any of them, you can see info about them, including an option to disable the clicked action/menu/submenu and to show it in the explorer.
You can press + and - on your keyboard while hovering over the menu to zoom in/out.
Please keep in mind the action tree does NOT update automatically, you need to click the Refresh button to see changes.
This applies to adding, editing, removing and manually disabling (from properties, not the action tree) any menu or action.
Main folder
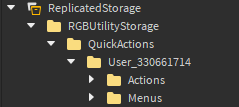
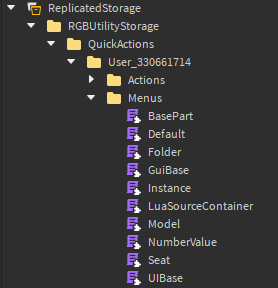
The RGBUtilityStorage folder is used to store all RGB Utility plugin assets. The QuickActions folder is the folder that stores all needed assets for this specific plugin. User_(user id) is the main folder that contains menus and actions for a specific player, by user ID.
Its stored in ReplicatedStorage, and is local to the place you are currently in, which means you have to copy and paste them in different games.

You cannot remove these folders, except for the contents of the Actions and Menus folders. Uninstall the plugin to completely remove.
Menus
The Menus folder contains modules which are named after classes.

(exception is Default, do not remove it, but you can change the contents)
When you use the plugin while having an instance selected, if that menu module name is equal to the selected instance’s class name, its contents will be used in the dropdown menu that will show up.
Menus are structured like this:
local Menu = {} -- do not change


Menu.Order = 1 -- [OPTIONAL] defaults to 1, the higher the value, the lower the menu will show up on the dropdown


Menu.ClassBlacklist = { -- [OPTIONAL] blacklist, if selected instance matches any of the classes in this table, it will be ignored
	"Terrain",
}


Menu.ClassWhitelist = { -- [OPTIONAL] whitelist, only the classes in this table will be considered
	"Part",
}


-- you cannot have a whitelist AND blacklist, you can only have one of them, or neither!


function Menu.CustomCondition(obj) -- [OPTIONAL] custom condition, needs to return true or false, selected instance will be ignored if this function returns false

	-- example
	if obj.Name == "example" then -- only allow when instance name is "example"
		return true -- allow
	end

	return false -- deny
end


Menu.ActionConditions = { -- [OPTIONAL] conditions for specific actions, can be reused
	example = function()
		if math.random(1, 2) == 1 then -- only allow the action by coin toss
			return true -- allow
		end

		return false -- deny
	end,
}


Menu.Actions = { -- do not change, order of actions is the same order you will see them in the dropdown

	{ ----------------- START -----------------
		Name = "RGB_FlipParts", -- aciton token, must be unique
		Text = "Flip part", -- action description
		Icon = "rbxassetid://8666161124", -- action icon
		ActionCondition = Menu.ActionConditions.example, -- [OPTIONAL] hook up the action to the condition function
		Parameters = {example = true}, -- [OPTIONAL] add parameters to your action, so you can use the same action multiple times in a single menu, but with different results (does not work with submenus)
		SubMenu = true, -- [OPTIONAL] make a submenu instead of an action

		Actions = { -- ONLY works if SubMenu = true, structured the same way normal actions are

		}

	}, ----------------- END ------------------

} -- do not change


Menu.ClassIcon = "Part" -- [OPTIONAL] what icon to use for the action tree, since some base classes such as "BasePart" dont have icons


return Menu -- do not change
Actions
The Actions folder contains folders named after your menus.
These folders names must have the exact same name as the menus.
(exception is Default folder, do not remove it but you can change the contents)
The folders contain modules that are named after the action tokens you put in your Menus modules.
The action modules contain code that can do anything you want.
However, these modules MUST contain a function function Action.ExecuteAction() or else it will not work.
Actions are structured like this:
local Action = {} -- do not change


function Action.ExecuteAction(selectedInstances, parameters) -- do not change
	-- do anything you want here

    -- `selectedInstances` is a table of all selected instances that match the menu whitelist/blacklist and custom condition

    -- `parameters` is the "Parameters" table that you specified in the menu module

	-- example
	for _, obj in pairs(selectedInstances) do
		if obj:IsA("BasePart") and parameters.example == true then
			obj.BrickColor = BrickColor.Random() -- set color to random
		end
	end
end


return Action -- do not change
Gotchas
- After first installing the plugin, you need to click
Allowon the script injection permission window, restart studio, and clickReset actions - Unfortunately, you need to set a keybind for this plugin manually, go into
FILE>Advanced>Customize Shortcuts..., search “RGB” and set “Open RGB Quick Actions” to any key you want. - You NEED to keep the
Defaultmenu and action folder, however, you can edit, add or disable the menus/actions. - The action tree does not update automatically, you need to click the Refresh button if you make any changes to menus or actions.
- The main folder does not carry over to other places. You need to copy and paste it manually, or convert it into a package.
Please let my know if you have any questions!
Also let me know if the explanations in this topic are clear enough, Im not very good at explaining things.


