Volumetric cloud

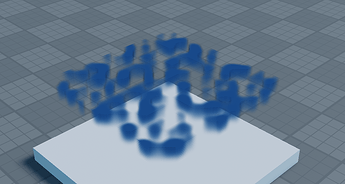
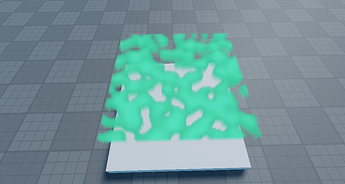
So i was bored and try to challenge my scripting skills and i have this idea of making a volumetric cloud but i said to myself “how?” the first thing that comes to my mind is stacking editable images and perlin noise to simulate the clouds that kind of worked and here’s the result

Result

Honestly it doesn’t look that bad it actually looks cool might use it in my other games but if you guys want the script here

Script
local SkyColor = Color3.new(0.4, 1, 0.309804)
local CloudSize = 0.9
local CloudSoftness = 0.3
local CloudQuality = 1
local CloudLayer = 20
local CSize = 10

local function volumentricCloud(layers)
	for i,v in script.Parent:GetChildren() do
		if not v:IsA("Script") then
			v:Destroy()
		end
	end

	for i = 1, layers do
		local Part = Instance.new("Part", script.Parent)
		Part.Position = Vector3.new(0, 5 + (i / layers), 0)
		Part.Size = Vector3.new(CSize, 0.05, CSize)
		Part.Anchored = true
		Part.Transparency = 1

		local SurfaceGUI = Instance.new("SurfaceGui", Part)
		SurfaceGUI.Face = Enum.NormalId.Top

		local Image = Instance.new("ImageLabel", SurfaceGUI)
		Image.AnchorPoint = Vector2.new(0.5, 0.5)
		Image.Position = UDim2.fromScale(0.5, 0.5)
		Image.Size = UDim2.fromScale(1, 1)
		Image.BackgroundTransparency = 1
		Image.ResampleMode = Enum.ResamplerMode.Default

		local EditableImage = Instance.new("EditableImage", Image)
		local Size = Vector2.new(100*math.clamp(CloudQuality,0,10), 100*math.clamp(CloudQuality,0,10))
		local Pixel = {}

		EditableImage.Size = Size

		for x = 0, Size.X - 1 do
			for y = 0, Size.Y - 1 do
				local noise = math.noise(x / 10, y / 10) + 0.5
				noise = math.pow(noise,1-CloudSize)
				local color = noise
				local alpha = math.clamp(color * CloudSoftness, 0, 1) * (i / layers * CloudSoftness)

				if color < 0.8 then
					alpha = 0
				end

				table.insert(Pixel, SkyColor.R * color)
				table.insert(Pixel, SkyColor.G * color)
				table.insert(Pixel, SkyColor.B * color)
				table.insert(Pixel, alpha)
			end
		end

		EditableImage:WritePixels(Vector2.zero, Size, Pixel)
	end
end

volumentricCloud(CloudLayer)

So what do you think? is it good?

  • YES ITS REALLY GOOD
  • ITS GOOD
  • NOT BAD
  • BAD

0 voters

**please if you ever use the script please give a credit

5 Likes

people much smarter then you can do great things with this idea if you inspire them

1 Like

This volumetric cloud looks GREAT! Nice job on it!

1 Like

This is impressive! The work you’ve done here is remarkable. However, as with any masterpiece, there’s always potential to reach even greater heights. I believe with a bit more refinement, this could be absolutely gorgeous!

In its current state, it’s already quite commendable!

2 Likes

it could be you to expand upon what he started i cant do it because im bad at coding but im sure you can

1 Like

I made an interesting proof-of-concept thingy not too long ago of a volumetric system uses shapes and meshes, but I sort of gave up half way through after I couldn’t quite figure out how to do shadows. Some methods of EditableMesh seem to do nothing which would be really useful to have but I didn’t want to write my own functions for them.

Originally, my simplest idea was to just sample for each pixel a specific number of points along that ray using Camera:ViewportPointToRay(), and have it increase opacity or change color based on if the sampled point was inside of a volume and possibly if it was in range of a light. Then after, the resulting data is just shown over the screen in a ScreenGui. Because of my approach, this doesn’t allow complex shapes like clouds, but for my need, I just needed a box to know if it works.


This was my first working test, at the end once everything is sampled, the results are averaged out (which isn’t very realistic)

This approach was really slow, computationally and definitely wasn’t smart. Another problem with this was, if the ray simply didn’t reach out far enough, it wouldn’t ever reach the entire volume, and it would lead to light fog just appearing as a transparent mask.


This 1024x1024 “mask” as I’m calling it, took 14 minutes to render, and it looks okay. One of the reasons I’m calling it a mask, is because if its just one render, you can move the camera and the render stays put (as its fixed to the screen) but the world can be seen behind it, leaving transparent silhouettes of the parts it hit.

This is another:

These two images used 0.04 density, 0.05 stepping (that is 0.05 studs of space inbetween each sample) and 450 samples per pixel.

Heres the full code for that example:
VolumetricsV1.lua (2.9 KB)
All you need to set this up is a boxed part with the “Volume” tag and a “Color” and “Density” attribute, and a seperate part with the “GlowPoint” tag and “Brightness”, “Color”, and “Range” attributes. Please excuse my amazing programming and shader skills.

This is my final one using this approach, which took just over an hour to render, and took a maximum of 2,359,296,000 individual spacial queries.

Then, I had a much better idea, which was to raycast instead, which would allow for more complex shapes, but still geometric. After lots of debugging


I managed to render this 1024x1024 image in 8 seconds at 0.02 density.

Unfortunately though, this is about where I stopped. I tried implementing shadows using raycasts, however finding an algorithm to determine if you are entering an object’s shadow vs exiting one, and other edge cases like exiting an objects shadow, but still remaining in another shadow makes it hard to find a perfect solution. In addition, I used a bit of the EditableMesh features to try and make this easier by constructing a plane that the shadows are defined by, which theoretically works for any mesh, its just that EditableMesh:GetAdjacentVertices and a few other methods do not work, or always return one thing.

You can get the second version here:
VolumetricsV2.lua (13.0 KB)
or get the odd framework I used which comes with a seperate module for taking a render here:
Volumetrics.rbxm (8.0 KB)

The “SingleRenders” module has a SingleRender method that takes in the desired module (the V1 or V2 module) and a output resolution, which is parented to game.StarterGui so you do not have to playtest to get results. Updating the modules however may require you to save and reload the place, if you are executing this through the Command bar.

Lastly, you can find a few functions in VolumetricsV2, specifically the getShadowTravel function I tried to use to calculate how much light is lost by particles being behind an object. I’m a lot happier with the V2 version even though I didn’t get to fully implement the shadows.

Now that I think about it I should probably add comments into my code so its easier to understand what each thing does

Edit: If you are trying to render with the V1 module, the SingleRender function takes in 2 extra values, the resolution (or the step increment) and the depth (number of samples)

3 Likes