[ WEBHOOKS ] How to use Cloudflare Workers for sending Discord Messages

How to use Cloudflare Workers for sending Discord Messages

Welcome! In this tutorial, I will guide you on how to use Cloudflare for sending messages to discord.

Requirements

Tutorial

Part 1: Cloudflare Setup
Start by heading to Cloudflare and creating a new Worker, name it whatever you want and save the Worker URL, as this will be the endpoint in which you will use to send messages to discord.

Navigate in the Tutorial Repo and copy the text inside the cloudflare.js file. This file will contain everything that you will need for the Backend part.

Change the AUTH_TOKEN to whatever you want. Just make sure it is secure and DO NOT share it with anyone.

Optional: You can modify the rateLimit to whatever suits you. By default, it is 2 messages per second per Webhook.

That’s it! Deploy your worker and you are ready to send messages to Discord!

Part 2: Roblox Setup
Grab the model from here and place it into ServerScriptService.

Open up the Example Script. There, you can customize the appearance of your Discord Message to send. Thanks to the new BitHook Module, it makes sending embeds really simple! The example script is as follows:

local BitHook = require(game.ServerScriptService.BitHook)

local embed = {
	title = "Embed Title",
	description = "This is a detailed description of the embed.",
	url = "https://example.com",
	color = 16711680,

	author = {
		name = "81Frames",
		url = "https://example.com/author",
	},

	fields = {
		{
			name = "Field 1",
			value = "This is the value for field 1.",
			inline = true
		},
		{
			name = "Field 2",
			value = "This is the value for field 2.",
			inline = true
		}
	},

	footer = {
		text = "Footer text goes here",
	},

	timestamp = "2025-01-01T00:00:00Z"
}

local cloudflareWorkerUrl = "YOUR_CLOUDFLARE_WORKER"
local discordWebhookUrl = "YOUR_WEBHOOK_URL"
local authToken = "YOUR_API_TOKEN"

local response = BitHook.SendMessage(cloudflareWorkerUrl, discordWebhookUrl, authToken, embed)

if response then
	print("Response:", response)
else
	print("Failed to send message.")
end

Just to test that it is working, edit the script’s CloudflareWorkerURL, AUTH_TOKEN, and your WebhookURL to whatever yours are. Run the script in studio and insure that HTTPService is enabled. You should see a new message in your Discord channel and it should look something like this:

image

If this example works! You are now welcome to edit the script to do what you want it to do! The Embed Message supports everything including passing images.

That concludes the tutorial, and thanks for reading.

Extra Service:
If you don’t want to self host this tutorial for whatever reason, you can try the public version of this Project! Just insert the BitHook Module from the Roblox Store and edit the AUTH_TOKEN to 81frames and the WORKER_URL to https://bithook.email-277.workers.dev/
For more information, check out the latest update post.
10 Likes

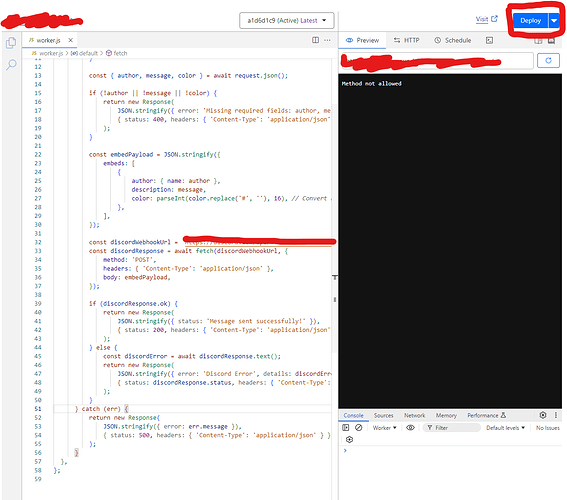
cool resource, but i keep getting the default cloudflare return, that being hello world

Sorry for not being clear in the post, but you need to deploy the code using this button

nice tutorial, similar to this one!
you might want to add some details about what cloudflare is and how to sign up.

also quick note - it doesn’t affect the file contents, but a javascript file ends in .js, not .java :‎)

1 Like

took a few tries hitting deploy for it to work, modified it to allow me to fully customize what is sent, can also pass an image id, and it will get the image from roblox and add it to the embed

image

really good for a global shop update channel!

1 Like

Hey guys!

I have two updates to announce today.

Update 1

V1.0.1 has officially released today! This update brings so much new customization to your discord messages.

V1.0.1 Files can be found here
A tutorial will be released soon.

1. As previously announced, Ratelimiting is now in V1.0.1! If your self hosting this project, you can choose how many messages/requests per second you can send to stay in the discord ratelimits.

2. Since hosting this service exposes your URL, there was previously no authentication needed to send a message, meaning anyone with your cloudflare URL could execute a message. That all changes today! You will now need a Access Token that you can choose to send messages.

3. Previously, you would only choose a title and description for the embed. Now, you can now fully customize the entire message embed!

This is now how your embed can look:
image

4. The source code in Roblox now uses a ModuleScript containing a easy-to-use function to execute Discord Messages. All you will need to do in Roblox is import the BitHook Module and start scripting your message embed! This is an example script using the Module:

The Module can be found here or in the main post.

This is an example script using the Module:

local BitHook = require(game.ServerScriptService.BitHook)

local embed = {
	title = "Embed Title",
	description = "This is a detailed description of the embed.",
	url = "https://example.com",
	color = 16711680,

	author = {
		name = "81Frames",
		url = "https://example.com/author",
	},

	fields = {
		{
			name = "Field 1",
			value = "This is the value for field 1.",
			inline = true
		},
		{
			name = "Field 2",
			value = "This is the value for field 2.",
			inline = true
		}
	},

	footer = {
		text = "Footer text goes here",
	},

	timestamp = "2025-01-01T00:00:00Z"
}

local cloudflareWorkerUrl = "YOUR_CLOUDFLARE_WORKER"
local discordWebhookUrl = "YOUR_WEBHOOK_URL"
local authToken = "YOUR_API_TOKEN"

local response = BitHook.SendMessage(cloudflareWorkerUrl, discordWebhookUrl, authToken, embed)

if response then
	print("Response:", response)
else
	print("Failed to send message.")
end


You can also add images to the embeds too, this embed structure follows the general structure on how to structure an embed, so you can find the documentation to include images! I don’t have an example with me at the moment…

So yeah, thats the main update! The new version can be found on the GitHub repo located in the main post. An updated tutorial will also be introduced soon once I finish writing it.

Update 2

I’m not sure how useful this will be but I’ve decided to host a public version of this project.

This is basically a modified version of the Project code meant for anyone to use. Because of potential abuse, I’ve limited requests to 1 message per second. Any others will be queued. I feel like this ratelimit is pretty strict, if you guys want it to be increased, I would be happy to do so.

If your using the Public Version of BitHook, all you will need is the BitHook module in the Roblox store/above in the main post. You will need to set the Authentication Token to 81frames and the Cloudflare URL to https://bithook.email-277.workers.dev/

This is an example script using the new BitHook Module and the Public Version of the project.

local BitHook = require(game.ServerScriptService.BitHook)

local embed = {
	title = "Embed Title",
	description = "This is a detailed description of the embed.",
	url = "https://example.com",
	color = 16711680,

	author = {
		name = "81Frames",
		url = "https://example.com/author",
	},

	fields = {
		{
			name = "Field 1",
			value = "This is the value for field 1.",
			inline = true
		},
		{
			name = "Field 2",
			value = "This is the value for field 2.",
			inline = true
		}
	},

	footer = {
		text = "Footer text goes here",
	},

	timestamp = "2025-01-01T00:00:00Z"
}

local cloudflareWorkerUrl = "https://bithook.email-277.workers.dev/"
local discordWebhookUrl = "YOUR_WEBHOOK_URL"
local authToken = "81frames"

local response = BitHook.SendMessage(cloudflareWorkerUrl, discordWebhookUrl, authToken, embed)

if response then
	print("Response:", response)
else
	print("Failed to send message.")
end

The public verison of BitHook is currently being hosted on a Cloudflare free plan (100,000 requests/day). If enough people start using this service, I might consider hosting this on a mini pc or VPS server (I’m welcome to do this if people like the service)

Please note that the public version of BitHook is not intended for large games, as this will essentially kill the service for others. If there are any large games that abuse this service, I will blacklist them from using the public version of BitHook.

You are not being forced to use this service, self-hosting this gets you the exact same features. All the code is open source on Github. I’ve made this for people who don’t want to self host it and just need a simple way to send a message to discord.

Conclusion

So uh yeah that what I’ve been cooking up these past few days. I hope you enjoy the update!
oh and uh ye new tutorial releasing soon. i need to go touch grass. but the project should be pretty easy to understand how to use.

Links

I dont understand the process part about the Auth Key, can You tell me how I can get it

How is this Cloudflare Workers then?

So basically, the auth key is decided by you in the Cloudflare worker. This is just an extra security measure incase someone gets your cloudflare URL endpoint, since without a auth key, they could potentially spam your webhook. The auth key is chosen by you here, (the auth_key variable):

const rateLimitData = {};

addEventListener('fetch', event => {
  event.respondWith(handleRequest(event.request));
});

async function handleRequest(request) {
  const { method, headers, url } = request;

  if (method !== 'POST') {
    return new Response('Only POST requests are allowed', { status: 405 });
  }

  const AUTH_TOKEN = 'YOUR_AUTH_TOKEN';

  const authHeader = headers.get('Authorization');
  if (!authHeader || authHeader !== `Bearer ${AUTH_TOKEN}`) {
    return new Response('Unauthorized', { status: 401 });
  }

  try {
    const body = await request.json();
    const webhookUrl = body.webhookUrl;
    const embed = body.embed;

    const payload = JSON.stringify({
      embeds: [embed],
    });

    if (!rateLimitData[webhookUrl]) {
      rateLimitData[webhookUrl] = {
        lastMessageTime: 0,
        queue: [],
      };
    }

    const currentTime = Date.now();
    const rateLimit = 500;
    if (currentTime - rateLimitData[webhookUrl].lastMessageTime < rateLimit) {
      rateLimitData[webhookUrl].queue.push({ payload, currentTime });
      return new Response('Rate limit reached. Message queued.', { status: 429 });
    } else {
      const discordResponse = await sendToDiscord(webhookUrl, payload);
      
      if (discordResponse.ok) {
        rateLimitData[webhookUrl].lastMessageTime = currentTime;
        return new Response('Message sent to Discord!', { status: 200 });
      } else {
        return new Response('Failed to send message to Discord.', { status: 500 });
      }
    }
  } catch (error) {
    return new Response('Invalid JSON or missing parameters', { status: 400 });
  }
}

async function sendToDiscord(webhookUrl, payload) {
  return await fetch(webhookUrl, {
    method: 'POST',
    headers: {
      'Content-Type': 'application/json',
    },
    body: payload,
  });
}

async function processMessageQueue() {
  Object.keys(rateLimitData).forEach(webhookUrl => {
    const webhookData = rateLimitData[webhookUrl];

    if (webhookData.queue.length > 0 && Date.now() - webhookData.lastMessageTime >= 500) {
      const message = webhookData.queue.shift();
      sendToDiscord(webhookUrl, message.payload)
        .then(response => {
          if (response.ok) {
            webhookData.lastMessageTime = Date.now();
          }
        })
        .catch(error => {
          console.error(`Failed to send queued message to ${webhookUrl}:`, error);
        });
    }
  });
}

addEventListener('fetch', event => {
  event.respondWith(handleRequest(event.request).finally(() => {
    processMessageQueue();
  }));
});

You then input the auth key into the roblox lua script.

The whole thing is designed around Cloudflare and it is, but

I decided to host a public version of this tutorial as well. Depending on how many people will actually use the service, I might host one on a server. But, this part is completely optional, I just wanted to make a public version for fun.

This doesnt affect the end user, this whole tutorial is using cloudflare workers.