INTRO
For anyone making their first tools in Roblox it can be kinda confusing. My goal is to give you a simple step-by-step process that’s easy to follow so you can get your tools set up and ready to script.
This is NOT a scripting tutorial. That’s for another post. The focus of this post is simply getting your tool model set up so your character can hold and equip/unequip the tool.
So, without further ado, lets dive in!
NOTE: I will include additional info and explanations in notes for those interested or wanting further explanation.
FIRST THINGS FIRST
First off, some objects and services you’ll want to know about.
Explorer - This is the part of studio that lets you view everything in your game.

Tools - Special objects that Roblox provides with built-in backpack and equip/unequip functionality.

StarterPack - Service that holds all the tools your character will start with when they spawn. You can find it towards the bottom of the Explorer.
NOTE
-
Services are top level containers inside your game that hold all of your objects. Each service has a specific purpose and may handle objects differently than other services. (e.g. objects in the workspace can be seen by anyone while objects in ServerStorage can only been seen by the server and server scripts).
-
Objects are the different things that make up your game. There are a lot of different objects and object classes that server different purposes in creating your game. (e.g. Part, BoolValue, PointLight, Script, ScreenGui, etc.)
-
All contents from the StarterPack service will be put into your character’s backpack so anything in StarterPack will be available to you when you spawn.
OVERVIEW
A quick overview of the process is:
- Add a tool object
- Put your tool model into your tool object and make sure it’s set up correctly.
- Make sure your tool has a handle
- If your tool model has multiple parts, weld your tool model together.
- Test, fix any bugs, enjoy!
START
To start off, insert a tool object into the workspace by right-clicking in your world and selecting “Insert Object” and then “Tool” from the drop down menus.


You should now have a Tool object in the workspace. You won’t see it in the world but you’ll see the object in the Explorer window.
MODEL
Now we need the actual model you’ll see when you equip the tool. For this part I’m going to use a sword model I made that’s made up of multiple objects and is a mix of regular parts and mesh parts.
In the explorer window, drag your model or part(s) into the Tool object. It doesn’t matter if you’re using a model or just putting all your parts directly into the Tool.
Make sure all the parts are not anchored and not cancollide. If any part is anchored your character will not be able to walk around and if any part is cancollide it can cause collision issues when walking around or using your tool. You may also want to make the parts in your tool massless otherwise the weight of your tool may slightly affect jump height / movement.
HANDLE SETUP
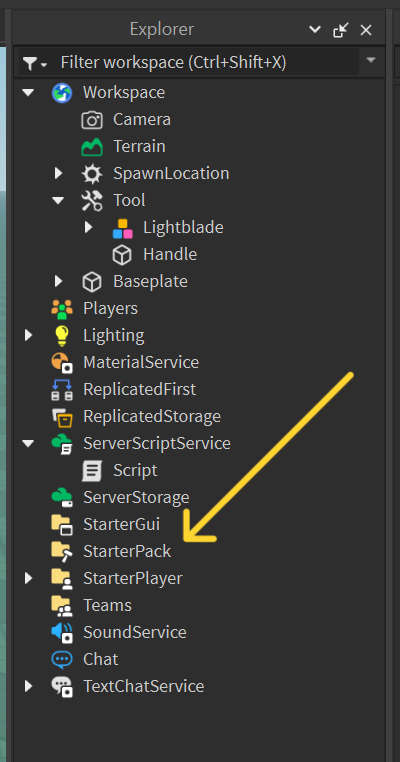
Next we’ll need a handle. This part is going to be the part of your model that will be attached to your character model’s right hand when you hold your tool. It can be a part of your model or it can be an invisible part. It should be the only part named “Handle” in the in tool. For me, I’m going to use a separate part that I’ll make invisible when I’m finished. (See the yellow block in the pics).
Here are some pics of my explorer with the model object collapsed and expanded:


NOTE
-
Unless you’re writing your own tool model handling code or creating a tool that doesn’t need a model (e.g. an ability tool), you’re going to want a part named “Handle” that is a direct descendant of the Tool.
-
I personally like using invisible handle parts because it makes orienting and positioning tools easier (more on that later)
Make sure your handle is a direct descendant of the tool object. If it is not, it won’t work. The rest of your model is free to be grouped together as a model but the handle must be directly inside the tool.
WELDING YOUR MODEL
Excellent work so far, if you only have the handle in your tool you can skip this next step, otherwise, onward!
At this point, your tool is almost set up but if you tried to use it your model would fall apart because the individual parts aren’t held together. To fix this you’ll need to weld all your tool parts together.
You can use a welding plugin or you can run a quick piece of code in the Command Bar. You can find the Command Bar toggle under the “VIEW” tab at the top of studio.
Unfortunately I don’t have a specific weld plugin to suggest, I’ll have to find a good one to link.
If you want to use the command bar, here’s some code you can run that will clear any welds from your tool and then re-weld everything to the handle. The clearing and re-welding is so that if you need to make any changes to your model you don’t keep adding extra/unnecessary welds from running the script multiple times.
local tool = workspace.Tool -- change this to reference the specific tool you want to re-weld.
-- e.g. local tool = workspace.NewTool

-- clear old welds
for i, obj in tool:GetDescendants() do
	if obj:IsA("Weld") or obj:IsA("WeldConstraint") then
		obj:Destroy()
	end
end

-- create new welds
for i, obj in tool:GetDescendants() do
	if obj:IsA("BasePart") and obj.Name ~= "Handle" then
		local weld = Instance.new("WeldConstraint")
		weld.Part0 = obj
		weld.Part1 = tool.Handle
		weld.Parent = tool.Handle
	end
end
TESTING
So close! The final step is to move your tool from Workspace to StarterPack in the Explorer window and then you’re ready to test out your tool ![]()
If the tool isn’t positioned where you want it you have a couple options:
-
If you are using an invisible handle you can simply move and rotate your handle into a better position and re-weld your model.
-
You can adjust the Tool object Grip properties. This method may be more difficult than #1 and will probably require some trial and error to get it correct.
END
Common issues you may encounter are:
- Your character is stuck in place because part of your tool is anchored.
- Your character has weird collision or movement because parts of your tool are cancollide.
- Part or all of your tool doesn’t show up or falls apart because it wasn’t welded correctly.
- Your tool isn’t in your backpack because it wasn’t put in StarterPack.
Best of luck and I’ll probably write some more posts in the future on scripting and animating the sword to make it functional.