Most of the kit is ready out of the box. For further instructions such as configurations, click on the arrow to view how to set up a specific part of the kit.
For video tutorial, you can view it here:
(Note: Video is intended as a rough guide. For up to date instructions, read “Instructions” below)
Instructions:
Kart
Video shortcut:
Create your own racing game! (Yar890 Racing Kit Tutorial) - YouTube
Kart Instructions:
- The “Kart” is the vehicle you want to spawn at kart spawn locations
- When the game is run, the kart is moved to ServerStorage.
- Do not delete the kart. This will break some elements of the kit.
- The kart is ready and does not need any setup.
- If you wish to configure kart, to go Racing Kit > Components > Kart > Kart > Yar890Kart > Configuration.
Configuration:
- BrakingTorque: The amount of braking force applied to kart.
- MaxTurnAngle: The maximum angle that the kart wheels can turn.
- ReverseTorque: The reverse force applied to kart.
- ReverseMaxSpeed: The maximum speed that the kart can go in reverse.
- Torque: The forward force applied to kart.
- Sound deamplification: The division applied to engine sound playback speed based on vehicle kart speed.
Custom Kart + A-Chassis
Video shortcut:
Create your own racing game! (Yar890 Racing Kit Tutorial) - YouTube
A-Chassis vehicle instructions:
- Ensure you have A-Chassis build version 6.52S2.
- The vehicle model “PrimaryPart” must be set to a Part in your vehicle. This is used to spawn your vehicle.
- Set “KartModel” in RacingKit > Configuration > Kart > KartModel.
Custom vehicle Instructions:
- You can use any vehicle, as long as your drive script checks and uses the vehicle seat max speed property when changed.
- The vehicle seat parent must be the vehicle model.
- The vehicle model “PrimaryPart” must be set to a Part in your vehicle. This is used to spawn your vehicle.
- Set “KartModel” in RacingKit > Configuration > Kart > KartModel.
Configuration:
- KartModel: Object value of kart to spawn in
Anti-Exploit
Video shortcut:
Create your own racing game! (Yar890 Racing Kit Tutorial) - YouTube
Anti-Exploit Instructions:
- This kit comes with kart anti-exploit. This includes 2 types of checks, which are light overspeed and hard limit overspeed.
- Light overspeed is when a player goes past the current light max speed limit + LightLimitOffset for a specific amount of time (LightOverspeedTime). If this condition is met, the player will get kicked from the game.
- Hard limit overspeed is when a player goes over the green light max speed limit + HardLimitOffset. If this condition is met, the player will get kicked from the game.
- Teleporting users while they are in the kart may falsely trigger anti-cheat.
- Harsh downwards ramps may falsely trigger anti-cheat.
- AntiCheat is off by default.
- To turn on and configure anti-cheat, go to Racing Kit > Configuration > Kart > AntiCheat.
Configuration:
- AntiCheatEnabled: Turns Anti-Cheat on to off
- HardLimitOffset: The hard limit offset that is added onto the green light max speed
- LightLimitOffset: The light limit offset that is added onto the current light max speed
- LightOverspeedTime: The allowed time over the current light limit + Limit limit offset max speed. Does not apply to the hard limit.
Safety Lights
Video shortcut:
Create your own racing game! (Yar890 Racing Kit Tutorial) - YouTube
Safety Instructions:
- Click on the Control panel or Safety lights.
- Copy and paste (Ctrl + c, Ctrl + v), duplicate (Ctrl + D) or move selected object.
- Move anywhere you want to move it to in the game.
- To configure Safety light max speed, got to RacingKit > Configuration > RacingLights > LightSpeed.
Configuration:
- Red: Vehicle max speed on red light.
- Yellow: Vehicle max speed on yellow light.
- Green: Vehicle max speed on green light.
Starting Lights
Video shortcut:
Create your own racing game! (Yar890 Racing Kit Tutorial) - YouTube
Starting Lights:
- Click on the Control panel or Starting lights.
- Copy and paste (Ctrl + c, Ctrl + v), duplicate (Ctrl + D) or move selected object.
- Move anywhere you want to move it to in the game.
- The starting light barrier will go transparent when the game starts.
Kart Spawn
Video shortcut:
Create your own racing game! (Yar890 Racing Kit Tutorial) - YouTube
Kart Spawn Instructions:
- Kart will spawn at all the parts in the RacingKit > KartSpawn > SpawnLocations (Unless “SpawnLocations” value has been changed on configuration)
- You can move each kart spawn part, as long as its parent stays the same (Inside “SpawnLocations”)
- All spawn location parts will become transparent when the game starts.
- To change the spawn location, go to RacingKit > Configuration > KartSpawn > SpawnFolder.
Configuration:
- SpawnFolder: The folder which contains all spawn locations for karts.
Collision
Video shortcut:
Create your own racing game! (Yar890 Racing Kit Tutorial) - YouTube
Collision Instructions:
- Click on the Control panel
- Copy and paste (Ctrl + c, Ctrl + v), duplicate (Ctrl + D) or move selected object.
- Move anywhere you want to move it to in the game.
Initialise
Video shortcut:
Create your own racing game! (Yar890 Racing Kit Tutorial) - YouTube
Initialise Instructions:
- This contains starting script, as well as all other main scripts.
- You do not need to access this script unless you wish to make modifications.
- This script has to stay within the kit folder.
Pit gate / barrier
Video shortcut:
Create your own racing game! (Yar890 Racing Kit Tutorial) - YouTube
Pit gate/barrier Instructions:
- Click on the Control panel or Barrier.
- Copy and paste (Ctrl + c, Ctrl + v), duplicate (Ctrl + D) or move selected object.
- Move anywhere you want to move it to in the game.
- To change control panel sign, to go ControlPanel > Sign > SignUI > TextBox and change the “Text” property.
- Each Barrier and Control Panel has ClassId value. When a control panel button is clicked with the same ClassId value as the Barrier, then the barrier state will change (open/close).
- Example: ControlPanel class Id of “OpenPitEntrance” will open/close all barriers with class Id of “OpenPitEntrance”.
- To configure the control panel class Id, got to ControlPanel > Configuration.
- To configure the barrier class Id and transparency, got to ControlPanel > Configuration.
Configuration:
- ClassId: Value used to connect different barriers and control panels together.
- BarrierOffTransparency: The transparency of barrier when the barrier is off.
- BarrierOnTransparency: The transparency of barrier when the barrier is on.
Track Change
Track Change Instructions:
- Create a new folder in “Workspace”.

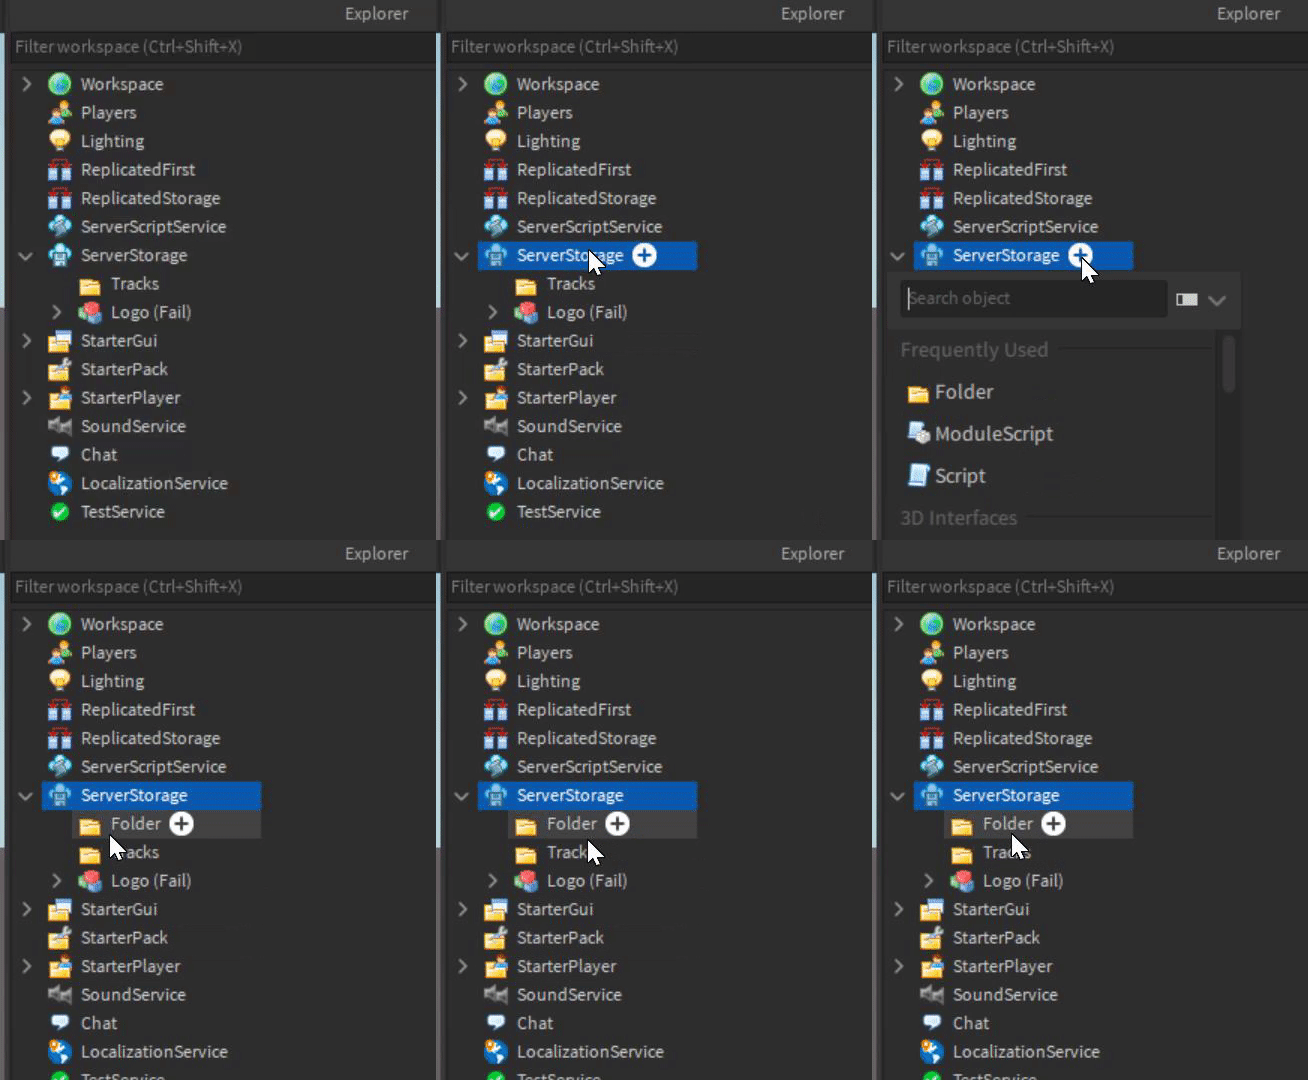
- Create a new folder in “ServerStorage”.

- Rename these folders. Suggested names are “CurrentTrack” for the workspace folder and “TrackStorage” for ServerStorage.
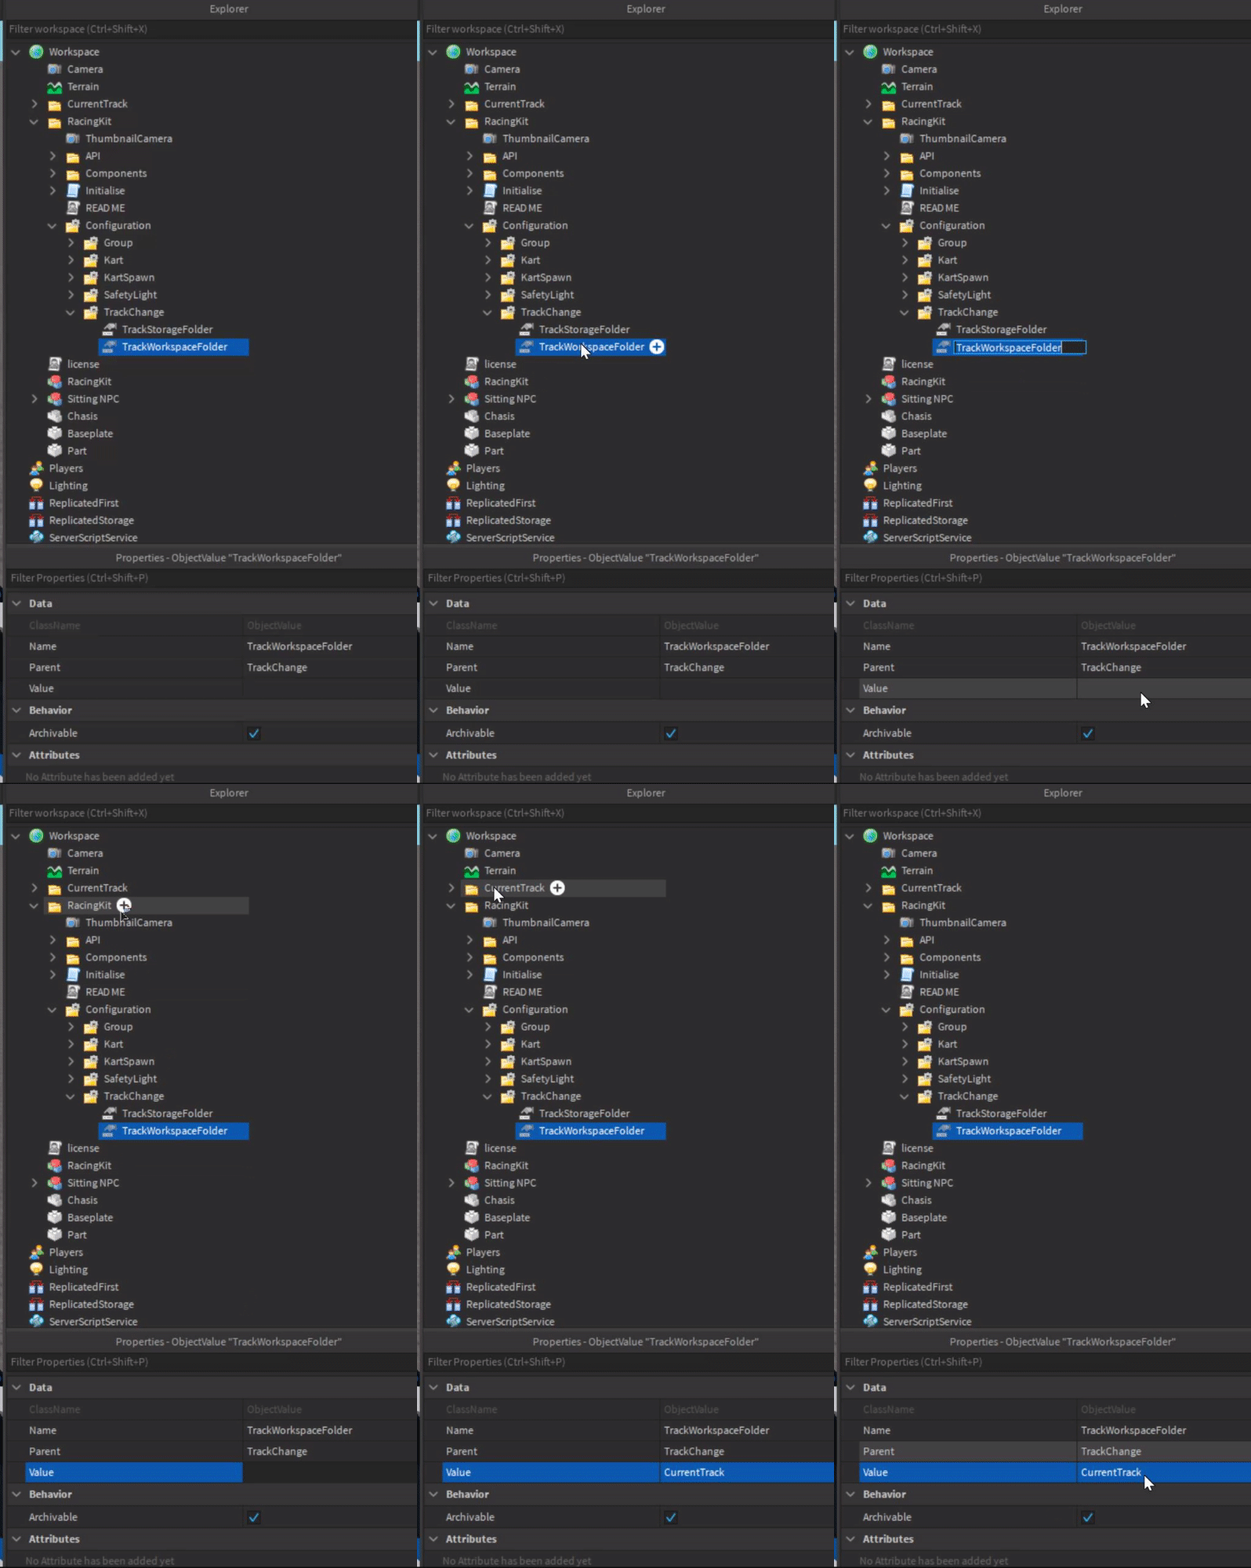
- Set “TrackWorkspaceFolder” configuration to workspace folder in configuration

- Set “TrackStorageFolder” configuration to server storage folder in configuration

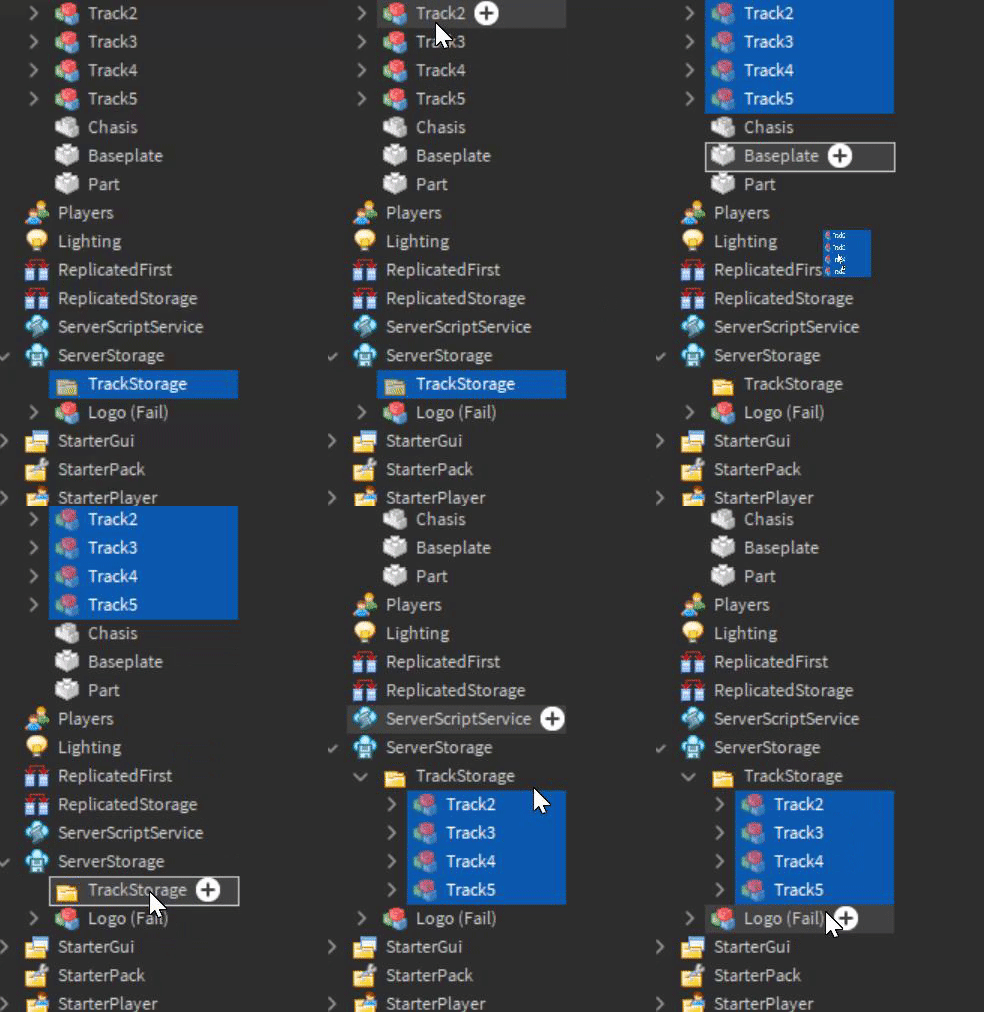
- Make sure each track is in its own folder/model

- Add the first track you want to show on the game in the Workspace folder you created.

- Add all other tracks to the ServerStorage folder you created.

Notes:
- If the track loads in the wrong place, you will need to move the track back into the workspace. Next, move the track to the correct position. Finally, moved the track back into the ServerStorage track folder.
Configuration:
- TrackWorkspaceFolder: The object value that links to the folder in Workspace.
- TrackStorageFolder: The object value that links to the folder in ServerStorage (Or other storage places).
Group Restriction
Video shortcut:
Create your own racing game! (Yar890 Racing Kit Tutorial) - YouTube
Group Restriction Instructions:
- Group restrictions allow people within a specific group and rank to click the button. All other players will not be able to click it.
- If group ID is set to 0, then all players can click on the button.
- To configure group restrictions, go to RacingKit > Configuration > Group.
Configuration:
- GroupID: The ID of your group (Typically found in the URL).
- RankID: The minimum RankID required to use the control panel.
API
API Instructions:
- The API is designed to allow advanced users to create custom scripts to trigger events or get info from events. This can include changing lights in scripts or getting info about who clicked a button.
- View “examples” to get an idea of how you can get info from API events.
How to:
Change a value object
Instructions:
- To adjust a “value”, you click on the pointing value, then go into the properties window and change the “Value”. You can see an example of this below:
You will need to know how to do this to change some of the configurations.
Last Update: 01/02/2021


