Hello again, DevForum!
It’s been a while since I’ve made a tutorial available to the community, and today I’m making another one. This tutorial isn’t going to be as long as my previous one (which was about making clothing on Roblox), but it should hopefully dispel some false notions about creating 3D art for architecture, CAD, video games, movies, and whatever else you’d need models for.
This specific tutorial will be covering the steps involved in a Blender sculpting workflow. There are many different ways to 3D model and texture, but this pipeline works the best for me.
This tutorial assumes you have basic knowledge of all of the topics covered. If you need more information, there are many resources out on the internet for you to use.
This tutorial will be split into 6 different “steps”, each associated with an image I used for applying to the UGC program. Do not use these as a reference to get into the UGC program, they’re pretty bad, and I’ll probably fail anyway.
ASSOCIATED SOFTWARE:
Blender - 3D Modeling application | [ FREE ]
Blender is a Free and Open Source Software (FOSS) project maintained by the Blender Foundation and its community of contributors. It is free to download on their website.
Substance 3D Painter | [ $20 USD ]
Substance 3D Painter is one of many tools in the Substance 3D suite by Adobe. It was acquired by Adobe a few years ago, and has since changed to a subscription model. You can purchase it as part of a bundle of software on Adobe’s website
Paint(dot)NET | [ FREE ]
Paint(dot)NET is a closed source project maintained by one individual. It is very good photo manipulation tool that I used to create many of the graphics used in this guide. While not necessary for the workflow, it may help with quick, minor edits, or creating simple graphics to go with it. It’ll help you make panels for your UGC application.
Let’s get this show on the road.
STEP ONE: Creating the low-poly mesh
Click to view.

Creating the low-poly mesh can be done in a few ways. The way I use is editing primitives.
The idea behind it is extruding, beveling, scaling, and subdividing primitives until they reach the desired shape.
Typically, when you first model an object, you should pick the primitive which most suits the object. For example, most head wear can be made with a Cylinder, and on rare occasions, a UV Sphere.
In the provided example, I used a Cylinder as my starting mesh and edited it until it fit the desired shape. I used an additional cylinder for the metal piece on the front.
STEP TWO: UV map the low-poly mesh.
Click to view.
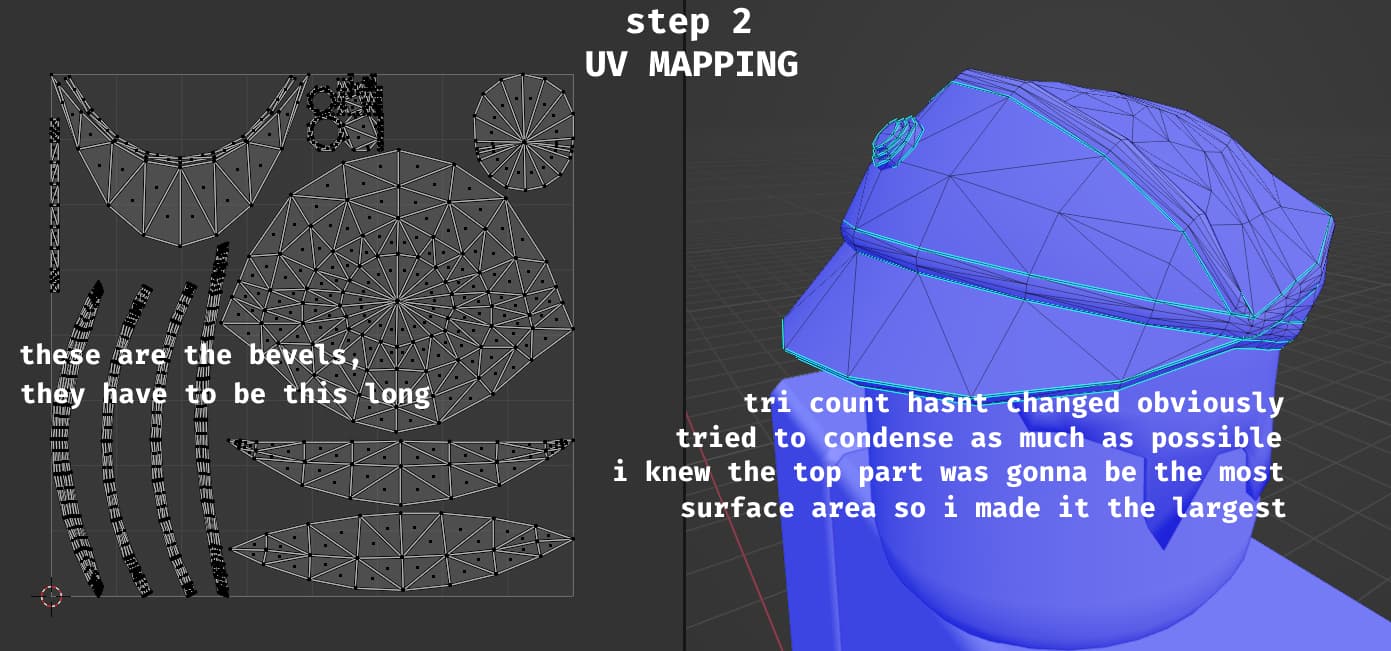
Like making the low-poly mesh, there’s a ton of different ways to make a UV map, and each modeler has their own way of doing it. I typically start with creating a good shape for all the islands first, and then merging them into a tight square.
All islands should be as close to a closed shape as possible. Longer objects should be crammed into the corners, and stretched to fill the sides of the UV square.
Objects in UV space should be a relative size compared to the surface area of the object. This basically just means that the larger it is in 3D space, the larger it should be in comparison to the rest of the shapes on the UV map.
STEP THREE: Sculpt a high-poly model using MultiRes.
Click to view.
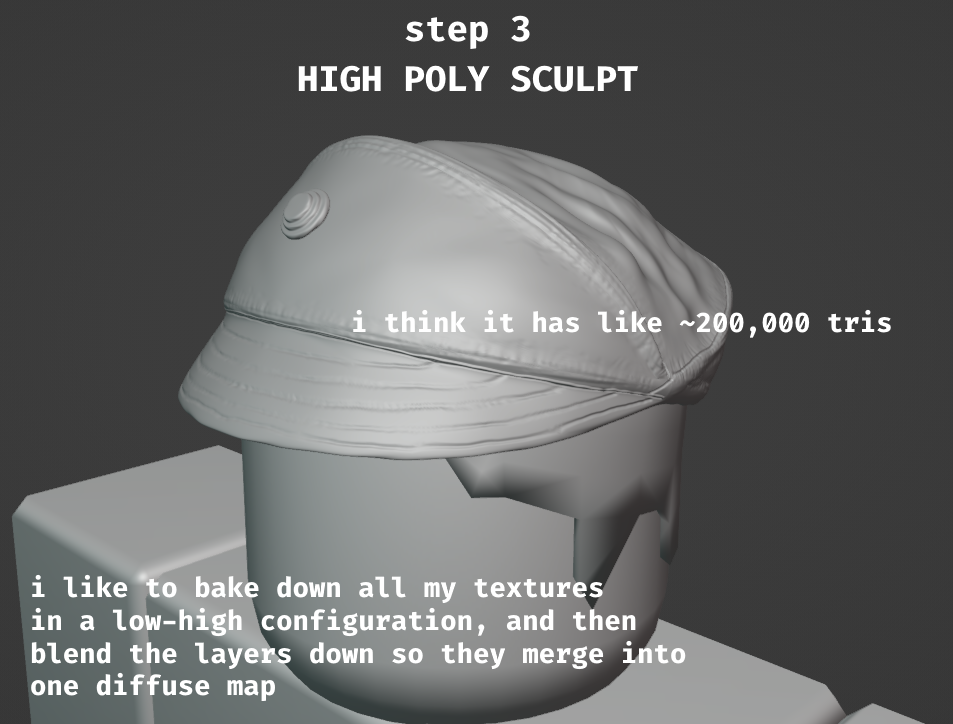
Apply a Multi Resolution filter to the low-poly mesh, and subdivide it up to around 4-6. I’ve found that I can get away with 5 on most objects. The higher the number, the exponentially more faces there will be. Do not spam the button.
Enter sculpting mode and start sculpting seams, nicks, and creases. Seams can be made by making a simple subtract line with 2 add lines on its edge. Creases can be made with a large area, low strength brush and dragging an area.
STEP FOUR: Bake the high-poly onto the low-poly.
Click to view.

This step is pretty self explanatory.
Export the high-poly and low-poly meshes as separate files. Add the high-poly model onto your baked maps and bake it. It should appear on top of your low-poly model.
STEP FIVE: Texture the new model.
Click to view.

This step is similarly self explanatory.
The mesh can be textured with the many provided materials in Substance Painter, but you can also make some with your subscription to Substance Designer. There are many tutorials out there on how to texture an object in Substance Painter, so I won’t go into too much detail here.
There are two different types of textures, Baked Lighting and Physics Based Rendering.
Physics Based Rendering (PBR) is utilized by the SurfaceAppearance class on Roblox. If you export your Substance Painter project with the Roblox (Surface Appearance) preset, you’ll have 4 matching texture maps to apply onto the object.
In UGC terms, PBR is only used in 3D clothing, not typical accessories. Typical accessories must utilize Baked Lighting.
Baked Lighting is utilized by the TextureId integer on Roblox. You must export your Substance Painter project with a custom-made preset, using the Baked Lighting material filter in your project and then exporting the Color layer as the final image. The resulting image will match the filtered output in your project.
In UGC terms, Baked Lighting is used in typical accessories. Upload the image as a TextureId on a MeshPart to get the result. This texture will also be used when you make your mesh into an accessory that can be sold on the UGC catalog.
STEP SIX: Export the model and rig it.
Click to view.
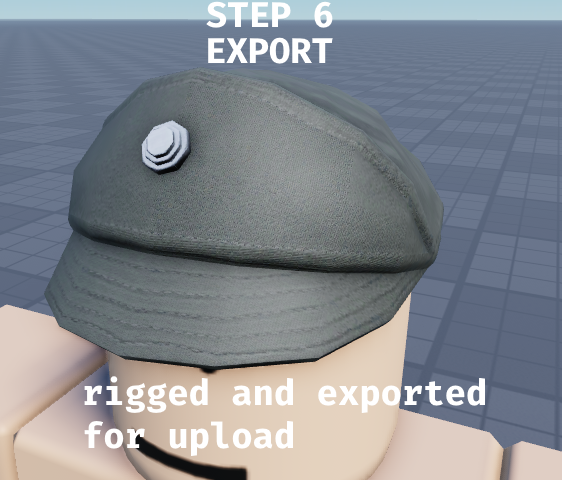
Create a MeshPart and upload your low-poly mesh as the MeshId integer.
If you’re using Physics Based Rendering, create a SurfaceAppearance class as a child of the MeshPart. Upload your texture maps in the correct attributes.
If You’re using Baked Lighting, set the TextureId integer as the exported image.
Here’s a simple preset that you can use.

Use the Accessory Fitting Tool provided by ROBLOX to rig your new model into a wearable accessory.
If your account has the UGC Feature Flag flipped on, you can upload a UGC item by right clicking the Accessory in the Explorer window and pressing “Upload to Roblox”. It should prompt you with a window asking you what type of accessory to make, as well as a name and a description. If you do not have the FFlag flipped, it will prompt you with the default “Upload Model to Toolbox” screen.
I hope you enjoyed a brief glance at a generic 3D pipeline which I use very frequently. I’ve been doing this for about 2 years now, and I don’t see any reason to stop. I hope this guide will provide some insight into how all of this actually works, no matter what your skill level might be, from new studio user to meta scripting.
If you have any questions, feel free to talk to me @ imjayden. on Discord, or shoot me a PM.