

Hello and welcome to my guide on creating large-scale terrain with World Machine (WM)! Included in the guide below are not only tutorials on how to create height and colormaps using the software but also examples of outputs as well as full WM files for said examples.
You are also free to explore the sample games where you can view what exciting kinds of terrain you’d be able to create with the workflow I’ll hopefully be able to teach to you through a guide broken up into mini-lessons. Ones that progressively get more complex to teach you what’s possible with the software.
At the moment, the guide is still a work-in-progress as well so feedback is appreciated and welcome but do note that not all the lessons may be released.

EXPAND
 Roblox Studio
World Machine B4031
ADDITIONAL NOTES:
- The lessons assume little to no experience with World Machine or the import process into Roblox Studio.
- It is not required to buy any license for the version of World Machine you download!
- Although for more complex terrain, a stronger PC is recommended, given we will be using the basic version, capped at 1024x1024 for outputs, this guide should not require a super beefy PC to do!

EXPAND
NOTES:
- Note that the flora and fauna are not mine! All just taken from the toolbox and cleaned.
- These sample outputs are free for use! Would be great for some credit though


- Base Roblox terrain tools are insufficient for creating large-scale terrain in a way that maintains a high level of detail
- There has been a lack of resources regarding height + colormap creation on the DevForum despite the tech’s presence in Studio + its potential in creating high quality, large-scale terrain
FULL RATIONALE
On Roblox, realistic, large-scale terrain made using the base terrain tools, e.g., grow, erode, add, etc., is not only really hard to make given the amount of time you would need to spend sculpting each bump on the side of a mountain to make it look natural, sculpting and eroding areas in a way that would follow natural erosion patterns, etc. etc.
This task only becoming more and more of a time dump the larger and larger a map gets.
Yet, there is a solution: heightmaps and colormaps!
The use of which assuming one uses noise or a software specifically designed for height and colormap generation allows one to create:
- Large-scale, realistically eroded terrain
- High-detail, well-painted terrain
All without needing to tediously sculpt a thing!
Now, as a developer who has mainly focused on creating such large-scale terrain on the platform for a while, there has been a noticeable lack of guides or tutorials on the DevForum that teach about how one would be able to create more detailed height and colormaps despite its aforementioned potential.
Though there have been posts about creating larger-scale terrain in the past:
Though creating these from scratch are definitely difficult, using software specifically designed for such processes not only speeds up one’s ability to create height and colormaps tenfold but would also allow one to explore how else they could improve their creation by freeing up more time and energy.
Although many software exist for this process,

GLOSSARY
EXPAND
Devices
- A device is a way for the software to represent code through the use of a node.
- Used to represent and store everything from the most basic geometry to full simulations of erosion within the program.
Erosion
- A natural modifier that requires you to input geometry for it to work, the Erosion device simulates realistic movement of rock and dirt to increase the detail in your terrain.
Masks
TIPS
- (Will be added onto and sorted later on)
EXPAND
Open up another window for a larger viewport!

- Mainly to be used to see what you’re editing better
- You can open other windows as well if you want to be able to see more info all at once

Click on the eye icon in the viewport screen to lock your view on a selected device

- Used to see updates to devices even if there are changes to it earlier in a device chain
- Very useful in long chains and when you want to see what changes you make with tweaks to earlier devices

LESSON 1: A noisy landscape
EXPAND
STEP 1: Insert an Advanced Perlin noise generator

- Found in the generator tab, the Advanced Perlin noise gen should provide you with a good base for any landscape.
- Other generators can also provide a base for your terrain but noise generator devices are the most common to provide a good natural looking start to any project.
- Feel free to play with the settings of the generator to get the terrain you want by double clicking the device!
STEP 2: Insert and connect an Erosion device to the noise generator

- This then adds detail to your initial terrain, giving it even more natural features by simulating the movement of dirt and rock over time.
- This is very important as this is the main step in creating any terrain that gives it it’s most realistic features.
- Again, don’t be afraid to play around with the settings of the device to see how you can do things like increase or decrease the intensity of the erosion!
STEP 3: Insert and connect a heightfield output device to the Erosion device

- This is then how one would export the terrain out of World Machine!
- Once connected, double-click the device and click on “Write to disk” to export the heightmap.
- Don’t forget to change the name so you can find it easily later on!

STEP 4: In Roblox Studio, open the terrain editor and click on ‘Import’

- From here, we can let Studio take the wheel in translating our heightmap data into actual voxel terrain!

- Feel free to play with the horizontal and vertical sizes as well though it’s important to note that if you stray from the aspect ratio of the heightmap (In our case 1:1), the terrain would start stretching. Something especially noticeable later on once we create an actual colormap
- For the vertical size, I’d recommend just playing around until you get the verticality you want from the terrain you’ve made
Once done, you should get something like this, depending on whichever material you chose for the terrain: (I chose Asphalt)


- Congrats on making your first realistic, if not monochromatic landscape using World Machine! Be sure to stick around for updates for the next lessons where we’ll cover creating colormaps and more complex terrain!
- Aside from that, for now, I’d recommend either dissecting the sample outputs, looking at the software’s documentation, or looking for YouTube tutorials for more details! One I’d recommend is by a YouTuber who specializes in creating World Machine projects named HYLK!
LESSON 2: A colored landscape
EXPAND
Assuming this setup, following the first lesson:

STEP 1: Grab a Color device

- We’ll first be creating our color key based on the one provided by Roblox.
STEP 2: Duplicate the Color device three times

STEP 3: Change the HTML Color values in the devices to the ones listed below

→ Grass is #6a7f3f
→ Ground is #665c3b
→ Mud is #3a2e24
→ Rock is #666c6f
- Don’t forget to name them to organize your device workspace better!

STEP 4: Move the Color devices in between the Heightfield Output and Erosion devices

- Mainly done to make laying out other devices easier in the following steps.
STEP 5: Grab a Select Slope device

STEP 6: Change the falloff value in the Select Slope device to zero

- We must always make sure to make it so the masks we use when creating colormaps only have COMPLETELY WHITE OR COMPLETELY BLACK PIXELS ONLY.
- This is because Roblox’s colormap importer doesn’t allow for any other values except for the exact ones listed in the color key! Otherwise, you might get this error:


STEP 7: Duplicate the Select Slope device three times

STEP 8: Connect the Erosion device to the Select Slope devices’ input ports

STEP 9: Edit the Slope Range values for the Select Slope devices


STEP 10: Connect each Select Slope device to their respective Color device’s Mask (Heightfield) port
- These ranges basically act as the places where the terrain, denoted by the color, will appear. For example, in the range, 0° - 23°, grass will appear because we connected it to the grass node
- Whatever the case, feel free to experiment with whatever feels right with you!


STEP 11: Grab a Combiner device

- From here, we will be combining all the color data to create a proper texture/colormap for our terrain
STEP 12: Edit the Method and Strength values of the Combiner device

- Method should be Smooth Max
- Strength should be 1.0
STEP 13: Duplicate the edited Combiner device twice

STEP 14: Connect the Color devices to the Combiner devices

- As you do this, you should see your colormap slowly come together in your viewports
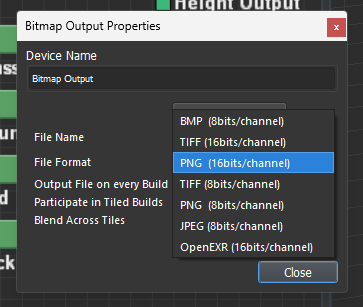
STEP 15: Grab a Bitmap Output device

STEP 16: Connect the last Smooth Max device to the Bitmap Output device

STEP 17: Output your colormap

- Don’t forget to name your output so it’s easier to find!
- Make sure you change the file format to PNG 16bits/channel to make sure the output is higher quality:

OPTIONAL STEP: Viewing your output in World Machine
EXPAND
STEP 1: Grab an Overlay View device
STEP 2: Connect your Erosion and Smooth Max nodes to the appropriate ports
STEP 3: View your terrain with the colormap overlayed on it


STEP 17: Import it into Studio alongside your Heightmap

Once imported, it should look like your landscape but with actual terrain variety!


- Congrats on coloring that realistic landscape! Again, hope this helps you with whatever you want to create!
OTHER DETAILS:
-
FINAL DEVICE SETUP:
- FINAL TMD FILE: A Colored Landscape.zip (9.8 KB)


Thanks for taking your time to follow the guide! For any questions feel free to comment below and feel free to suggest lesson ideas, different strategies to approaching the terrain generation, etc.
Aside from that, feel free to post what you’ve made based on the tutorial below as well!
I truly hope this guide has and will help you create larger scale terrain for your game in a way that’s quick and easy but if not, I hope at least you’ve learned something new! Thank you again for your time ![]()


