Hello
Recently I’ve had trouble with a development project that I have been working on. It’s a very largescale project with lots of advanced Unions & Meshes, and I found a simple way to lower your Triangle count and improve performance considerably.
By using this method, you can go from this

to this
![]()
in a couple easy steps.
Intro
In an attempt to optimize the game, I have found a considerably easy, and less-destructive way to lower the Triangle count in your unions, while converting them to meshes to help with loading times & memory usage.
Using blender, you can easily convert unions upwards of 3k triangles, down to sub 1k by simply exporting your union to Blender, merging your Vertices by Distance, and importing said mesh into ROBLOX.
Exporting your mesh into Blender
Exporting unions, models, and parts outside of ROBLOX, to Blender, is really quick and easy. To export a model/union/part, you can:
-
Select your part.
-
In the workspace, right click your Union and select “Export Selection”. As I said, this works for Unions, Models, and simple parts.
-
Save your model to a place you can easily find it. I suggest creating a folder for Objects that are Unoptimized, and a folder for Objects that have been Optimized, and are ready to be uploaded to roblox.
-
Now, in blender, you can go to the top right of your screen, select File > Import > Wavefront (.obj)
Select your Union, and import it to Blender.
Note: I’ve found that usually, Unions I import into Blender are not always at 0, 0, 0.
To fix this, right click anywhere in your workspace (with your union selected (it should already be selected after import)), and Set Origin > Origin to Geometry
Then simply hold Shift + S and move your mouse upwards to select Selection to Cursor
Now, your part should be centered, and easy to see. -
Your Union/Mesh is now in blender, and ready to be optimized.
Optimizing/Merge by Distance
-
From what it seems, ROBLOX forms it’s topography very poorly, which results in extremely inflated Triangle counts. This form of optimization is very very very lightly destructive to the geometry of your union, but if your keep the distance by which the vertices are merged, you can keep any disforming to a minimum.
-
Now that we have our Union in Blender, select your part, and enter “Edit Mode”, found in the top left of your screen.

- Next, ensure you have “Vertices” selected. It is located right next to the “Edit Mode” box.
*After, swap to the Wireframe Shading, found in the top right.
Your object should look something like this:
-
Zoom out, and select the entirety of the vertices of your part.

If you miss any vertices, your model may end up messed up or not properly optimized. -
Next, right click your object in the workspace, and find Merge Vertices > By Distance
*You can stop here, and depending on how advanced your model is, your Triangle count will decrease significantly. However, by selecting the box in the bottom left of your screen, you can adjust how far the distance you want your vertices to be merged. Meaning, the larger the number, the more deformed your model will be, but also the more triangles it will remove.

For a simple model like mine, a higher number is okay, but be cautious of how many vertices you are removing, as it will drastically deform your model if you put the number too high.
Importing your model back into ROBLOX
Importing your model is just as simple as exporting it to blender.
To import your model:
- Head back to the top left of your screen (in blender). Select File > Export > Wavefront (.obj)
*Save your object to somewhere you can easily find it. (this is where the two folders are helpful)
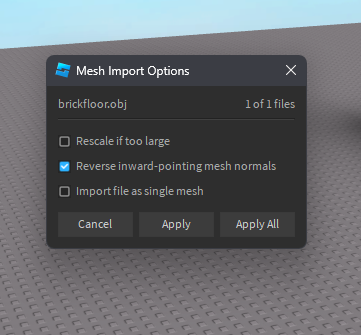
- Heading back to ROBLOX, open the Asset Manager tab (found in “View”) and upload your model to roblox.
!!!ensure you upload the “optimized” model!!!
- Disable Rescale if too large

Voilla! Your object should now be optimized! Depending on how advanced your model is, your model can look very similar, if not the exact same! Here’s how mine turned out:
*unoptimized
*optimized
Personally, I see no discernable difference between them, and your computer will thank you.
All finished. Remember, use your own discretion when using this method, it isn’t perfect, but I don’t know any optimization methods that are. Play around with it, figure out what works with you, and what looks good.


