EzUISprings - Simple UI Movement Module

Original post is outdated, jump to here to read the newest version.

Despite being on the forum for about a year and having used it extensively for information, I haven’t really contributed much myself so I felt it was time to change that, so this is my first ever resource!
Albeit; this is a small contribution.

Say hello to EzUISprings!
(Uses the spring module made by BlackShibe.)

- What is it?

EzUISprings, as the name suggests, is a module made to make spring-like movements for your GUI's as simple as possible, giving them some more life with little fuss. Geared mainly towards newer developers / people who don't typically script themselves (i.e, UI Designers). After all, who want's to write out all the CFrame math? Not you that's for sure. There's not a whole lot more to say since that's basically all it is.

There’s only like 4 main functions, each of which is pretty simple to explain:

- Setting it up.
My module can be found the roblox library here just plop it wherever and you should be good to go:

Once you have it, you can create a new instance simply by using EzUiSprings.new(). Make sure to specify your GuiObject as the constructor.

local EzUISprings = require(...) --module path (wherever you have it stored)
local MyGuiObject = script.Parent
local UISpring = EzUISprings.new(MyGuiObject)

If you want to have multiple UI elements moving all at once, I would recommend having them all together in a Frame or CanvasGroup, and giving that as your GuiObject.

- 2D UI

I don't really know how to title my headers, but this is a straightforward one. It's "the standard" UI movement, goes along with your camera movement.

EzUISpringExample2D

local EzUISprings = require(...)
local MyGuiObject = script.Parent
local UISpring = EzUISprings.new(MyGuiObject)

UISpring:ApplySpringEffect(
3, --SpringIntensity: number
false) -- UseCameraFocus: boolean

Just change the intensity to be however much you’d like the spring to move.
You can also change UseCameraFocus to true if you only want change in focus to influence the spring. Good for UI movements only when the player moves. (Assuming you aren’t already doing some camera manipulation).

There’s also a passthrough for the shove function so that you can influence the spring yourself if you’d like to.

UISpring:Shove(Vector3.new(1,0,1))
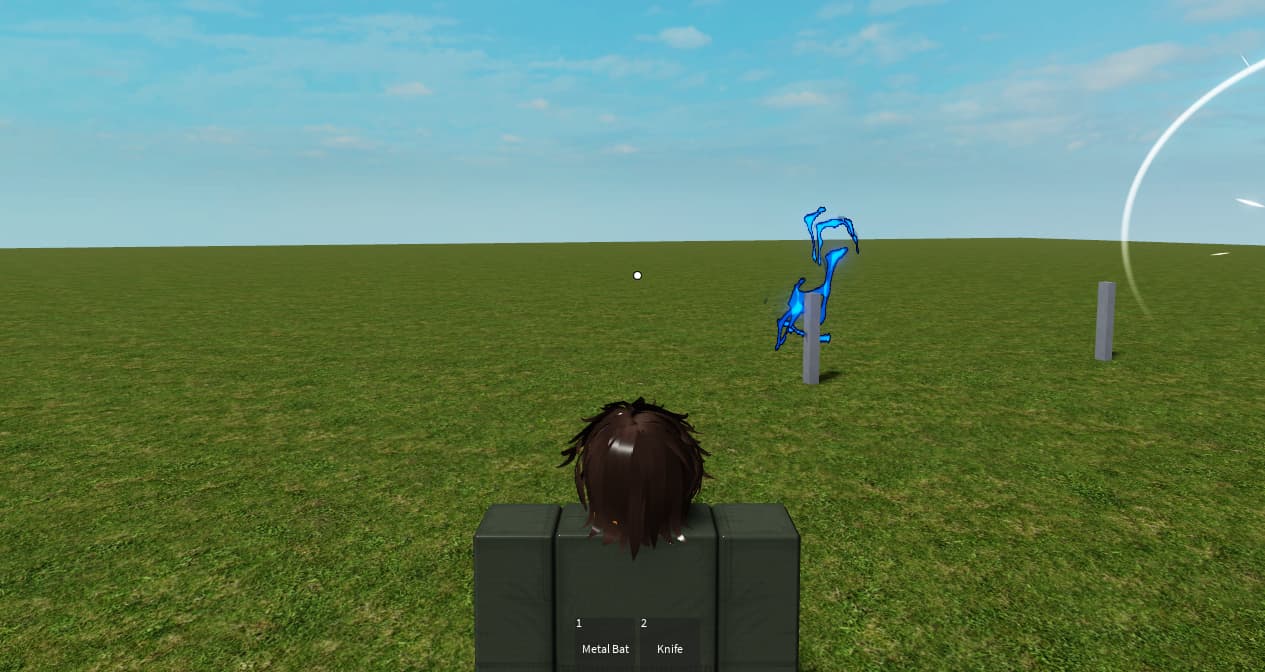
- 3D UI

Alright, the main prize, this one is just as simple as 2D actually, EzUISprings will automatically apply your object to a SurfaceGui, and display that in (roughly) the same place as it was placed on-screen beforehand.

EzUISpringExample3D1

local EzUISprings = require(...)
local MyGuiObject = script.Parent
local UISpring = EzUISprings.new(MyGuiObject)

UISpring:Apply3DSpringEffect(
1, --SizeFactor: number (I recommend keeping this set to 1 unless you are having issues with the gui not fitting on screen.)
2, --SpringIntensity: number
Vector3.new(), --BaseRotationOffset: Vector3
false, --UseCameraFocus: boolean
{}) --SurfaceGuiProperties_OPTIONAL: {[string]: any}

You can apply a rotation before any spring effects to it by changing the BaseRotationOffset property.

UISpring:Apply3DSpringEffect(..., ..., Vector3.new(0, -20, 0))  -- in degrees

20 Degrees to the left for example:
Niko Plushie looking swag and 20 degrees to the left
And if you’d like to change some properties of the SurfaceGui, just add a dictionary of properties that you’d like to change at the end of the function. (Similar to a tween goal)

local PropertiesTable = {
 Brightness = 3,
 AlwaysOnTop = false -- you CAN do this although I wouldn't as there would probably be clipping issues in first person
}

UISpring:Apply3DSpringEffect(..., ..., ..., ... PropertiesTable)

Personally, I think this goes great with fast-paced movement, as it gives a bouncier feel to everything.
EzUISpringRealExample

- 3D Mouse Influence

This one follows your mouse. Wow. In all seriousness though, this one is pretty handy for main menu's and the like.

EzUISpringExample3D2
Same-ish constructors, you get the idea at this point.

UISpring:Apply3DMouseEffect(
1, -- SizeFactor: number
2, -- Spring Intensity: number
{}) --SurfaceGuiProperties_OPTIONAL: {[string]: any}

- Done With It?

Just use :Disconnect()! Your GUI will automatically get sent back to it’s original parent, unless ReturnToParent is set to false; in which case it just get deleted.
EzUISpringExampleDisconnect

UISpring:Apply3DMouseEffect(1, 2)
task.wait(3)
UISpring:Disconnect(true) -- ReturnToParent: boolean (warning: will error if parent no longer exists)

As I’ve said at the beginning, this is my first module / resource that I’ve posted publicly. Feedback is greatly appreciated!

113 Likes

Can you make a testing place which makes use of this module in like menus for screen or idk like that?

5 Likes

Nice module man. This is an effect most FPS developers have thought about before, and this module makes it a lot simpler.

3 Likes

is gud, much wow (you should use it!!!)

2 Likes

It works great! Though, is it possible to decrease the intensity when you use the 3D mouse influence? I’m trying to make a menu out of your module and if I move my mouse too much, it tilts quite a bit. Is it possible to not exaggerate the tilting as much? Thanks :slight_smile:

Excellent module and good work, it is very sure that I will use it in the future :grinning: :+1:

Is it possible to have the Apply3DMouseEffect() rotate around the anchor point of whatever ui

Instead of rotating on the center of the whole screen?

yooooo its not the ultrakill hud in roblox!!! /j
anyways cool module, might use

Hey all, I have decided to revisit this old module I made a bit ago and clean it up a bit since it was made in a night when I had less of an idea what I was doing. I haven’t added too much functionality but I did fix a few lurking bugs that were roaming around after all this time.

Change Log V 1.1:

→ Bug Fixes:

  • Mouse3DInfluence no longer has janky SpringInfluence based on look Camera LookVector.
  • Fixed disconnect not destroying residual parts sometimes.
  • Isloated UISpringObjects into their own metatable.

→ Functionality Changes

  • ApplySpringEffect (the 2D one) has been deprecated and since removed.
  • Paramaters are no longer specified when calling apply functions, but rather when the UISpringObject is created. (Example can be found near the top of the module)
  • UISpringObject:Disconnect()UISpringObject:Destroy(), given a more fitting name but also done to avoid confusion as apply functions now return their connections.
  • Added EzUISpring:ClearAll(), just a way to destroy all active SurfaceGuis and SpringParts.

You can find this new version both on the toolbox, as I have updated it to include this new version, and also as an attachment here.

Toolbox Version:

Thanks for using my janky stuff!

I’m not quite sure how your gui is set up entirely but from the looks of it, this is intended behavior. It just plops your gui onto a part surface as is.

The problem is that no matter what gui it is, the Apply3DMouseEffect() is always centered in the middle of whatever size screen at 0.5, 0, 0.5, 0

But instead of whatever size screen it is,I want it to be the center of the gui/frame itself.

Hey so cool module, but for some reason im getting this error and the ui partially works, anyone has this error? Idk what im doing wrong tbh

Erm, that is really weird. Can you show me what you fed into the function for SurfaceGuiProperties?

Yeah, sure, I just used the example you gave for the 3D movement, but here it is


its a script inside of a frame, i tried using it in a imagelabel and gave me the same error, so yh, it errors in any kind of UI element you put it
Only thing i changed was the rotation to test if it worked but since it errors, it just moves side to side but nothing else

Yeah uhhh, I updated it a couple days ago and it doesnt take those constructors anymore.
There’s a small example at the top inside the modulescript that could help you, but I should probably make a new writeup on how to use it since that little bit clearly wasn’t enough xd, my apologies.

UISpring:Apply3DSpringEffect() takes in an optional SurfaceGuiProperties table, which is just a dictionary of properties for it, something like this:

UISpring:Apply3DSpringEffect({
   LightInfluence = 0;
   ZIndexBehavior = Enum.ZIndexBehavior.Global;
   --etc. etc.
})

If you want to change the properties of the spring effect, thats now done with a new parameters constructor for when you first make the UISpring object.

local SpringParams = EzUISprings.newSpringParams()
local UISpringObject = EzUISprings.new(MyGuiObject, SpringParams)

The SpringParams governs the behaviors of the spring, and is just a dictionary given this type:

type SpringParams = {
	SizeFactor: number;
	SpringIntensity: number;
	MouseIntensity: number;
	UseCameraFocus: boolean;
	ShowDebug: boolean;
	MouseCap: Vector2;
	BaseRotationOffset: Vector3;
};

You can also apply new spring params after you start displaying the object too, with UISpring:UpdateSpringParams(NewSpringParams)

In the end though, your new script should look something like

local EzUISprings = require(...) --path to module
local MyGuiObject = (...) -- path to object

local SpringParams = EzUISprings.newSpringParams({
  SpringIntensity = 2;
  BaseRotationOffest = Vector3.new(0, -90, 0);
})

local UISpringObject = EzUISprings.new(MyGuiObject, SpringParams)
UISpring:Apply3DSpringEffect({})

Let this be a lesson to myself not to update things out of the blue without writing extensive documentation! If there are any more issues then i’ll make a full write up but for now i will leave it be.

1 Like

…ok im just dumb, didnt think on checking the module itself lol…yeah, doesnt show up errors now and works better, thank you man and sorry for the trouble, loved the module

1 Like

C̶h̶a̶n̶g̶i̶n̶g̶ ̶t̶h̶e̶ ̶r̶o̶t̶a̶t̶i̶o̶n̶ ̶d̶o̶e̶s̶n̶’̶t̶ ̶s̶e̶e̶m̶ ̶t̶o̶ ̶w̶o̶r̶k̶ ̶w̶i̶t̶h̶ ̶t̶h̶e̶ ̶u̶p̶d̶a̶t̶e̶d̶ ̶v̶e̶r̶s̶i̶o̶n̶.̶ ̶T̶h̶e̶ ̶3̶D̶ ̶m̶o̶u̶s̶e̶ ̶e̶f̶f̶e̶c̶t̶ ̶d̶o̶e̶s̶n̶’̶t̶ ̶w̶o̶r̶k̶ ̶e̶i̶t̶h̶e̶r̶.̶ ̶I̶t̶ ̶s̶e̶e̶m̶s̶ ̶l̶i̶k̶e̶ ̶c̶h̶a̶n̶g̶i̶n̶g̶ ̶t̶h̶e̶ ̶S̶p̶r̶i̶n̶g̶P̶a̶r̶a̶m̶s̶ ̶d̶o̶e̶s̶n̶’̶t̶ ̶a̶f̶f̶e̶c̶t̶ ̶a̶n̶y̶t̶h̶i̶n̶g̶ ̶a̶t̶ ̶a̶l̶l̶.̶

Edit: Nvm, the code example you posted to the devforum doesn’t work. Using the example included in the actual module does work.

i apologize for reviving this dead topic, but i do have a question, how could i go about making this work for a custom camera?

normally it looks like this

but when i use a custom camera offset, it dissapears

i tried reading the code of the module but i just couldnt figure out how to offset the position of the surface gui

Are you using a secondary camera or modifying the camera that is being used already by the player?

i am modifying the default camera and giving it an offset to create this effect