Haha, hey! Read your Tweet so I’ll help out a bit! The textures are usually really simple, all you have to do it add an image onto a plane.
For this example, I’ll be using this image:

I’ll be using a plane for this example, the way to get this is Shift+A > Mesh > Plane!

If you going to directly edit the texture of the floor, you’ll have to sift around (if the textures are not labeled, AKA they are have ‘Part’ as the name) and find the particular texture in the textures and materials tab, which is under this icon!

Our materials tab looks like this, just a plain white material. We’re going to add the texture now!
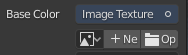
Move over to Base Color, and hit that small circle on the right.

After selecting the circle, hit ‘Image Texture’!

After selecting that, hit the folder icon that’ll appear under the ‘Image Texture’ bar.
Then, import the texture!
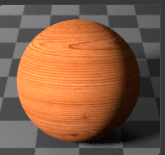
After you’ve done that, now our plane looks like this!

We’ve now added a texture! 
Now if you notice these 4 nodes (also on the materials tab, but scroll down a bit to find them), these really get the idea of a texture!

All of these “nodes” or values are from 0.000 to 1.000!
Roughness: Changes the roughness of the material! 0.000 roughness is very glossy:

1.000 roughness makes the material less reflective:

Note: if you want to see the material preview, hit the arrow next to ‘Preview’!

Specular: This value changes how reflective an object is, which means the higher the value, the more “sensitive” the object will be to light. This node gives more of a matte feel to a plane or object. This will not work well if the roughness is 0.700 to 1.000!
Specular at 0.000: (both examples are at roughness 0.500)
Specular at 1.000:

A great setup for specular is at 0.200 to 0.500!
I don’t really use specular tint, all it does is tint the specular to be less white, and be more towards the material’s color:

Finally, we have the metallic value! This one is pretty self-explanatory, makes an object more metallic. Make sure your roughness is 0.600 or lower for this to work! The texture or color will also become darker.
Metallic at 0.500, specular at 0.500, roughness at 0.500:

Metallic at 1.000, specular and roughness at 0.500:

Keep in note, you can also utilize these nodes on character accessories! AKA, you can apply a roughness and specular value to a hair item, and it will have a matte-ish effect on it.
With lighting, I don’t have much to say, but make sure to apply generous lighting, render the image multiple times, adding more lights if it’s dark, adding less and spreading out the lights if it’s too bright in one area or overall. If the scene is outside (no walls covering up outside lights), then make sure to use an HDRI! It’s very helpful. Check out https://hdrihaven.com for a lot of free HDRIs! Feel free to download one at any resolution.
I really hope this helped, don’t hesitate to ask any questions you may have!
-Star
 so I want your feedback on how this GFX is.
 )
) & I was wondering on how to do this I tried so many ways but nothing worked, I got really stressed about this & I need some help.
 & I was wondering on how to do this I tried so many ways but nothing worked, I got really stressed about this & I need some help.


