Hello!
This is my approach to allowing custom font files in Roblox.

Table of Contents:
Preamble
Section 1: Introduction and Generating a .fnt file
Section 2: Actually doing things
Section 3: “Feed” functions
Section 4: Debugging
Section 5: Documentation
Preamble
I am not responsible for any use of this resource aside from my own. What you do with this resource is beyond my control and I take no responsibility for any moderation actions that happen on your account if you decide to use this in a way that is not appropriate and/or violates Roblox’s terms of service. You should also educate yourself on the acceptable uses of the font files you are using with respect to copyright. If you are violating any copyright laws, you are taking full responsibility for any legal actions that may be taken against you if you so choose to violate these laws.
I grant permission for you to use and manipulate this resource in any way you wish, you may redistribute as you please, I really don’t care honestly.
Section 1: Introduction and generating a .fnt file
This is a very bare-bones system and requires you to do some things by hand, there is no interface, however I will be going over how to do things and use this properly. My example generates a label using the specified graphemes. You will have to copy this frame, or modify the source if you want to use it in a way that isn’t a single frame in the top-left corner.
You might be asking what a .fnt file is. It basically allows you to take a spritesheet (particularly one for a font), and stores positioning and sizing properties. There are multiple benefits to doing this over manually uploading every single glyph: only one file has to load, therefore less time is spent waiting for images to load, and if one file is moderated and you need to appeal, you don’t have to copy every single moderated decal’s ID to appeal.
First off, we need to get a .fnt file, you can do this how you wish but I personally used snowb.org, a resource that does this without any external programs. If you have your own program, skip to section 2.
For this example, I’m using the font “Bradley Hand ITC”, however any font file should work.
When you get to the website, it should look something like this, pretty simple but I’ll still go over how to use it:
Over on the lefthand side, press the add font file button, you should navigate your file explorer and find the font file you want to use. When you do this, the preview should change to whichever font you used.

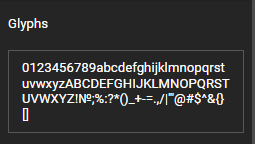
If you’re just using English characters and symbols, it should be fine to use this without any modification, however if there is any missing glyph, add this on the textbox on the left, the one labeled as “Glyphs”

If you want to manipulate the colour of your text in Studio, you should change the font colour to white, which can be done on the righthand side. Ensure “Fill” is selected.

Change it to white, type in R 255, G 255, and B 255, or use hex code #FFFFFF

This should make the preview white

Now, it is crucial that you verify that in the generated file, there isn’t anything profane or visually inappropriate because Roblox will moderate your file, regardless of intention. If your map does contain anything not considered appropriate, you can mess with layout settings which will change the order of the characters:
Now, once you’re happy, click “export” on the top bar:

This window should pop up:

You can choose any file type except xml. I’m using .fnt just for consistency purposes. Press “save”, it should download a .zip file.

I assume you know how to extract the .zip file so do that, if you don’t know how, google it.
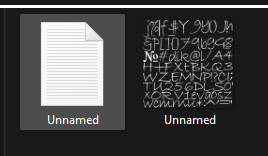
Once you’ve extracted the .zip file, you should see two files: a .png file, and a .fnt/txt file depending on what you downloaded.

Section 2: Actually doing things
This is the most substantial part of this post I guess. I am terrible at introductions so I’ll just pick up where I left off.
You should have 2 files: a .png file and a .txt/.fnt file (hereon referred to as .fnt file). Upload the .png file to Roblox as a decal. If you don’t know how to do that, google it.
Now, get the model, which is the “interpreter” even though it’s basic:
Insert it somewhere, I’m using ServerScriptService which is what you should be using for server scripts anyway.
Open your .fnt file with notepad or some other text editor, it really doesn’t matter what you use because you aren’t manipulating it.
Open the “main” script, it should look something like this:
Select the full .fnt file source (usually ctrl + A or cmd + A), and paste it inside of the two sets of square brackets, right next to the “s” variable.
It should look something like this:
Now, scroll down to the “fontMap” variable, paste the decal ID from above.
![]()
Now, run the script however you please (through run or play), and it should create a folder, as the direct child of the script, this will be a folder that contains each of the glyphs.

Section 3: “Feed” functions
I don’t know what to call these functions so I’m going to call them “feed” functions because you’re feeding a string to the “interpreter”.
This “feed” function is simply a function that turns the string into an actual visual label. It does this by iterating through the graphemes, cloning the frame from the folder to a ScreenGui.
IMPORTANT: If you are working with non-ASCII characters (characters whose decimal codes are not beween 0 and 255), it is important that you use the UTF-8 library, not the string library for splitting and manipulating strings. I’m using the UTF-8 library in my example so I highly recommend you do this with yours as well.
I’m going to be providing my feed function with comments. You can use this or create your own. A feed function should handle kernings as well, which is essentially any removed space between the current and next letter
local function feed(str: string)
	-- example feed function:

	-- first off, we have a function that will return a table of graphemes
	local splitString = (function()
		local graphemes = {}
		for i,v in utf8.graphemes(str) do -- for each of the graphemes,
			table.insert(graphemes, str:sub(i,v)) -- we have to use string.sub because utf8 returns a pair where i is the beginning of the grapheme and v is the end of the grapheme. We must use this because we're working with a non-ASCII character (№).
		end
		return graphemes -- returns the table of graphemes
	end)() -- ensure you call this function so it actually assigns the graphemes table to the splitString variable
	local newFrame = Instance.new('Frame') -- create a new frame that will store the glyphs

	local newUIListLayout = Instance.new('UIListLayout')
	newUIListLayout.Parent = newFrame
	newUIListLayout.SortOrder = Enum.SortOrder.LayoutOrder -- we don't want them to be aligned vertically
	newUIListLayout.FillDirection = Enum.FillDirection.Horizontal -- align them horizontally from left to right
	newUIListLayout.Padding = UDim.new(0,0) -- we don't want any padding

	for i,v in ipairs(splitString) do -- where i is the index and v is the glyph
		local thisLetter = stringFolder:FindFirstChild(v) -- look inside the folder for a frame with the glyph's name
		if thisLetter then -- if it found a frame with this name,
			local newLetter = thisLetter:Clone() -- clone it and parent it to the frame
			newLetter.LayoutOrder = i
			newLetter.Parent = newFrame

			local next = splitString[i + 1] -- look for the next character to handle kernings
			if next then
				local kerningThisLetter = info.kernings[v] -- inside the kernings table, look for the kerning for this letter and the next letter
				if kerningThisLetter then -- if there is a kerning table for this letter then
					local kerningNextLetter = kerningThisLetter[next] -- if inside that kerning table there is a kerning for the next letter
					if kerningNextLetter then -- if there's a kerning then
						newFrame.Size -= UDim2.fromOffset(0,kerningNextLetter) -- subtract it from the frame's size, not the actual letter label's size because we don't want to clip the letter
					end
				end
			end
		end
	end
	return newFrame
end

feed('№test test№').Parent = game:GetService('StarterGui'):WaitForChild('ScreenGui')
Section 4: Debugging
You might find that there is unappealing spacing between characters, or you might find weird positioning etc. This shouldn’t happen but in case, modifying is easily done thankfully because of how .fnt files are laid out. You must find the character’s code point (type print(utf8.codepoint('some character'), changing the some character to a character and from there you can change the properties of each character). See documentation of how each property is used.
Section 5: Documentation
Now, you might have noticed a table called “info” in the script, this is a table that contains information about the font, and about each glyph:
Legend:
(0/1): boolean, where 0 is false and 1 is true.
(u): unused
info.characterTable
Table of more tables containing information about each glyph. Inside of these sub-tables, contains more properties:
charId: character ID passed to utf8.char
x: X position of the grapheme inside of the character sheet
y: Y position of the grapheme inside of the character sheet
width: visual width of the grapheme
height: visual height of the grapheme
xOffset: distance from the left of the frame
yOffset: distance from the top of the frame
xAdvance: like the absolute width of the character, distance between the left of the current and left of the next character
page: for informative purposes (u)
chnl: for informative purposes (u)
fontInfo
Dictionary of information relating to the font
face: name of the true type font
size: the size of the true type font
bold: the font is bold (0/1) (u)
italic: The font is italic (0/1) (u)
charset: the name of the OEM charset used (when not unicode). (u)
unicode: set to 1 if it is the unicode charset. (0/1) (u)
stretchH: the font height stretch in percentage. 100% means no stretch. (u)
smooth: set to 1 if smoothing was turned on. (0/1) (u)
aa: The supersampling level used. 1 means no supersampling was used. (0/1) (u)
padding: the padding for each character (up, right, down, left). (u)
spacing: the spacing for each character (horizontal, vertical). (u)
outline: the outline thickness for the characters. (u)
info.kernings
Table indicating the space to subtract between each character (if any) where the index is the first character, and the value is a dictionary where the index is the second character and the value is the space in pixels to subtract
You can get the source here:


