In this tutorial, I will be showing you how to create useful trees in Blender for your own game. To do this, it is preferred to have a little bit of knowledge about Blender and Roblox Studio. But I tried my best to explain this to everyone.
Advantages:
- This will save lots of time when creating trees in general. I’ve seen people create trees manually and it takes way more time than just to simply generate a tree.
- The trees look realistic for not having any sort of texture.
- Better looking game and environment.
Disadvantages:
- Some difficulties like keeping the triangle count below 10k for the branch or leaves depending on how triangle-expensive your meshes are.
- Decimating a mesh is needed if there are too many triangles. This will eventually make the tree look worse but it Isn’t too bad.
Examples:
Step 1:
Make sure to install Blender v2.80 or above. In this tutorial, I will be using 2.80 since I’m not quite not sure how the newer versions look, but I doubt they are different.
Step 2:
Open up Blender, or to be more specific [blender.exe]. The file should be inside the folder that is installed. The program should look something like the image below.
Step 3:
Start by pressing the [del] button on your keyboard (delete button), which should delete the block in the center since we won’t be using it for this tutorial. You can also delete the block by doing: right-click → delete.

Step 4:
Point your mouse to the top left of the program and click [Edit] and then [Preferences], which should make a menu pop-up.

Step 5:
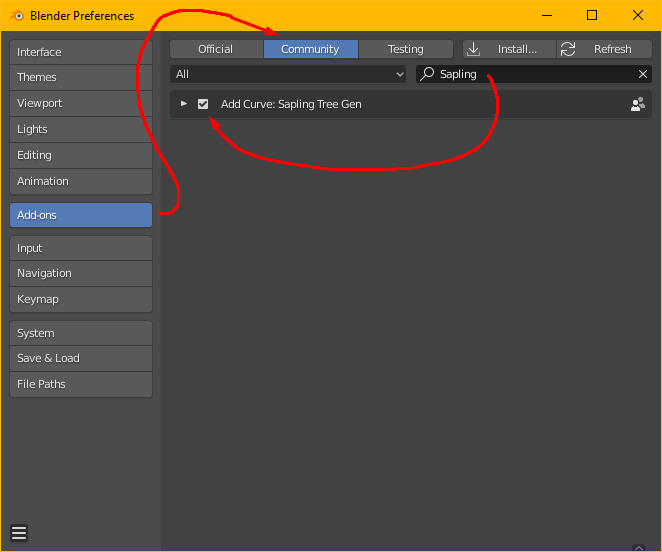
Click on [Add-ons] and then proceed to the top where it says [Community] and click it. Then at the top right side of the menu, you will be able to search: Sapling. Only one add-on comes up which is when you click on the empty square to enable it.
Step 6:
You can now safely exit the [Preferences] menu.
Step 7:
Proceed to click on the [Add] button on the top right side of Blender. Then click [Curve], and click on the last clickable button which is [Sapling Tree Gen].
Step 8:
A random tree should’ve now appeared after doing the previous step. You can now click on the button in the bottom left that says [Sapling: Add Tree].
Step 9:
A menu of changeable properties will now appear to the left and changing most of the values will change the appearance of the tree.
Step 10:
To prevent us from hitting 10k triangles immediately, I change [Curve Resolution] to 2. I also change [Handle Type] to Vector. You should now change properties in geometry and branch settings until you achieve a great branch structure.

Step 11:
We will now have to add leaves to the tree. To do that we go to [Settings] → [Leaves].

Step 12:
To get the leaves we check the box where next to [Show Leaves]. You can now change the properties until your leaves look good. The issue with this step is that it creates lots of Triangles, which won’t let us import it into Studio without being cautious of the triangles amount. Make sure to keep Triangles for the leaves and branch under [10,000] or [10k] each.
Step 13:
As you are done with the tree then you have to Select on the leaves mesh and click [Tab] on your keyboard or just click [Object Mode] in the top left and select [Edit Mode].
Step 14:
Click [A] (keyboard) to select every single vertex of the leaves. You can now click on [Face] → [Solidify Faces] which will solidify the leaves, which is needed to prevent invisible leaves in-game.
Step 15:
You can now choose the thickness of the leaves from the box that pops up. I used [0.015m] this time.
Step 16:
You can now get out of edit mode by clicking [Tab] or by clicking [Edit Mode] → [Object Mode].

Step 17:
The leaves will now probably be over [10k] triangles which means that we will have to decimate it. Go into edit mode like shown previously then select everything by clicking [A]. You now have to click on [Mesh] → [Clean Up] → [Decimate Geometry].
Step 18:
A box will pop up and we have to lower the Ratio property to get fewer triangles. I did this until the ratio became [0.435] and the triangle count became a little under 10k.

Step 19:
We are almost done in Blender. Get out of edit mode and select the Branch mesh/Tree root. [Right Click] then select [Convert to Mesh].
Step 20:
We now have to export the branch mesh and leaves mesh into Roblox. Firstly I select the Branch/root mesh and click [File] → [Export] → [Wavefront (.obj)] because that is a mesh type that Roblox supports.
Step 21:
Select a location where you want the mesh files to end up. I select Desktop and delete the mesh after it’s been imported into Roblox. Give the mesh a name.obj, then Select the unmarked box in the bottom right that says [Selection Only]. Lastly, we click [Export to OBJ] which is in the top right. Do the same with both meshes so you have the leaves mesh and (tree root/branches) mesh.
Step 22:
Open up Roblox Studio and select [MODEL], then click [Insert Object], then search [MeshPart] in the Insert Object menu and add two MeshPart’s into your game.
Step 23:
Select one of the MeshParts and click the Yellow Folder icon in the properties menu. Then find the location where you saved your meshes, select it, and click [Open]. Do this for the leaves and branches.
Step 24:
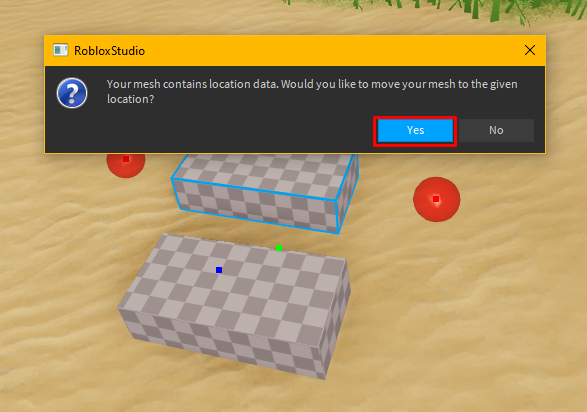
A pop up will show and you should definitely click [Yes].

Step 25:
After both meshes are added, then they should look like this. Select both meshes and click [CTRL + G] to group the meshes into a single tree.

Step 26:
Select the model and use the [Scale] tool to make the tree larger.
Step 27:
You should now color both meshes and give each its own material. First, hold [ALT] then select the Branch mesh. Give it a wood texture and brown color. Do the same with the leaves and give it the grass material and green color that fits with the grass.
Step 28:
Select both meshes from the model and click the [Anchor] in the top middle of your screen for both meshes.
Step 29:
I now get these realistic-looking trees for my island as you can see.


 That was it, I hope you understood!


