How to fully customize your tool using Motor6D! (Idle, unsheathing, multiple attacks, inspect animations and sound effects)


Firstly Id like to say thank you to these helpful resource right here:
please check this forum out since its great to also understand this forum here.
Tool 6D | Animate Tool Handles easily!


Hello this forum is a more explained and easier to understand version of the forum I pasted above. Again this forum will show you how to make a tool that is fully customizable to your liking, like in the title it will have an idle, unsheathing/pullout, multiple attacks (or one), and lastly an inspect animation to show off your tool.


The reason why Im making this is so that people who want to animate their tools and instead the handle/tool being stuck to your hand you can freely move it around.

SHOWCASE:

If you want to try out the tool yourself itll be here


Chapters

  • Chapter: 1 Setup an Animation Dummy with Motor6D and your tool
  • Chapter: 2 Animating
  • Chapter: 3 Configuring the Script
  • Chapter: 4 Inserting the Animations into the Tool
  • Summary: Testing

Lets get started.


Chapter: 1 Setup an Animation Dummy with Motor6D and your tool


Youre gonna want to go to the Avatar tab and go to the Rig Builder then youre either gonna get the R6 or R15 whichever one youre gonna do and make sure it is the Block Avatar because its easier to animate on there.


image
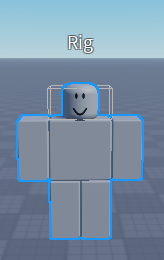
Im doing R6 for this case


After doing that youre gonna want to get your tool in this case im using this sword and putting it inside of the Rig Model THEN add Motor6D into the Rig aswell. Then after that youre gonna change some part about the Motor6D, firstly the part0 should be the part where you are gonna be holding the tool. So if you were holding the tool in your Right Hand, make sure the Part0 is the Right Hand. If it the Left Hand then make sure it is the Left Hand. etc… etc… Then your Part1 would be the Tool/Item.
MAKE SURE YOUR TOOL IS UNANCHORED

Now that youre done setting it up its time to move on into the next chapter


Chapter: 2 Animating


You can either animate in Moon Animator if you have that or just Animate with the normal roblox Animator. Youre gonna need to make an Idle, Inspect, Unsheathe/Pullout, and Two Attack Animations. Ill show you how to add more in the configuring script chapter.


Chapter: 3 Configuring the Script


Firstly youre gonna want to download this, what Im providing you is modified scripts of the forum that gave us this but I modified it for people to understand it better and just overall easier really.

Once youve downloaded it, it should be a model called “Modified Scripts UNGROUP ME”

BUT BEFORE YOU UNGROUP THIS
youre gonna have to put it inside of a tool, in the tool properties make sure that the “Require Handle” Property is set to false otherwise this wouldnt work at all.

then you are able to ungroup this, it should look like this.

image
image

to get your tool/item back just copy it from the Rig and paste it inside the tool.

Now were gonna go inside of the ServerMain script and scroll down until we find configuration.

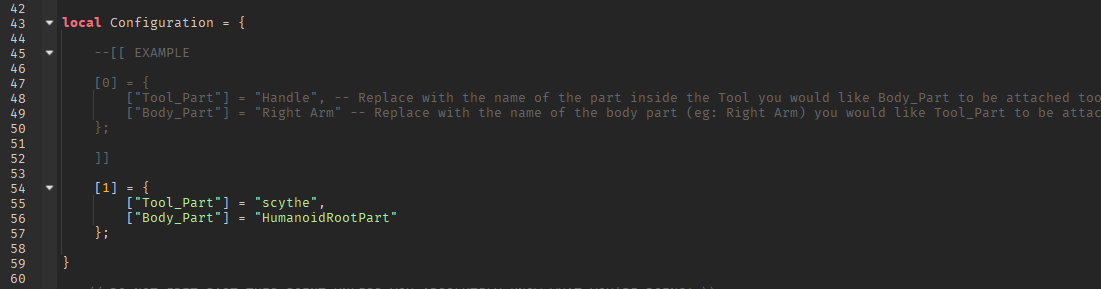
After that your Tool_Part should be the name of your Handle then the Body_Part should be the name of which your body is holding the Handle.

For example earlier I put the Motor6D Part0 as my Right Arm so Im the Body_Part it should be named Right Arm, and as for the Motor6D Part1 it was the scythe, and so the Tool_Part should be also named scythe.


After youve successfully configured the ServerMain Script were gonna go inside of the ServerMain Script and go into the LocalScript.
image

In here the only thing you really need to change is the handles name.
image

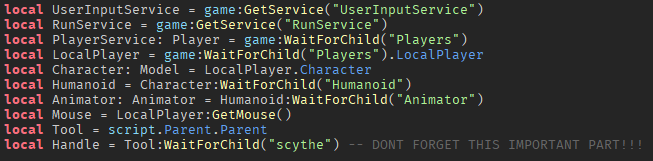
This is to ensure that this is the right handle.


Chapter: 4 Inserting the Animations into the Tool


The last and a bit important chapter youre gonna take all of your Animations and replace the Animation IDs inside of the Animations Folder
image

PLEASE REPLACE ALL OF THEM.


Summary: Testing


See if it worked, if something is wrong make sure to reread all of the steps and importantly dont forget to turn off the “Require Handle” property inside of your tool.

8 Likes

Hey there, I’m happy to see that you like my tutorial! I just wanted to let anyone know who is possibly reading this post that I’ll be making an update to the script I made, making it more modular. I don’t exactly have an ETA, but trust me, it will be way more friendly than the current setup!

4 Likes

Hey thank you for responding, I tried making the scripts easy to understand as I made in my tool but I still dont really know what Im doing for the most part, Im bunching stuff up together in hopes it works, and im glad it did work honestly.

4 Likes

Oh, I’d like to inform you that the tool link appears to be private, so no one can actually look at what you’ve made. Not sure if this was intentional.

image

1 Like

Oh shoot how do I make it public?

1 Like

ive reedited the tool see if its public now?

3 Likes

this topic is probably gonna get taken down considering the fact this is no tutorial nor resource, just leaving my message here

1 Like

woah i just opened this. so basically this helps to animate the tools, but does it with like a script or something

1 Like

Yea read the forum Ive pasted from above, and yes it basically solves the problem of your tool being fully animatable instead of being stuck to your hand

1 Like

I do want to suggest something to make the point of this forum post more specific to a particular issue:

People might get confused on whether or not you’re talking about my Tool 6D script that is located inside the Scythe, or the Animation code.

I’m assuming this post is showcasing the tools ability to have combos with animations, so you could rewrite this post in a way that explains how to do that. I’m fine with you using my script in this resource, but I do feel it should be made more clear what this is exactly trying to solve.

Good luck with the Motor6D journey, however!

1 Like

hey if you dont mind I recently just changed the forum and would like feedback on whether or not my explainations were helpful!

2 Likes

It’s definitely a lot better, though I would suggest making the model on the link public again as it’s inaccessible. Users could refer to my tutorial if they want to setup the motors, as that was already explained in that post.

Also I’m still a little confused on how the script you made is playing the animations, as that isn’t explained much, and it seems that is what this topic is for. Other than that, it’s better than before!

1 Like

Also to add something to add to this tutorial:
You can create a JointHandle that uses WeldConstraints instead of motor6d between tool and character, Now you can add an AnimationController in it with an Animator object, it can more animate small details tho!

2 Likes

No I don’t recommend separate animation runners in tools rather than using the Humanoid’s Animator itself. What’s a JointHandle? Why Welds instead of Motor6Ds to animate?

As Motor6D are those joints that are animated using Animator, and if two animators are present in an assembly of Motor6Ds then only one of them would work, If we use WeldConstraints to connect tool and Actual character, We can divide the assembly into 2 parts, one of them that is present by default in character and other Present inside AnimationController of that tool.

I see now, but I still recommend using the Humanoid’s Animator with a connected Motor6D for playing tool animations.

This is not the only method; Connecting a Motor6D to the HumanoidRootPart allows tools or any kind of mesh to be animated alongside the character, but it won’t rotate relative to another part. You can keep connecting Motor6Ds onto parts and create parent chaining that effectively gives you a lot of creative room without the need of WeldConstraints. Just thought I’d put that out there!

2 Likes