How to make in-game Cameras that can take photos

A few people has asked me how I made a camera function in Roblox (https://twitter.com/EjoTheDev/status/1189920983429394433?s=20), So I decided to post a tutorial on how I made it here (For educational purpose).

Disclaimer: Please keep in mind that I am still quite new to scripting, and my ways may not always be the best, but I am doing my best.

Step 1:

Start by setting up the brick where the objects you want to take a photo of should be. To make it simple, I have just made a big grey block and set the transparency to 0.8. I have named this part “CameraFocus” to make it easier to find later on.

Step 2:

Add the screen where the photo should be shown. To do this, simply put a part in the workspace, change the size of it to whatever you like, and then put it somewhere suitable. I have named the screen “Display”.

Step 3:

Add a model of a camera. It isn’t necessary to do this to take the photo, but I place it in here so that the player, as well as the developer, has a reference of the direction where the photo will be taken. I have named the camera model in this tutorial “Camera”.

Step 4:

You can trigger the camera with anything you would like, but for the purpose of this tutorial, I have just made a small little red button model. Like with the other parts, I have named this model “Button”, and the red part that you will press “RedPart”.

Step 5:

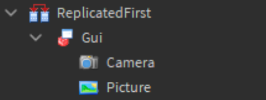
Place a SurfaceGui in ReplicatedFirst. After you have done that, set the Adornee to the display (The part you created in Step 2). I named this “Gui”

Step 6:

Insert a ViewportFrame inside the SurfaceGui. For the simplicity, I reccomend that you name it “Picture”. After that, change the Size to {1, 0},{1, 0}. This will make so that the picture is shown on the whole display, and not on just a small part of it.

Step 7:

Now, we gotta place the Camera from which angle the picture should be taken.

The best way to get the right angle of the Camera is to zoom inside the Camera model before you copy the Camera instance from Workspace.

When you have done that, copy and paste the Camera (I don’t mean the Camera model, I mean the camera that you are using. You find this in the Workspace where it is simply called Camera.) inside of the SurfaceGui.

Step 8:

Now set the ViewportFrame’s “CurrentCamera” to the Camera you just placed inside the SurfaceGui. This will make so that the ViewportFrame uses that Camera to display the picture for the Players.

It should all look something like this:

image

We have now set up all the necessary parts for the scene. Time to start looking into scripts.

Step 9:

Insert a ClickDetector inside the Buttons “RedPart”. This will be the trigger for the Camera.

Step 10:

Make a Script and put it inside of the “RedPart”. Inside the Script, you type this:

local CameraAngle = script.Parent.Parent.Parent.CameraFocus --This is the zone where the objects will be cloned
local Region = Region3.new(CameraAngle.Position - (CameraAngle.Size/2), CameraAngle.Position + (CameraAngle.Size/2)) --The region of the Camera Focus

script.Parent.ClickDetector.MouseClick:Connect(function()
	wait(3)
	for i, v in pairs(workspace:FindPartsInRegion3(Region, nil, 1000)) do  --Finds all parts in the region
		v:Clone().Parent = game.ReplicatedFirst.Gui.Picture --Clones every object into the picture
	end
	
	wait(2)
	for _, Player in pairs(game.Players:GetPlayers()) do -- The loop that makes the picture visible for all players in the game
		local Copy = game.ReplicatedFirst.Gui:Clone()
		Copy.Parent = Player.PlayerGui
	end
end)

Done! You have successfully created a working Camera!

Now this is the basic fundamentals to make the camera module. Players characters will not display correctly as no shirts or pants will be cloned, but to solve this, simply just change the script to this:

local CameraAngle = script.Parent.Parent.Parent.CameraFocus --This is the zone where the objects will be cloned
local Region = Region3.new(CameraAngle.Position - (CameraAngle.Size/2), CameraAngle.Position + (CameraAngle.Size/2)) --The region of the Camera Focus

script.Parent.ClickDetector.MouseClick:Connect(function()
	wait(3)
	for i, v in pairs(workspace:FindPartsInRegion3(Region, nil, 1000)) do  --Finds all parts in the region
		if v:IsA("BasePart") and not v.Parent:FindFirstChild("Humanoid") then	
		v:Clone().Parent = game.ReplicatedFirst.Gui.Picture --Clones every object into the picture
		end
	end
	for c, Plr in pairs(game.Players:GetPlayers()) do
		Plr.Character.Archivable = true -- Makes sure that you can clone the Player
		local PlrCopy = Plr.Character:Clone() -- Clones the player
		PlrCopy.Parent = game.ReplicatedFirst.Gui.Picture --Inserts the player into the picture
		PlrCopy.Humanoid.DisplayDistanceType = "None" -- This is to remove the nametag so you can't see the name of the cloned object
	end
	
	wait(2)
	for _, Player in pairs(game.Players:GetPlayers()) do -- The loop that makes the picture visible for all players in the game
		local Copy = game.ReplicatedFirst.Gui:Clone()
		Copy.Parent = Player.PlayerGui
	end
end)

Now, this Camera function might not be optimal for games, but this should give you the basics to work with.

If you want to copy the model I made, then here’s the link to the place: Photo Studio - Roblox

WARNING: The ViewportFrame is not optimal for rendering, so it can easily become slow and bug when too much objects are in place. I have only tested with up to 6 characters, and 3 background objects, and that was already stretching it a bit, so don’t try to use this for pictures that contains lots of parts.

If you have any questions, feel free to send me a message or comment down below :smile:

Good luck!

100 Likes

Nice, this could be used for games that feature vaults like in super smash brothers

2 Likes

I have a problem, when you take a second picture there’s two of you instead of an entirely new picture. Is there any way to fix this?

2 Likes

You need to clear the viewport frame with ClearAllChildren(). What’s happening is that when you press the button, a copy of you is saved in it, and when you press it again, it copies and puts it in there again.

3 Likes

thank you! I hooked it up and it works PERFECTLY! I was stumped for a week on this, thanks for the help!

3 Likes

I actually did this because I wanted to make a very low frame rate camera, and it works fine! I just made a while true do on click so when you click it the security camera thing will work. Thanks a lot again!

1 Like

I am going to try to see if it will be able to work for a server instead of just locally.

3 Likes

I’m happy that you found it usefull, good luck :smile:

3 Likes

Wow dude, this is super cool! It’s gems like these that really widen my perspective to game possibilities - and sure, it takes some time for it to complete but still!

I have a question. So I’d love to be able to use this to make Image Gui elements from models, instead of taking a bunch of screenshots and cutting them out them manually. However, for a large number of models (I estimate I’ll need about 60-80) it might not be practical time-wise to take the snapshots while a loading screen is on.
Do you know a way I can save these images in Studio? I noticed that SelectionImageObject doesn’t change after the snap is taken.

2 Likes

(Sorry for late reply)

It’s a good question! Everytime you take a photo, the models will be saved in the Viewport (We could say that the viewport is a picture by itself), so if you want to save it down, simply just swap it with a new one and save the old one down to a folder

If you want a Viewport that can show all the models, you could simply just swap out the models inside of it, and they will be displayed as well (See the viewport as a seperate workspace)

I hope that answers your question! :smiley:

1 Like

Whenever it takes the picture, my character falls through the floor. Can anyone help?

3 Likes

Thanks, this really helped me out
I made some changes though, here’s how mine works now

local tele = 0

script.Parent.ClickDetector.MouseClick:Connect(function()
	script.Parent.ClickDetector.MaxActivationDistance = 0
	
	game.ReplicatedFirst.Gui.Camera:Destroy()
	game.Workspace.Camera.CameraType = Enum.CameraType.Scriptable
	game.Workspace.Camera.CFrame = game.Workspace.CameraModule.Cameramodel.ori.CFrame --ori is the main camera part
	local camthing = game.Workspace.Camera:Clone()
	camthing.Parent = game.ReplicatedFirst.Gui
	game.ReplicatedFirst.Gui.Picture.CurrentCamera = camthing
	game.Workspace.Camera.CameraType = Enum.CameraType.Custom
	
	game.ReplicatedFirst.Gui.Picture:ClearAllChildren()
	for _, Player in pairs(game.Players:GetPlayers()) do
		if tele == 1 then
			Player.PlayerGui.camt:Destroy()
		end
	end
	
	for i, v in pairs(game.Workspace:GetChildren()) do
		if v:IsA("BasePart") and not v.Parent:FindFirstChild("Humanoid") and not v:IsA("Terrain") and v.Parent ~= game.Workspace.CameraModule.Cameramodel then	
		v:Clone().Parent = game.ReplicatedFirst.Gui.Picture
		end
	end
	for c, Plr in pairs(game.Players:GetPlayers()) do
		Plr.Character.Archivable = true
		local PlrCopy = Plr.Character:Clone()
		PlrCopy.Parent = game.ReplicatedFirst.Gui.Picture
		PlrCopy.Humanoid.DisplayDistanceType = "None"
	end
	
	for _, Player in pairs(game.Players:GetPlayers()) do
		local Copy = game.ReplicatedFirst.Gui:Clone()
		Copy.Name = "camt"
		Copy.Parent = Player.PlayerGui
	end
	tele = 1
	wait(5)
	script.Parent.ClickDetector.MaxActivationDistance = 32
end)

One major difference in mine is that it copies the entire workspace, generally not a good thing to do, but I haven’t encountered any problems with it yet, I might use the Region3 method instead if I run into problems. You really helped me out, thank you for making this tutorial :+1:

2 Likes

changed again, it now works as a tool and can be used by multiple players and multiple displays (displays have been moved onto the camera itself)!

local tele = 0

script.Parent.Parent.Activated:Connect(function(plr)
	
	game.ReplicatedFirst.Gui.Camera:Destroy()
	game.Workspace.Camera.CameraType = Enum.CameraType.Scriptable
	game.Workspace.Camera.CFrame = script.Parent.Parent.lens.CFrame --"lens" is... well... the lens... what else did u expect?
	local camthing = game.Workspace.Camera:Clone()
	camthing.Parent = game.ReplicatedFirst.Gui
	game.ReplicatedFirst.Gui.Picture.CurrentCamera = camthing
	game.Workspace.Camera.CameraType = Enum.CameraType.Custom
	
	game.ReplicatedFirst.Gui.Picture:ClearAllChildren()
	for _, Player in pairs(game.Players:GetPlayers()) do
		if tele == 1 then
			Player.PlayerGui.camt:Destroy()
		end
	end
	
	for i, v in pairs(game.Workspace:GetDescendants()) do
		if v:IsA("BasePart") and not v.Parent:FindFirstChild("Humanoid") and not v:IsA("Terrain") then	
		v:Clone().Parent = game.ReplicatedFirst.Gui.Picture
		end
	end
	for c, Plr in pairs(game.Players:GetPlayers()) do
		Plr.Character.Archivable = true
		local PlrCopy = Plr.Character:Clone()
		PlrCopy.Parent = game.ReplicatedFirst.Gui.Picture
		PlrCopy.Humanoid.DisplayDistanceType = "None"
		PlrCopy.CameraTool:Destroy()
	end
	
	for _, Player in pairs(game.Players:GetPlayers()) do
		local Copy = game.ReplicatedFirst.Gui:Clone()
		Copy.Name = "camt"
		Copy.Parent = Player.PlayerGui
		Copy.Adornee = script.Parent.Parent.dis --"dis" is the display part
	end
	tele = 1
	wait(5)
end)
1 Like

Try to anchor the players HumanoidRootPart, that should fix it :smile:

I’m happy to hear that you found it usefull :smile:

1 Like

thank you so much for your feedback its now working without falling through the ground :smiley:

1 Like

nevermind i tried it again now and it seemed to do it again, it could have something to do with server lag. any ideas if i could switch to client?

You could try to make the image on each client, but I don’t know how it would affect performance unfortunately. It seems odd that they would just fall to the ground, are you sure you properly anchored all of them?

I was anchoring the humanoid root part from the player copy variable.

(also switched to local player but now it doesnt appear on screen)

Are you running this in a localscript placed in workspace? I believe you need to redo most of the script for the player itself