A few people has asked me how I made a camera function in Roblox (https://twitter.com/EjoTheDev/status/1189920983429394433?s=20), So I decided to post a tutorial on how I made it here (For educational purpose).
Disclaimer: Please keep in mind that I am still quite new to scripting, and my ways may not always be the best, but I am doing my best.
Step 1:
Start by setting up the brick where the objects you want to take a photo of should be. To make it simple, I have just made a big grey block and set the transparency to 0.8. I have named this part “CameraFocus” to make it easier to find later on.
Step 2:
Add the screen where the photo should be shown. To do this, simply put a part in the workspace, change the size of it to whatever you like, and then put it somewhere suitable. I have named the screen “Display”.
Step 3:
Add a model of a camera. It isn’t necessary to do this to take the photo, but I place it in here so that the player, as well as the developer, has a reference of the direction where the photo will be taken. I have named the camera model in this tutorial “Camera”.
Step 4:
You can trigger the camera with anything you would like, but for the purpose of this tutorial, I have just made a small little red button model. Like with the other parts, I have named this model “Button”, and the red part that you will press “RedPart”.
Step 5:
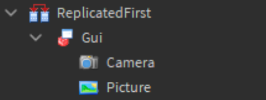
Place a SurfaceGui in ReplicatedFirst. After you have done that, set the Adornee to the display (The part you created in Step 2). I named this “Gui”
Step 6:
Insert a ViewportFrame inside the SurfaceGui. For the simplicity, I reccomend that you name it “Picture”. After that, change the Size to {1, 0},{1, 0}. This will make so that the picture is shown on the whole display, and not on just a small part of it.
Step 7:
Now, we gotta place the Camera from which angle the picture should be taken.
The best way to get the right angle of the Camera is to zoom inside the Camera model before you copy the Camera instance from Workspace.
When you have done that, copy and paste the Camera (I don’t mean the Camera model, I mean the camera that you are using. You find this in the Workspace where it is simply called Camera.) inside of the SurfaceGui.
Step 8:
Now set the ViewportFrame’s “CurrentCamera” to the Camera you just placed inside the SurfaceGui. This will make so that the ViewportFrame uses that Camera to display the picture for the Players.
It should all look something like this:

We have now set up all the necessary parts for the scene. Time to start looking into scripts.
Step 9:
Insert a ClickDetector inside the Buttons “RedPart”. This will be the trigger for the Camera.
Step 10:
Make a Script and put it inside of the “RedPart”. Inside the Script, you type this:
local CameraAngle = script.Parent.Parent.Parent.CameraFocus --This is the zone where the objects will be cloned
local Region = Region3.new(CameraAngle.Position - (CameraAngle.Size/2), CameraAngle.Position + (CameraAngle.Size/2)) --The region of the Camera Focus

script.Parent.ClickDetector.MouseClick:Connect(function()
	wait(3)
	for i, v in pairs(workspace:FindPartsInRegion3(Region, nil, 1000)) do  --Finds all parts in the region
		v:Clone().Parent = game.ReplicatedFirst.Gui.Picture --Clones every object into the picture
	end

	wait(2)
	for _, Player in pairs(game.Players:GetPlayers()) do -- The loop that makes the picture visible for all players in the game
		local Copy = game.ReplicatedFirst.Gui:Clone()
		Copy.Parent = Player.PlayerGui
	end
end)
Done! You have successfully created a working Camera!
Now this is the basic fundamentals to make the camera module. Players characters will not display correctly as no shirts or pants will be cloned, but to solve this, simply just change the script to this:
local CameraAngle = script.Parent.Parent.Parent.CameraFocus --This is the zone where the objects will be cloned
local Region = Region3.new(CameraAngle.Position - (CameraAngle.Size/2), CameraAngle.Position + (CameraAngle.Size/2)) --The region of the Camera Focus

script.Parent.ClickDetector.MouseClick:Connect(function()
	wait(3)
	for i, v in pairs(workspace:FindPartsInRegion3(Region, nil, 1000)) do  --Finds all parts in the region
		if v:IsA("BasePart") and not v.Parent:FindFirstChild("Humanoid") then
		v:Clone().Parent = game.ReplicatedFirst.Gui.Picture --Clones every object into the picture
		end
	end
	for c, Plr in pairs(game.Players:GetPlayers()) do
		Plr.Character.Archivable = true -- Makes sure that you can clone the Player
		local PlrCopy = Plr.Character:Clone() -- Clones the player
		PlrCopy.Parent = game.ReplicatedFirst.Gui.Picture --Inserts the player into the picture
		PlrCopy.Humanoid.DisplayDistanceType = "None" -- This is to remove the nametag so you can't see the name of the cloned object
	end

	wait(2)
	for _, Player in pairs(game.Players:GetPlayers()) do -- The loop that makes the picture visible for all players in the game
		local Copy = game.ReplicatedFirst.Gui:Clone()
		Copy.Parent = Player.PlayerGui
	end
end)
Now, this Camera function might not be optimal for games, but this should give you the basics to work with.
If you want to copy the model I made, then here’s the link to the place: Photo Studio - Roblox
WARNING: The ViewportFrame is not optimal for rendering, so it can easily become slow and bug when too much objects are in place. I have only tested with up to 6 characters, and 3 background objects, and that was already stretching it a bit, so don’t try to use this for pictures that contains lots of parts.
If you have any questions, feel free to send me a message or comment down below 
Good luck!


