Hey, I’m Zander,
Chapters:
- Chapter 1
- Chapter 2 coming soon!
In this tutorial, I will be covering three major aspects, deltaTime / RunService, lerping, and beziers. I have split the tutorial into its major parts, and then subsections within those.
I have tried my best to visualize what I am talking about through videos and images.
So how do we do it?
Our first concept is Delta Time.
Delta Time
We will be using Delta Time, in RunService.
Delta Time is the measurement of the time between two events, not specifically between frames, but in this scenario it is.
Imagine ROBLOX is running at a steady 40 frames per second

This means that the time in between each frame is 1/40 or 0.025 seconds, so deltaTime is 1/40 or 0.025 sec.
RunService8
So what does RunService have to do with this, as said on the wiki:
RunService also houses events that allow your code to adhere to Roblox’s frame-by-frame loop.
This means that if we want something to be as smooth as possible, we will update it every frame. Okay Great, but how do we do it. We will utilize the events of RunService:
- Heatbeat
- RenderStepped
- Stepped
Each of them has its own uses and abilities, which are explained in this handy diagram, (source)

I will be providing a little more depth on them here.
Heartbeat
Heartbeat
Heatbeat fires at the end of the frame rendering process. This means that it will not hold up anything else important before, this is normally your go-to if you don’t know which one to use, and it is a good replacement for “while waiting” loops such as while task.wait() do and while wait() do
Heartbeat has one parameter of delta time. You could use it like this:
local RunService = game:GetService("RunService")

RunService.Heartbeat:Connect(function(deltaTime)
	--Code with delta time
end)
or
local RunService = game:GetService("RunService")

while x > y do
	local deltaTime = RunService.Heartbeat:Wait()
end
RenderStepped
RenderStepped
RenderStepped is the first thing to be rendered, so only put something in here if it must be shown to the user quickly. An example of what you would put in here would be Camera Manipulation, where you control the user’s camera. However, if your code is slow, it will negatively affect you by making the rendering process slower.
RenderStepped also has one parameter which is delta time. You use it similarly to Heartbeat.
local RunService = game:GetService("RunService")

RunService.RenderStepped:Connect(function(deltaTime)
	--Code with delta time
end)
or
local RunService = game:GetService("RunService")

while x > y do
	local deltaTime = RunService.RenderStepped:Wait()
	--Code with deltaTime
end
Stepped
And finally
Stepped
Stepped also runs before physics, so you do not want to be putting anything too demanding here, that is what Heartbeat is for. Stepped takes two  parameters, (I know, amazing right)!
The first parameter is elapsed time, and the second is deltaTime, of course.
To demonstrate what the elapsedTime parameter does, if I run this piece of code:
local RunService = game:GetService("RunService")

RunService.Stepped:Connect(function(elapsedTime, deltatime)
	print(elapsedTime)
end)
It will output:
0.06666667014360428
0.13333334028720856
0.1666666716337204
0.17916667461395264
0.2458333522081375
0.3125000298023224
0.37916669249534607
0.40416669845581055
0.42500001192092896
0.491666704416275
0.5208333730697632
0.5375000238418579
0.5625000596046448
0.5833333730697632
Which is the elapsed time.
Using the deltaTime parameter we can make a simple timer, if we want the code to run for 2 seconds, then print “I’m done”.
We could do this:
local RunService = game:GetService("RunService") --Reference RunService

local currentElapsed = 0 --Create our current length variable
local timerLength = 2 --How long we want our timer to be, in seconds

print("Started") --Note when we start

while currentElapsed < timerLength do --When our current length is less that our timer leength
	local elapsedTime, deltaTime = RunService.Stepped:Wait() --Grab our deltaTime
	currentElapsed += deltaTime --Shorter version of saying currentElapsed = currentElapsed + deltaTime
end

print("I'm Done") --Mark end
And it is perfect!
![]()
They are exactly two seconds apart!
*Disclaimer, you could have done this with any of them, but I chose Stepped because it is the last and you would have a better grasp of it.
Lerping
“Lerp” is short for linear interpolate (/ interpolation), it returns a value between two objects at a decimal position. For example, if we have a green block and a red block, which will be our two points, and we have a blue box which we will move.

Where the red block is exactly 20 studs in front of the green. So let's use the :Lerp() function, Lerp takes 2 parameters, along with the original CFrame:
CFrame:Lerp ( CFrame goal, number alpha )
The first CFrame will be our green block, the second CFrame will be our red block, and the alpha will be the position between them. For example, if we wanted it to be exactly halfway, we would make our alpha 0.5, but if we want it one quarter through, we would make it 0.25.
To move the blue part a quarter way to the red block, we would do this:
First, define variables:
local greenBlock = workspace:WaitForChild("GreenBlock")
local redBlock = workspace:WaitForChild("RedBlock")
local blueBlock = workspace:WaitForChild("BlueBlock"))
Then we Lerp() it.
blueBlock.CFrame = greenBlock.CFrame:Lerp(redBlock.CFrame, 0.25)
And the result…

What happens if we want to move it slowly from green to red? Let’s use a loop.
To ensure a smooth loop, let’s count from 1 to 100 so you won’t see it teleporting and it gives the effect that it is gliding.
Let’s use a for loop:
You might think this is how we do it:
for i=0, 1, 0.01 do
	print(i)
end
However there is a very important error here.
Floating points will mess it up:

As we can see, it does not go up to 1, only 0.9900000000000007, this is because it wants to add another 0.01 but it can’t because that means the value would be over 1, which was our final endpoint. This is due to floating-point errors. You may think it is insignificant, but when you do operations on larger scales, a small decial error can case big changes.To overcome this, we will use fractions:
for i=0, 100, 1 do --We will be using an increment of 1, counting from 1 to 100
	print(i/100) --We divide our result by 100 to get the exact value
end
And wow! 

Perfect!
So now we can get to smoothly moving the part:
local greenBlock = workspace:WaitForChild("GreenBlock")
local redBlock = workspace:WaitForChild("RedBlock")
local blueBlock = workspace:WaitForChild("BlueBlock")

for i=0, 100, 1 do
	blueBlock.CFrame = greenBlock.CFrame:Lerp(redBlock.CFrame, i/100) --We lerp the blue block with our number in the loop
	task.wait() --Let's wait one frame.
end
The result…

Okay, so now, let's make projectiles, or the less glorious, synchronized moving parts.
We can return to our blocks which we used earlier!
Say you wanted to move the blue block, 20 studs forward to the red block from the green block, and we want it to take 1 second.
(I placed the blue block on top of the green block just so we know where it is and it isn’t blocking our view of the green block.

*The green part is Position 0,0,0 ; I moved the baseplate down.
We will make a local script and start scripting!
Let's start by defining our variables and services, which will be similar to the timer we made earlier:
local RunService = game:GetService("RunService")

local greenBlock = workspace:WaitForChild("GreenBlock")
local redBlock = workspace:WaitForChild("RedBlock")
local blueBlock = workspace:WaitForChild("BlueBlock")
local currentElapsed = 0
local moveTime = 1 --The total time which we want it to take
Then we want to create our loop that runs when the current elapsed time is less than more time, this means that every frame, we check if the total time that has been accumulated is greater than our total time which we allow, so the frame it goes over the total time, we end the loop.
while currentElapsed < moveTime do
	currentElapsed += RunService.Heartbeat:Wait() --Adding the delta time
end
This will loop for exactly one second, but how do we move the part?
The way it works is that we will grab the fraction of how far we have taken and apply that to the decimal, we will update our code to this.
while currentElapsed < moveTime do
	currentElapsed += RunService.Heartbeat:Wait()
	blueBlock.CFrame = greenBlock.CFrame:Lerp(redBlock.CFrame, currentElapsed/moveTime)
end
So what we are doing now, is we are getting the fraction of the current elapsed time over the total time which we want it to take. For example, if we have been running for 0.5 seconds, and the total time is 1 second. The fraction would be 1/2, so the part would have moved exactly half of the distance.
The result…
Works perfectly?
No, there is one small issue. If we print out the incremented fraction we get this:

It goes over 1 which means the part is going a little too far. To fix this, we should cap the number at 1, we can use math.min
math.min chooses the lowest number which is supplied to it.
So if we printed:
print(math.min(0.1, 1))
--It would print 0.1
But if we printed:
print(math.min(1.1, 1))
-- It would print 1
Now we can change our code to include this:
local RunService = game:GetService("RunService")

local greenBlock = workspace:WaitForChild("GreenBlock")
local redBlock = workspace:WaitForChild("RedBlock")
local blueBlock = workspace:WaitForChild("BlueBlock")
local currentElapsed = 0
local moveTime = 1

while currentElapsed < moveTime do
	currentElapsed += RunService.Heartbeat:Wait()
	blueBlock.CFrame = greenBlock.CFrame:Lerp(redBlock.CFrame, math.min(1, currentElapsed/moveTime))
	print(math.min(1, currentElapsed/moveTime))
end
And in our output we get:

Which is exactly what we want. 
Bézier Curves
Bézier curves are a type of curve that are very popular among developers. The type of bézier curves which we will be looking at are quadratic bézier curves, but it is easy to use cubics or quartics.
A quadratic bézier uses three points, the first and last being the endpoints of the curve, and the second makes the curve.
Nearly always, the second point is not touching the curve.
On the (now deprecated  ) developer hub, they provide some good images and gifs.
Here is an image of the curve:
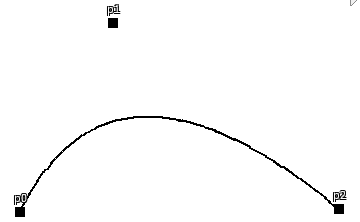
As you can see, P1 is influencing the line a lot, but the line doesn’t touch it.
Here is a gif of how a curve is made:
Here is the way it works, as we learned earlier, we can lerp between two points. And that is what is happening here, a point between P0 and P1 is being lerped with the t (for time) as the time value, which simultaneously a point between P1 and P2 is being lerped, with the same t value as the point between P0 and P1. And between those two points, we draw a line, which is the green line in the gif. and between the start and end of that green line, we lerp again, with the same t value. This makes a beautiful curve which we will be using.
As stated on the Dev Hub, there are two main which you could be using, I will be showing you both and you can make your own judgment on which one you want to use.
- The first way is simpler and easier to get your head around.
- The second is used more widely and it is shorter
Method 1
We will be making our own lerp function, which is easier than you think. It looks like this:
function lerp(a, b, t)
	return a + (b - a) * t
end
- t is the time reference
- a and b are our points
To understand it, we can make a theoretical example. Let’s imagine we have two points on the X-axis,
We will say point a is at (4) and point b is at (8), both points on the X-axis, and we want to lerp exactly halfway through:
Here are our values:
- a = 4
- b = 8
- t =0.5
Our code
return a + (b - a) * t
And when we plug in our values:
return 4 + (8 - 4) * 0.5
And using BIDMAS (BODMAS, PEMDAS, whatever you call it, order of operations. We can simplify it to:
return 4 + (4) * 0.5

--Which turns it into

return 4 + 2
Which returns 6 ; exactly halfway through our points.
So now we move on to bringing these lerps together, as we saw earlier, make the bezier by lerping the lerps we made, so let’s write some code:
function lerp(a, b, t)
	return a + (b - a) * t
end

function quadraticBezier(a, b, c, t)
	local point1 = lerp(a, b, t)
	local point2 = lerp(b, c, t)
	local calculatedPoint = lerp(point1, point2, t)

	return calculatedPoint
end
For reference, if we look at our gif again:

The start of the green line (on the left side) is point1 and the end is point2
And the black dot is calculatedPoint.
Now we can return to our blocks earlier!

We have a yellow brick which we will be moving to show the bezier.
And by using photoshop, we can get an estimate of where the yellow brick will be if we lerp the bezier halfway (t = 0.5):

So let’s plug in the code:
Define the variables:
  local blueBlock = workspace:WaitForChild("blueBlock")
  local greenBlock = workspace:WaitForChild("greenBlock")
  local redBlock = workspace:WaitForChild("redBlock")
  local yellowBlock = workspace:WaitForChild("yellowBlock")
Make the lerp function:
function lerp(a, b, t)
	return a + (b - a) * t
end
Make the bezier function:
function quadraticBezier(a, b, c, t)
	local point1 = lerp(a, b, t)
	local point2 = lerp(b, c, t)
	local calculatedPoint = lerp(point1, point2, t)

	return calculatedPoint
end
And execute the code:
yellowBlock.Position = quadraticBezier(greenBlock.Position, redBlock.Position, blueBlock.Position, 0.5)
The results…

Right on the dot!
Method 2
This method is much shorter and just is one equation:
If you want to learn more about it, you can read more about it here (gamedeveloper.com)
function quadraticBezier(a, b, c, t)
	return (1 - t)^2 * a + 2 * (1 - t) * t * b + t^2 * c
end
And we can execute the code: (The same as before)
yellowBlock.Position = quadraticBezier(greenBlock.Position, redBlock.Position, blueBlock.Position, 0.5)
The results…

And it works as expected.
(Although it’s not as fun  )
)
Now to bring it all together
Let’s say we want to move a part in a curve at the same time for every client.
If you haven’t guessed already, we will be doing this:
- On server, we FireAllClients() with our parameters
- On clients, we make our Runservice lerp loops with beziers.
When the user touches the gray block, we want the yellow block to take two seconds to lerp from the green to blue in a bezier curve,

Simple enough right?
Let’s start by making the server, (a script that is a child of the gray part).
local remoteEvent = game:GetService("ReplicatedStorage"):WaitForChild("bezierEvent")

local notRunning = true
script.Parent.Touched:Connect(function()
	if notRunning then
		notRunning = false
		remoteEvent:FireAllClients()
		task.wait(3)
		notRunning = true
	end

end)
We want a quick debounce so we get some nice results.
Simple.
Then let's move on to the not-so-simple client.
1. Define variables:
local RunService = game:GetService("RunService")
local event = game:GetService("ReplicatedStorage"):WaitForChild("bezierEvent")

local blueBlock = workspace:WaitForChild("blueBlock")
local greenBlock = workspace:WaitForChild("greenBlock")
local redBlock = workspace:WaitForChild("redBlock")
local yellowBlock = workspace:WaitForChild("yellowBlock")
2. Create lerp functions (I will be using method 1)
function lerp(a, b, t)
	return a + (b - a) * t
end

function quadraticBezier(a, b, c, t)
	local point1 = lerp(a, b, t)
	local point2 = lerp(b, c, t)
	local calculatedPoint = lerp(point1, point2, t)

	return calculatedPoint
end
3. Create event necessary variables inside:
event.OnClientEvent:Connect(function()
	local currentElapsed = 0
	local moveTime = 2
end)
4. Plug in our functions:
while currentElapsed < moveTime do
		currentElapsed += RunService.Heartbeat:Wait()
		yellowBlock.Position =  quadraticBezier(greenBlock.Position, redBlock.Position, blueBlock.Position, math.min(1, currentElapsed/moveTime))
end
The results… 


So that’s the essentials, here is another slightly more complex example of something you could do with it, a while ago I scripted a boomerang using this method:

If you are reading this, thank you so much for taking the time to reach this point in my tutorial. If you have any questions / constructive criticisms / requests, please add a comment with them and I will try and respond as quickly as possible!
- 1
- 2
- 3
- 4
- 5
- 6
- 7
- 8
- 9
- 10
0 voters
- 1
- 2
- 3
- 4
- 5
- 6
- 7
- 8
- 9
- 10
0 voters
- Yes
- No
- No (Because I am not a scripter)
0 voters
Thanks again for reading and doing the poll 
- Zander
