This is a tutorial on how to use the Dialogue Maker.
The toolbar button
Currently, Dialogue Maker only has one button: the Edit Dialogue button.

This button creates Dialogue Maker-related scripts and opens the Dialogue Maker GUI. You can only press it after selecting a model.
The scripts
DialogueClientScript
After pressing the Edit Dialogue button, the plugin should’ve created a LocalScript in the StarterPlayerScripts service named “DialogueClientScript”. This script allows the player to receive, read, and interact with the dialogue the server sends it.
DialogueServerScript
The plugin should’ve also created a Script in the ServerScriptService named “DialogueServerScript”. This script handles conditions and action scripts and sends dialogue to the client.
The GUI
After creating the scripts, the Dialogue Maker GUI should open.
The GUI buttons
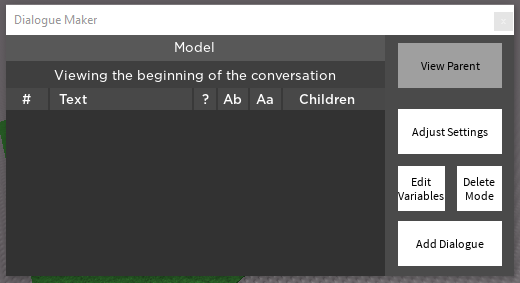
Add Dialogue
This button creates a new message and places it on the current directory you’re viewing.

You’ll be able to edit its priority (under the # label), text, condition, scripts that run before and after the message, and other messages, responses, and redirects you put into its children.
Turning the message into a response (and vise versa)
You can turn the message into a response by right-clicking the priority number, which will turn the message green. This will make the conversation more interactive!

You can turn it back to a normal message by right-clicking the priority number again, which will make it lose its green background.
Turning a message into a redirect (and vise versa)
You can also turn the message into a redirect by right-clicking its text, which will turn the message blue. Instead of putting text like a message or a response, you need to type the full priority number of the message you want the redirect to point to. (Note: You cannot redirect to a response.)

To turn it back to a normal message, all you have to do is right-click its text again.
Edit Variables
This button opens the “DefaultVariables” ModuleScript for the NPC you’re editing. This script is located in the DefaultVariables folder of the DialogueServerScript.
Delete Mode
This button toggles delete mode. If delete mode is enabled, the button will be red. Otherwise, it will be white.
After enabling delete mode, you can remove messages from the dialogue list by pressing its priority number.

A confirmation box should cover the message asking you if you want to delete it.

Adjust Settings
This button opens a script containing NPC-specific settings. There are comments along with the settings that explain what they do.