How to use the FE gun kit (edited), and what it is

VIEWMODEL VERSION HAS BEEN UPDATED. THIS TUTORIAL DOES NOT MATCH THE NEW VERSION.


For a couple years now, the FE gun kit has been a go-to choice for most developers that like making FPS games.

Popular examples are: Randomizer, Ray’s Mod, and maybe more to come


What is it?


It’s a really flexible gun system that you can easily modify and add your own aspects to.

There are two versions; a viewmodel version and a roblox character version.
Here are some unmodified examples. They may look a little bland, but as I said, you can modify it to your likings.

Character example:


Viewmodel example:


How to install it


The FE gun kit is surprisingly simple to install.

  1. Insert the viewmodel or normal version
  2. Open the model in workspace
  3. Open contents, and drag all the contents of the folders to their respective services
  4. Modify and test it!

How to animate it


For actual animation, check out my other tutorial!

There are a couple of rules for animating the FE gun kit.

  1. Idle priority must be Movement for equip animations to work
  2. Fire, reload, and hold must be animation priority Action.
  3. The idle must be looped

When you have animated, publish them all and open your gun, double-click setting module, and change all the animationIDs to your animation’s ID.

Remember, users that have BTRoblox can download your animation, do NOT set your inventory to public!


Modifying the UI

The UI is very sensitive to changes and you can easily break it. So, I’ll show you how to properly do it.


Part 1: The Crosshair.


Summary

I will just be showing how to make it look more modern. There isn’t really a need for further modification, so I will make a stepped tutorial:

  1. Grab GunGUI from your gun’s GunScript_Local
    image

  2. Drag it to StarterGui

  3. Open it, and find Crosshair

  4. Open crosshair, open main, and change Center’s transparency to 1

  5. Set HL, HR, VD, and VU’s borderwidth to 0

  6. This is the result! A clean looking crosshair.
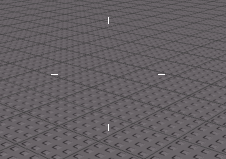
    image


Part 2: The Ammo Display.


Summary

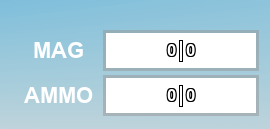
The ammo display looks like its from 2001, so let’s change that.

You can change the transparency of anything, but not the visibility as that might break things.

For example, I will make the transparency 1 on the Frame in GunGUI.

Before:
image

After:
image

That already looks a lot better. Now the font:

Before (font:arialbold):
image
After (font:code):
image

Criminality anyone? Now, that bar in the middle looks ugly, we can change it by making the Frame shown in the image background transparency 1, and use reclass to make it a textlabel.

image

Now copy all the properties over from your other texts.

Before:
image
After:
image

That is basically all you need to know to edit the UI!


Thanks for reading!


That concludes my tutorial. Please let me, or the owner of the gun kit know if you have any issues.

47 Likes

Look great! Keep it up man! :+1:

8 Likes

Tutorial Update:

Added a ammo display tutorial!

5 Likes

How can I add more weapons to this.

2 Likes

Simply duplicate the weapon and change its settings

For the viewmodel, you will have to go to replicated storage > misc > viewmodels and copy the viewmodel too

2 Likes

is there any way we can contact? I need some help. But I need to show you.

2 Likes

how would i add a viewmodel to edited :skull:

3 Likes

Hey, is there any way we can contact? Please message me in private message.

2 Likes

he left since July so it’s impossible to contact him

2 Likes

Hello, for some reason my guns bullets go through people and don’t damage them. Can I get help?

1 Like

Bruh How do I aim in third person

1 Like

Hello, I don’t know if you still respond to this, but I’ve just started using FE kit and im new to all this same goes to animation and scripting I’m more of a builder, so here’s my problem: I’ve imported my animations and all of that for my weapon (shotgun) first weapon ive done with FE but when i test play it all the animations glitch super fast so then I turned the Swaying and Bobbing to false in the scripts and it worked, but now when I try to turn left and right or up and down it keeps glitching like that super fast like the camera breaks or something. Hope you understood that (also amazing system thanks for editing it)

3 Likes

My question is why is there no option to change the trail color?

I dug through the script and I found a way to change it to red but for some reason there’s 2 trails and I only found 1 to change to red

1 Like

That’s because it is on the projectile, having that setting werent that necessary and would dump more spaces, you only have to edit the trail from the projectile a setting is set to

1 Like

I see, thanks, that was helpful, I have another question though if you don’t mind and if you might have the answer

How do you use the OnHitEvent/OnShootEvent/CustomShot modules, I modified the template + added their names in the settings script but nothing seems to happen.

Thanks

1 Like

They execute the module after it recognizes the name you are putting to the module and the setting, name also must be Case sensitive otherwise it returns to none, i also would clone the template and name it to whatever it is.

  • OnShoot triggers on server much like CustomShot event but keeps the projectile rendered on Client (OnClientShoot also does the same for client)

  • OnHitEvent triggers on server when it hits the humanoid only, anything listed in blacklist or blocked will prevent this event to fire

  • CustomShot removes the ability to fire projectile from the settings, This only rely on server so it triggers after each fire happens

1 Like

Another question is why is the gun I made able to fire through walls, whilst the default one cannot
I can’t tell any difference between the two that would make it so, I even made the GunFirePoint1 in the first one be 10 studs away and it still can’t shoot through a wall

By shooting through wall I mean I put the barrel in a part and the bullet fires whilst inside the wall and it goes through and hits something else

1 Like

Nvm, figured it out, apparently GunFirePoint attachment rotation matters when detecting if the gun is in the wall or not

1 Like

I want to clear crosshair. According to above tutorial
" 1. Set HL, HR, VD, and VU’s borderwidth to 0" What is HL, HR, VD, VU means?

1 Like

They are essentially a line frame from crosshair that separates in 4 directions in 2D dimensions.

2 Likes