Roblox only supports Normal, Roughness, Metallness, and Color maps through the surface appearance object. In this tutorial, we’ll not only be looking at how to get the right lighting and studio graphics settings for PBR, but also how to import additional maps, such as Displacement and Ambient Occlusion.
Difficulty level of this tutorial: Medium. There is some hand-holding, especially when it comes to blender. I tried to make this as step-by-step as possible.
END RESULT

Starting up
Step 1: Setting up your tabs (optional)
- Toggle explorer and properties so it looks like this

- Now set up your screen so it looks like this, or however you want it to


Step 2: Setting up lighting
-
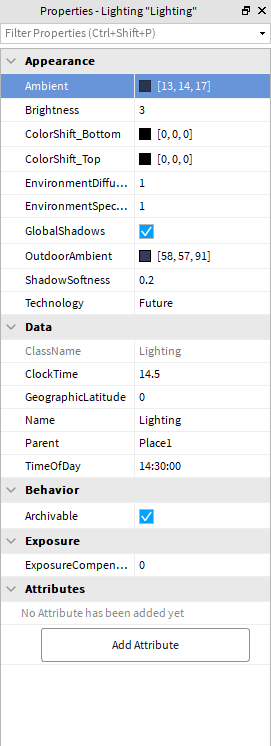
Select lighting in your explorer, and in the Properties tab, set your lighting settings like so:
Important settings:
- Ambient should be low; close to zero
- Outdoor ambient should be lowish
- IMPORTANT: Technology should be Future
- IMPORTANT: EnvironmentDiffuseScale and EnvironmentSpecularScale should be high; close to 1
- Everything else can be whatever you want
Step 3: Studio Settings
-
Go to file → studio settings (click it)

-
Now select rendering, and set Quality Level and Edit Quality level to 21. You can always set this slightly lower if your pc can’t handle it.

-
You will now get a message asking you to restart studio. Save, and click restart now


Importing & Choosing the texture
PSA: IF YOU HAVE TWO OPTIONS FOR NORMAL MAPS, GL OR DX, CHOOSE GL!

- I recommend following this tutorial by my friend which explains how to get a free pbr texture, and import the maps which Roblox Supports: Normal, Metallic, Roughness, and Color. In the rest of the tutorial, I’ll be covering how to import the maps which Roblox doesn’t handle for you; mainly Displacement and Ambient Occlusion
How to make your textures look 3D! PBR (Physics Based Rendering)


Hot, but it still doesn’t look like what we were promised:

This is because we still need to import the displacement and AO maps, which I will cover in the next section
Displacement map
Displacement maps are a technique where the actual geometry of an object is displaced, or moved along the surface normal, according to a black-and-white map. White pixels are pushed up and black pixels are flat. To import our displacement map, we will need to use Blender
-
Download blender and run the file you get. Follow the instructions to set blender up.
-
Open blender like so


-
If you have no idea how to use blender, I would recommend following tutorials to get the hang of it before continuing. You could also get a friend to help you.
-
Import your file/open your project
-
Select your model. Press tab, this brings you into edit mode. Press A to select everything. Right click → Subdivide. Right click–> subdivide.
-
Do this until you have tons of vertices: example:
(I’m doing this with a sphere, so I used a subdivision surface) -
Now add a displace modifier
-
Press new

-
now press the button to the right of the X

-
Almost done. You’re gonna click Open and select your image. *Protip: You can set the tiling of the image at the bottom


-
Set the strength property of the displace modifier to 0.2.
Result:
-
Now add a decimate modifier. This will reduce the amount of vertices we have while keeping the shape as accurate as possible. Set the Ratio to something small, like 0.1 – triangle count cannot be over 10,000
-
Now export your file like so
-
Create a meshpart and import it back to Roblox


Result:

Ambient Occlusion (AO)
Imagine rays of light being cast from the sun. They start bouncing around when they hit stuff. However, every time they hit, they lose a bit of energy. Eventually, the rays that bounce into your eyes are what you see. This is a VERY simplified model of raytracing.
Cavities are places where light may bounce into and get “trapped.” Because of this, you’ll see a soft shadow there. This is what AO, Ambient Occlusion maps, seek to replicate.
We’ll be using paint.net for this, but you can use any photo editor you like.
-
download paint.net if you want: getpaint.net
-
Open paint.net (
 )
) -
Open the colormap
-
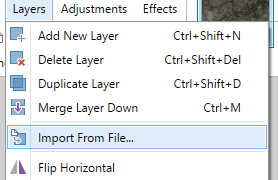
Layers → Import from file → choose the AO map
-
Press f4, and in the layer properties choose multiply

-
Export your image

-
Go to studio, select your model’s Surface Appearance texture, and import the new ColorMap


Make sure to leave a  if this helped. I’d love to see what you guys make using this!
EDIT: Added tiling to displacement texture
