How to convert different doors and more
If you are wondering how you can use different models with this system, well here you go!
(Just to let you know, this will have alot of images and it will be long.)
CHAPTER ONE/CONVERTING DOORS
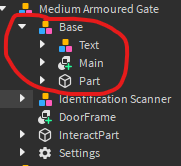
If you look into any of the already existing doors, you will find some core features.

Things you would want to keep:
- Settings
- InteractPart
- Base
You can delete the Frame if you want, but it is not mandatory. Now, for doors that are classified as gates, and not doors like this that have left and rights, this part will be fairly simple. We will get onto these doors below soon.
Now, take your model for your gate and name it “Main” if it is a mesh. If it is made up of multiple parts, you can either make it into a union or select a certain part and name it “Main” Make sure that something like this.

Once you have named it Main, find the two Sound objects called:
- DoorClose
- DoorOpen
Once you find them, place them into Main. You can also modify the sound of it, to whatever you want it to sound like. Without without these two, your door will not work.
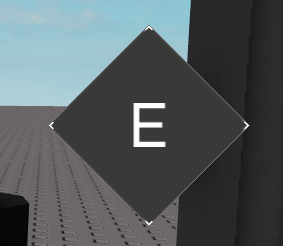
After that, find your InteractPart. It is where the popup will show. Inside of your InteractPart, you will also find two other Sound objects called, “Denied” and “Granted.” These are also mandatory to keep, and you can change the audio to whatever you like. You can also move it wherever you want.

It is not mandatory to keep the identification scanners, they are just for show.
Onto the Settings.

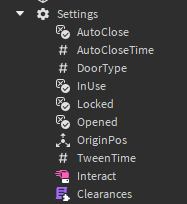
This is also one of the most importants things, since it holds all of the settings for your door. Do not delete anything, as it will affect your door. If you want to make something close automatically, or whatever, please enable the value or whatever.
But, there is a specific property that classifies the door as it is. “Door Type.” It should currently be “bdoor” since you’re using a gate, but you may have already configured it to your likings. This tutorial will go over on how to create your own type of door with the DoorType, but we will cover it later on.
Now, for the other types of doors that are not gates, these will be fairly the same, but just a little different. For these types of doors, you will need hinges. These make your doors move differently from the gate.
I would recommend building off of the original door, as it makes things easier. If you have questions about this, please ask me.
Same goes with this door.
CHAPTER TWO/CREATING DOOR TYPES
Once you have completed the chapter above, you are ready for this section.
Look into ServerScriptService and find “Door System.” There will be a ModuleScript parented to it which holds the door types.

Once you have opened it, look for the DoorDictionary. It holds the door types and how it opens.
If you want to a gate, a double door, or a sliding door, you can modify the bdoor for the gate, dsdoor for the sliding door, and dhdoor for the double door.
To modify the positions on how the doors go, you can modify this to your likings.
Just make sure to apply the name of the door type to the DoorType configuration in Settings.
CHAPTER THREE/CREATING CUSTOM RANK PROPERTIES
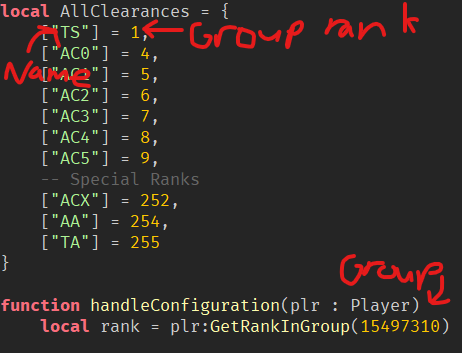
If you want to create custom group ranks, go find RankHandler. It is also inside of ServerScriptService. Make sure to just change the group id, the group ranks, and the name to your likings.

If you want to make it so that its just based on teams, you can use this script.
TeamRankHandler.rbxm (1.8 KB)
This is end of the tutorial! This is essentially my first time making a full on guide on how to do something, and if something is left out that you would like to mention, feel free! I am open to suggestions.


