Snap - An advanced grid placement class v1.2

@AwesomeAnemii @Lord_BradyRocks @desinied @pahreh619

Sorry had to make sure everything was working as intended and most feature were working properly which they are!

Module Release

12/11/2023

I’ve created a demo place for testing aswell, and the model link is public now!
If anyone has any questions about setting up please feel free to leave a comment!

5 Likes

Yeah currently it just doesnt support that right now, it just’s for placing any object on any side grid right now but, I am looking into make that actually possibly though in the future, thank you

2 Likes

No worries! Thank you for taking the time to make sure it worked as intended, you have my gratitude. It’s better to keep it off-sale with it not working, than leave it on-sale with it not working. :slight_smile:

I look forward to using your plugin! :smile:

3 Likes

So, is it now ready to be used?
and what about deleting the objects u placed, i dont think theres a way yet is there?

2 Likes

Yeah basically it is ready to use and has the basics but I still havent implemented deleting an object you’ve placed though… will probably get to that but I was having a hard to figuring out the easiet way since like when you place something the is and X and Y that is then associated to the structure you built, so i was thinking just having a function where you pass in the X and Y then itll check if it has a “structure” associated with it then itll find the buiding piece inside of your buildings folder that is inside of your plot but youd have to create your own way of retrieving those X and Ys though

3 Likes

Snap Setup Guide

Step 1.

Get the module from marketplace here

Step 2.

Once you have it drag it into ReplicatedStorage

Step 3.

Create your building pieces folder, you can put this in ReplicatedStorage aswell, this is all the models your game will have (make sure they are in models & named correctly)

Step 4.

image

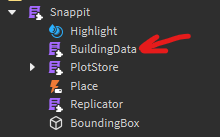
In the Snappit module go to the BuildingData module and then setup the tables for all your building models, they can just be the name and then an empty Dimensions table, like so

local module = {

   ["exampleModel"] = {
      Dimensions = {}
   },

   ["exampleModel2"] = {
      Dimensions = {}
   }

}
return module

Step 5.

Get your plot parts created, make sure they are even and the X and Z size, for example 16x16, 32x32, 64x64, 128x128

Once you have you plot plot created just put it inside of workspace, and thats it for this step

Step 6.

In a server script set the code up like this, I’m just using one plot for an example but, I setup the global setupinfo which says every plot in the game is 64x64 and the grid size of every plot will be 15x15, then I get the plot I created earlier and then setup info for that specific plot!

local Snap= require(game.ReplicatedStorage.SharedModules.Snap)
local buildingData = game.ReplicatedStorage.SharedModules.Snappit.BuildingData
local buildingPieces = workspace.buildingPieces

local setupInfo = {
   plotSize = 64,
   gridSize = 15,
   buildingPieces = buildingPieces,
   buildingData = buildingData,
   key_1 = "Structure",
   key_2 = "Occupied"
}

Snappit.init(setupInfo)

-- The plot that I have in workspace called "Plot"
local part = workspace.Plot
local plotInfo = {
   plot = part,
   canVisualize = true,
}

local plot = Snappit.new(plotInfo)

Step 7.

After you’ve created a plot object it has a function called :SetOwner, this takes in a Player and it will make the owner of that plot that player and it’ll create a grid and load if it finds data or create a blank one if it doesnt find grid data!

In your game you could possibly have something like a ProximityPrompt associated with that grid and when its interacted with you can pass the player to that plot objects :SetOwner function

Step 8.

Once you’ve got the owner of a plot set your pretty much ready to go! Now you can start using the client functions which dont take alot of explanation!

So in a StarterCharacterScripts, you can have something like this where you require the same Snap module like on the server, but you use the building functions associated with the client side version

(This is just an example but of course you can have UI buttons and when they are clicked they can run these functions aswell as keyboard inputs)

local Snap = require(game.ReplicatedStorage.SharedModules.Snap)
local UserInputService = game:GetService("UserInputService")

UserInputService.InputBegan:Connect(function(input, gpe)
   if input.KeyCode == Enum.KeyCode.F then
      Snap.EnterBuildMode()
   elseif input.KeyCode == Enum.KeyCode.E then
      local buildingPieces = game.Workspace.buildingPieces:GetChildren()
      local randomPiece = buildingPieces[math.random(1, #buildingPieces)]
      Snap.ChangeBuildingPiece(randomPiece.Name)
   elseif input.KeyCode == Enum.KeyCode.Q then
      Snap.ExitBuildMode()
   elseif input.KeyCode == Enum.KeyCode.R then
      Snap.Rotate()
   elseif input.KeyCode == Enum.KeyCode.X then
      Snap.Place()
   end
end)

And that’s about it, if you have ANY questions on the setup or having errors just leave them below and I will try my best to help you fix them!

7 Likes

Thank you for the instructions!

4 Likes

So uh, i had alot of errors, but i think i fixed them, im not sure too, and what do you mean by

so like, how to exactly do that?
i might sound stupid for not knowing how or idk, and im sorry for that, but i hope u understand and dont think that its a waste of time to help me.

I also still get errors like this:

ServerScriptService.Script:14: attempt to index nil with 'init'
buildingPieces is not a valid member of Workspace "Workspace" (that error multiple times)

buildingPieces is prob the items that players will be able to place? if so then ig i know how to fix that, but idk if “attempt to index nil with “init”” Does any error or just is there cuz its nil.

1 Like

So wait show me how your server script is setup, and by step 7 basically like I doubt unless like in your game you automatically have plots assigned to players on join the just like teleport them to the plot which I dont think you have basically usually in tycoons games or what have you like you have to touch something or interact with something for you to claim that plot of that makes sense

1 Like

server script? so the one in serverscriptservice right?
image

local Snap= require(game.ReplicatedStorage.Snappit)
local buildingData = game.ReplicatedStorage.Snappit.BuildingData
local buildingPieces = game.ReplicatedStorage.Items

local setupInfo = {
	plotSize = 16,
	gridSize = 4,
	buildingPieces = buildingPieces,
	buildingData = buildingData,
	key_1 = "Structure",
	key_2 = "Occupied"
}

Snappit.init(setupInfo)

-- The plot that I have in workspace called "Plot"
local part = workspace.Plot
local plotInfo = {
	plot = part,
	canVisualize = true,
}

local plot = Snappit.new(plotInfo)
2 Likes

Sorry I didnt reply soonr yeah the setup looks great do you have a part in workspace that is called “Plot”?

1 Like

yes i do
image

1 Like

The model is not listed on the Marketplace.

2 Likes

Nice job with the rotating placement grid!

Any chance Snap would support grid-intersection in the future? (Passing a table of parts, and, allowing rectangular hitboxes to be placed between multiple grids)

2 Likes

Do you have the building pieces folder inside of workspace?

1 Like

Yeah I have no clue what that is but the module is open source if you wanna take a stab at adding it, your more then welcome too

2 Likes

The Github page does not contain any Lua code, and the model is not listed on the Marketplace, could you please release this? It looks very interesting.


2 Likes

Ah it’s probably just my wording. This is what I’m trying to explain:


Placing in-between multiple aligned or unaligned placement grids

2 Likes

now yes, but error still there

1 Like

Send me the rbxl file so I can take a look its hard without actually seeing the game file

2 Likes