Snap Setup Guide
Step 1.
Get the module from marketplace here
Step 2.
Once you have it drag it into ReplicatedStorage
Step 3.
Create your building pieces folder, you can put this in ReplicatedStorage aswell, this is all the models your game will have (make sure they are in models & named correctly)
Step 4.

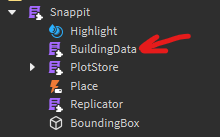
In the Snappit module go to the BuildingData module and then setup the tables for all your building models, they can just be the name and then an empty Dimensions table, like so
local module = {

   ["exampleModel"] = {
      Dimensions = {}
   },

   ["exampleModel2"] = {
      Dimensions = {}
   }

}
return module
Step 5.
Get your plot parts created, make sure they are even and the X and Z size, for example 16x16, 32x32, 64x64, 128x128
Once you have you plot plot created just put it inside of workspace, and thats it for this step
Step 6.
In a server script set the code up like this, I’m just using one plot for an example but, I setup the global setupinfo which says every plot in the game is 64x64 and the grid size of every plot will be 15x15, then I get the plot I created earlier and then setup info for that specific plot!
local Snap= require(game.ReplicatedStorage.SharedModules.Snap)
local buildingData = game.ReplicatedStorage.SharedModules.Snappit.BuildingData
local buildingPieces = workspace.buildingPieces

local setupInfo = {
   plotSize = 64,
   gridSize = 15,
   buildingPieces = buildingPieces,
   buildingData = buildingData,
   key_1 = "Structure",
   key_2 = "Occupied"
}

Snappit.init(setupInfo)

-- The plot that I have in workspace called "Plot"
local part = workspace.Plot
local plotInfo = {
   plot = part,
   canVisualize = true,
}

local plot = Snappit.new(plotInfo)
Step 7.
After you’ve created a plot object it has a function called :SetOwner, this takes in a Player and it will make the owner of that plot that player and it’ll create a grid and load if it finds data or create a blank one if it doesnt find grid data!
In your game you could possibly have something like a ProximityPrompt associated with that grid and when its interacted with you can pass the player to that plot objects :SetOwner function
Step 8.
Once you’ve got the owner of a plot set your pretty much ready to go! Now you can start using the client functions which dont take alot of explanation!
So in a StarterCharacterScripts, you can have something like this where you require the same Snap module like on the server, but you use the building functions associated with the client side version
(This is just an example but of course you can have UI buttons and when they are clicked they can run these functions aswell as keyboard inputs)
local Snap = require(game.ReplicatedStorage.SharedModules.Snap)
local UserInputService = game:GetService("UserInputService")

UserInputService.InputBegan:Connect(function(input, gpe)
   if input.KeyCode == Enum.KeyCode.F then
      Snap.EnterBuildMode()
   elseif input.KeyCode == Enum.KeyCode.E then
      local buildingPieces = game.Workspace.buildingPieces:GetChildren()
      local randomPiece = buildingPieces[math.random(1, #buildingPieces)]
      Snap.ChangeBuildingPiece(randomPiece.Name)
   elseif input.KeyCode == Enum.KeyCode.Q then
      Snap.ExitBuildMode()
   elseif input.KeyCode == Enum.KeyCode.R then
      Snap.Rotate()
   elseif input.KeyCode == Enum.KeyCode.X then
      Snap.Place()
   end
end)
And that’s about it, if you have ANY questions on the setup or having errors just leave them below and I will try my best to help you fix them!


