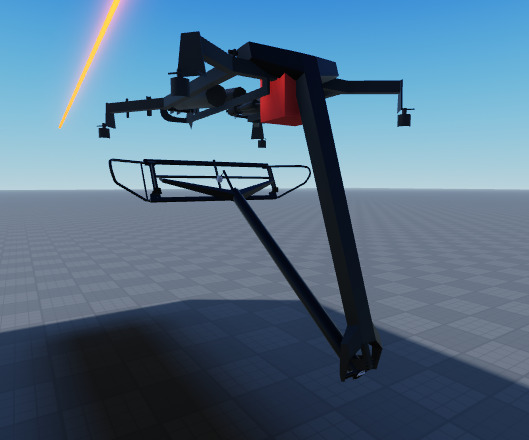
[SOLVED] Problem with pantograph

Hello! I am working on a pantograph for trains and for the pantograph I would like it to raise or lower depending on the height of the overhead wire that is above the pantograph, so far I’ve kind of got it to work but the issue is it doesn’t raise properly.

I believe the thing that is causing this issue is the calculations I’m using but I’m not sure what to change or do. I’m horrible at math so yeah very hard for me to do but anyways…

Here is a couple screen shots of what is happening:
If the wire and the pantograph is the same on the Z axis it’ll raise properly but if not it’ll either be too low or too high.

image
image
image

How it should be:
It should always be touching the wire no matter what the Z axis difference is.
image

This pantograph is controlled by 3 motors. 1 motor controls the lower arm, 1 motor controls the upper arm and 1 motor controls the pantographs hand.

In the image below, each green dot represents a motor.
Top dot - Hand
Middle dot - Upper Arm
Bottom dot - Lower Arm

Here is the code that controls the lower arm and upper arm. The coding for the hand works perfectly so I have removed that from below.

local RaycastResult = workspace:Raycast(OriginRay.Position, OriginRay.CFrame.UpVector * 20, raycastParams)

if RaycastResult then
	local Wire = RaycastResult.Instance
	local Distance = RaycastResult.Distance

	local LowerArmAngle = math.rad(-Distance * LowerArm.Size.Z)
	local UpperArmAngle = math.rad(Distance * UpperArm.Size.Z)

	LowerArm.Motor.C1 = CFrame.fromOrientation(LowerArmAngle / 2, 0, 0)
	UpperArm.Motor.C1 = CFrame.fromOrientation(UpperArmAngle, 0, 0)
end

I’ve tried a million different ways to get it to try raise properly but nothing will work so I’ve now came here for help.

Thanks to anyone that can help!

This was a repost due to lack of activity in the last post.

3 Likes

Hello, it’s been 12 hours and no one’s has replied and I really need to get this fixed as this has been an issue for months and I can’t figure it out so any help is appreciated!

2 Likes

Please elaborate on the issue, this is very confusing

1 Like

What part is confusing? I’ve given you images on what’s happening and how it should look. It should always raise enough for the hand to touch the wire

1 Like

I do not know how Motor6D works, so perhaps there is an easier, built-in way to do this. However, I think a way we can approach this is to force the second motor to always be in the middle, and have the bottom arm only reach half the distance. If that’s the case then we can use the sin law to be able to figure it out.

The arms can be seen as two separate triangles. Furthermore, both triangles have a known θ which would be 90. So to calculate the θ that the starting motor and the other motor need to be we can do the following formula:
image

Which can be narrowed down to the following:
image

Knowing this, we now have a full formula to calculate the angle of the first corner and the second:

local secondAngle = math.sinh(halfHeight/rodSize);
local firstAngle = math.rad(90) - secondAngle; --(Due to the properties of a triangle, where all sides need to add up to 180)

secondAngle *= 2 --We multiply this angle by 2 since the second motor is actually two triangles as seen on the diagram

With this in mind the arguments we need for this operation are:

  • The target height
  • The size of the bar

The code in its entirety would be:

local getAngle = function(targetHeight : number, size : number): number & number
	local secondAngle = math.asin(targetHeight * 0.5/size);
	local firstAngle= math.rad(90) - secondAngle;
	
	return firstAngle, secondAngle * 2;
end

This function will return both angles in radians. Now you just need to set the desired angle for the motor, which I think can be done via the DesiredAngle member that can be found in all Motor classes (you might need to transform the angle to world coordinates or the like, but I have no clue since I do not know how Motor6D instances work).

PS: The first angle is purple and second angle is green as seen on the diagram

1 Like

This is a little bit confusing but I might be able to get it. I was also recommended by a friend to use the acos law but I don’t know what that is or how to use it.

Is this the RaycastResults Y position?

The size of what bar? If its the length of the arms then I think 1 is longer than the other

Once you’ve answered these then I’ll give it ago and then let you know how it goes but, if you’d really like I could give you the model so you can see how it works and how its setup.

image

Purple would be the target height (distance between the rope and floor). Meanwhile, green is the size of the individual bars (which should be the same or similar)

If they are not the same I think the average of both would also be fine.

1 Like

So does target height = raycast distance or the raycasts hit height/result.position.Y?

Ok I’ll give it ago

1 Like

If we assume that the ray cast is the distance between the base and the rope then yes.

1 Like

I edited the answer due to a mistake, it’s fixed now. (I multiplied the first angle by two, when it should be the second angle not the first)

1 Like

It didn’t really work well, infact it kind of made it worse. Am I supposed to be changing the C1 of the motor6D or the desired angle? If its the desired angle then is there a possible way to convert it to C1 otherwise I’d have re rig the pantograph which I don’t really want to do. FYI I think Motor6Ds are nearly the same as welds but motors have extra properties. I changed the C1 but I think you mentioned earlier that I’d have to change the desired angle or something

Heres what changing the C1 did.
image
image

1 Like

The angle is for the DesiredAngle property. Can you send me the model so I can take a look at how it is rigged?

1 Like

Oh Ok I’ll try that!

Yup here you go:
Pantograph Motor6D Model.rbxm (29.2 KB)

2 Likes

This is what happens when I change the desired angle.

image

1 Like

I think I know why, but first, let me check the model

1 Like

Alrighty then, hopefully that works.

1 Like

Wait can you send me this updated model?

1 Like

Sure,

Here it is
Pantograph Motor6D Model.rbxm (29.2 KB)

2 Likes

Got it. Just as I thought we only needed to offset the calculation due to the way it was rigged!

So there were two problems with this model:

  • I made a mistake the first time I posted and I ended up switching first with second. I made a comment that clarified my mistake but I think you might’ve not noticed. No problem though, it’s fixed.

  • The bottom motor needed an offset of 90° due to the way it was rigged, with that this is the result:
    image

The only problem is that the hand got messed up, when I find a fix I’ll tell you.

Here’s the new script:

local raycastParams = RaycastParams.new()
raycastParams.FilterDescendantsInstances = {script.Parent}
raycastParams.FilterType = Enum.RaycastFilterType.Exclude

local GetAngle = function(targetHeight : number, size : number): number & number
	local secondAngle = math.sinh(targetHeight * 0.5/size);
	local firstAngle= math.rad(90) - secondAngle;

	return firstAngle, secondAngle * 2; --change here
end 

local function UpdatePantograph(Pantograph)
	local RaycastResult = workspace:Raycast(Pantograph.OriginRay.Position, Pantograph.OriginRay.CFrame.UpVector * 20, raycastParams)

	if RaycastResult then
		local Wire = RaycastResult.Instance
		local Distance = RaycastResult.Distance

		local FirstAngle, SecondAngle = GetAngle(Distance, 7.383)

		Pantograph.LowerArm.Motor.DesiredAngle = FirstAngle + math.rad(90); --change here
		Pantograph.UpperArm.Motor.DesiredAngle = SecondAngle;

		local HandAngle = (Pantograph.UpperArm.Orientation - Wire.Orientation).X
		Pantograph.VisualHand.Motor.C1 = CFrame.fromOrientation(math.rad(HandAngle), 0, 0)
	end
end

--game.ReplicatedStorage.RemoteEvent.OnServerEvent:Connect(function()
game:GetService("RunService").Heartbeat:Connect(function()
	UpdatePantograph(script.Parent.Panto)
end)
--end)
2 Likes

Theres a problem with the ray you did it lol… its backwards… the lets call it elbow of the lower arm and upper arm should be on the opposite side… and this could be why the hand is messed up. Reading your last post again… you might of mentioned this?

We need to also do the most vital test… moving the wire or the “train” backwards and forwards to test if it still raises correctly.

2 Likes