So without further ado, let me begin.
Backbone of the module.
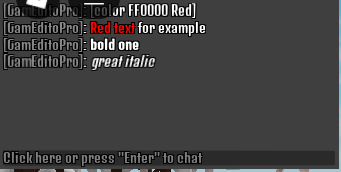
The module is quite simple, it just takes in a text and splits it into individual words and processes the words into a table which are then used to format everything!
The splitting.
I use string.split to split the text into it’s individual letters. Now, there are two ways to go by this out of which one way does not work.
Most people would just loop through the characters like so:
for index = 1,#text do
	local letter = text:sub(index,index)
end
This won’t work as I am going to be skipping letters a lot and using a simple continue would just complicate everything! Therefore, I use while loops. Like so:
while index < #text do
	index += 1
	local letter = text:sub(index,index)
end
This is good because I can skip to a certain index.
Basic markdown.
Now that I know how the loop works, I can get on with the markdown. For this, I need a state table like so:
local states = {
	BoldActive = false,
	ItalicActive = false,
	UnderlineActive = false,
	StrikeActive = false,
	PerformattedActive = false
}
What this table essentially does is it allows us to know if the text is going to be bold,italic or the other listed things.
So, how do I actually set these values? I will use if-statements of course!
Just like so:
if text:sub(index,index+1) == "**" then
	states.BoldActive = not states.BoldActive
	index += 1
	continue
end
Okay so that already looks pretty tricky correct? Let me break it down for you smooth brains- Ahem! Apologies.
So basically I would first see that if our letter and the next letter is equal to double asterisk. This basically identifies the bold state and so I will set the bold active state to be the opposite of it’s current state, this ensures that I can close the bold state later on.
This can be repeated for all other states like so:
if letter..nextLetter == "**" then
	states.Bold = not states.Bold
	idx += 1
	continue
elseif letter == "*" then
	states.Italic = not states.Italic
	continue
elseif letter == "_" then
	states.Underline = not states.Underline
	continue
elseif letter == "~" then
	states.Strike = not states.Strike
	continue
elseif letter == "`" then
	states.Performatted = not states.Performatted
	continue
end
In my case, I used nextLetter to represent text:sub(index+1,index+1).
You see, I used index + 1 or idx + 1 because now I can skip to the next ACTUAL letter or another markdown.
Storing the data.
This is the easiest part as we just do:
letters[idx] = data
Where data is:
local data = {
	Letter = letter,
	Bolded = states.Bold,
	Italicized = states.Italic,
	Underlines = states.Underline,
	StrikedThrough = states.Strike,
	Performatted = states.Performatted,
}
As you can see, we are using the states that we made earlier here.
Applying the markdown on the text.
This would again use a lot of if statements. But before that we will loop through the letters table as we talked about in the previous section.
So just use a for loop for this like so:
for idx,letterData in letters do
	local letterText = letterData.Letter
	if letterData.Bolded then
		letterText = "<b>"..letterText.."</b>"
	end
	if letterData.Italicized then
		letterText = "<i>"..letterText.."</i>"
	end
	if letterData.Underlined then
		letterText = "<u>"..letterText.."</u>"
	end
	if letterData.StrikedThrough then
		letterText = "<s>"..letterText.."</s>"
	end
	local letter = MakeLetter(Label,letterText,idx)
	if letterData.Performatted then
		letter.FontFace = Font.new("rbxassetid://12187362578")
	end
end
You may wonder that why can’t I just use one statement with elseifs? Well, that’s because it would not allow us to use mixing and matching! If I just use one if-statement with multiple elseifs it won’t give us the ability to mix and match like so:
***bold+italic*** would be bold+italic. (If we used elseifs.)
But with separate if-statements we get:
bold+italic!
Just how we want.
Finally, you wonder what the function MakeLetter is, correct? I would say it requires a whole another section for it but to keep it simple, it simply makes a text label with all the properties of our parent text label with the addition of being scaled and sized properly.
Finalizing and parenting the letters.
Now that we have letters as text labels, we need to know how we can parent them and make them appear properly! For this purpose, we are going to use UiListLayout with their new Flex Features!
So for this, just make a UIListLayout like so:
local listLayout = Instance.new("UIListLayout")
listLayout.Wraps = true
listLayout.FillDirection = Enum.FillDirection.Horizontal
listLayout.Parent = Label
listLayout.Name = "TextList"
listLayout.SortOrder = Enum.SortOrder.LayoutOrder
Ensure that its fill direction is kept Horizontal.
And that’s all. We have a rough concept idea of how a text formatted would actually work.
That’s all, I hope you learned something new. Till next time!
- Great tutorial!! You should make more.
- Bad tutorial but make more tutorials.
- Bad tutorial, don’t make more tutorials.
0 voters
