Introduction
Hello! I’m a UI Designer of 4 years on ROBLOX, I’d consider myself experienced enough to manipulate my UI just the way I want it.
In this post, I’ll be teaching you how to properly position each element within your UI with the magic of anchor points, scalar and offset, and some special UI objects that assist you with it!
Of course, you’d need to have some knowledge regarding UI to fully understand these demonstrations and there are many tutorials on YouTube and posts on the DevForum that should be able to get you up to speed!
What Are Anchor Points, How Do They Work? How Should I Use Them?
Anchor Points are essentially the origin of your frame’s position, here’s what I mean.
As you can see in the image below, there are 8 dots in total surrounding the square frame, these aren’t as important as the Anchor Point; they are handles to resize the frame. What you should be looking at however is the darker outlined dot, encircled with red.

That dot is ROBLOX Studio visualizing the Anchor Point, the reason why it’s in the top left corner is because the default Anchor Point is {0, 0}.
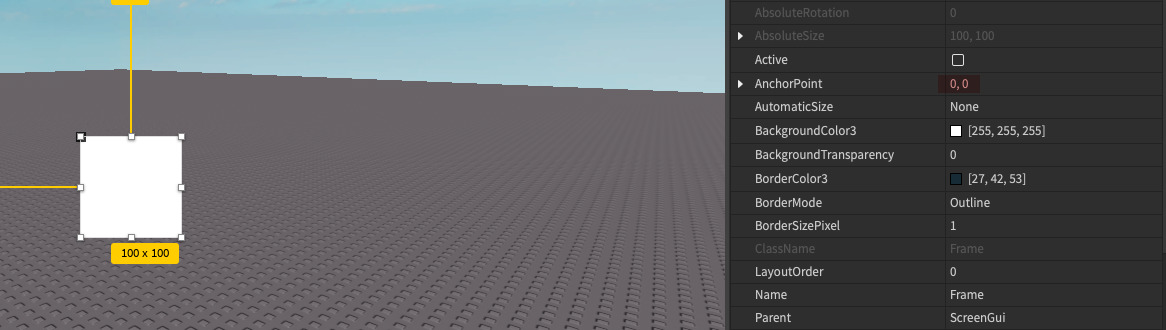
Highlighted in red is the Anchor Point property
This means if we positioned it, it would be relative to the top left point’s position, because that is the Anchor Point and as I’ve mentioned before the origin of your frame’s position.
Let’s move the frame to {0, 0}, {0, 0}, otherwise known as the top left of a user’s screen.
This should make the Anchor Point go to the very top left corner, as it in itself is positioned at the top left of the frame.

I was correct, as you can see, it moves to the top left of the screen, how about we try changing the X value of the Anchor Point to something else? For the purposes of this example I’m going to change the Anchor Point to {0.25, 0}, 0.25 being the X value of the Anchor Point; Basically in charge of left and right, while 0 is the Y value, in charge of down and up.

As you can see, the Anchor Point was moved a little to the right, and since it’s not directly in the top left anymore; A part of the frame has been consumed by the screen, hiding anything beyond the 0.25 mark.
Both the X and Y value of an Anchor Point only go up, meaning if you tried to negate the number (i.e switch the sign from positive to negative) it would just default to 0, and thus making it go back to exactly the top left of the screen. The Y value caps at 1, as it’s a scale from 0 to 1.
An Anchor Point I see many people use is {0.5, 0.5}, it puts the origin of the frame smack dab in the middle of the frame, allowing you to center the frame with the position {0.5, 0}, {0.5, 0}.
The reason why 0.5 is used out of every number is that scalar adjusts relative to the size of your ROBLOX window, on a scale from 0 to 1, the half of 1 is 0.5 making it in the middle of the scale, and in result putting the Anchor Point, not the frame; in the middle of the window. This is why using {0, 0} doesn’t work, it’ll position the frame a little more to the right and also a bit downwards, purely because the Anchor Point is in the top left of the frame.
This is extremely useful, but you shouldn’t use it unless necessary; here’s why:
1. Why would you use an incompatible Anchor Point?
Anchor Points are the best way to position your UI rather than manually tinkering with the offset and scalar properties on an Anchor Point that isn’t super compatible with the position you’re trying to put your element in.
The resulting position is always unsatisfying and you can’t figure out why, for example; I wouldn’t put the Anchor Point on the left side of my element if I wanted to put it on the right, what sense does that make?
Here’s an example of this mistake, and how you should amend it.

As you can see here, the Anchor Point is on the right side of my frame; when I’m trying to put it on the left side. I had to come up with an extravagant position just to get it there, when I could’ve saved so much time just putting the Anchor Point on the left.

There we go, I made the Anchor Point move to the left by switching it to a 0 on the X axis, and I didn’t have to make a super special position for it; just had to move it to the right by 0.05.
This applies to using {0.5, 0.5} on things that aren’t centered as well.

Here’s me putting the Anchor Point on {0.5, 0.5} and trying to move the frame to the left, let’s see what happens when I put the Anchor Point back to {0, 0.5} moving it back to the left.

Way farther than I anticipated, I know there isn’t much of a difference but it really helps with responsiveness, speaking of responsiveness; let’s move on to the next topic.
Responsiveness
Let’s continue from our previous statement, as I’ve mentioned; keeping the Anchor Point compatible helps with responsiveness, what I mean by this is it will scale properly to other device’s screens. Here’s an example.

As you can see, I’ve put the Anchor Point at {0.5, 0.5}, but I’m trying to keep it to the left. The problem I’m facing is that a part of the frame is clipping into the edges of the screen, and if the screen got smaller the problem would only be amplified.

Here I’ve put the Anchor Point at {0, 0.5}, moving it to the left of the frame rather than in the center. As you can see, it’s pretty much perfectly on the left, a bit to the right like I intended.
This was a rather short section, but I’ve explained everything I need to explain.
Basic Layouts & Positioning Elements Inside Other Elements
This might be on the beefier side of things in comparison to the other sections and quite loosely related, but nevertheless it is important and will really help you.
Here I have a little sidebar I created and designed, there’s a title, and 3 buttons.

Those 3 buttons have been manually positioned through offset, and have a default Anchor Point of {0, 0}.
Obviously, this would be hell to maintain, what if I need to add more buttons?
There’s a few objects me and many other UI designers use, mostly for layouts like these.

Here we have them, ROBLOX has developed many objects to help UI designers incorporate conformity into their designs, we will only be using a few here as the rest are a bit complicated, and are best fit for other posts as if I explained them I would stray far away from my lesson.
The ones you want to pay attention to are “UIPadding”, “UIListLayout”, and “UIGridLayout.”
What use do these have for us? Let me show you!
UIListLayout
First of all, UIListLayout is important for vertical and horizontal lists of elements. It automatically positions each element within the same parent either next to each other, below each other, et cetera.
We’d want to position the buttons inside the UI I showed earlier, but not the title. The problem is they’re in the same parent, meaning they’d also position the title. How do we combat this? Simple, we just make another frame inside the frame of the title; and put the buttons inside it, + a UIListLayout.
“Uhhh, I used the {1, 0}, {1, 0} trick for sizing; but wouldn’t the buttons overlap the title if I added the UIListLayout”?
Yup.
Wanna fix it? Here’s a trick I made for this exact problem.
Set the AnchorPoint of the future Buttons frame to {0, 1}.

Now it’s on top, you may find this strange at first; but all you have to do is change the scalar Y value to 1, the position should be {0, 0}, {1, 0}.

Okay, it’s back in the same position. You may think this was useless, but there’s a reason for it.
If we sized down the frame while the Anchor Point was still {0, 0}, it would go upwards after sizing it downwards.
The effect is inverted if the Y value of the Anchor Point is set to 1, since they are both polar opposites on the “scale” I mentioned earlier.
Since our title is on top, and not the bottom, we do this trick. Otherwise, I’d just keep it as {0, 0}.
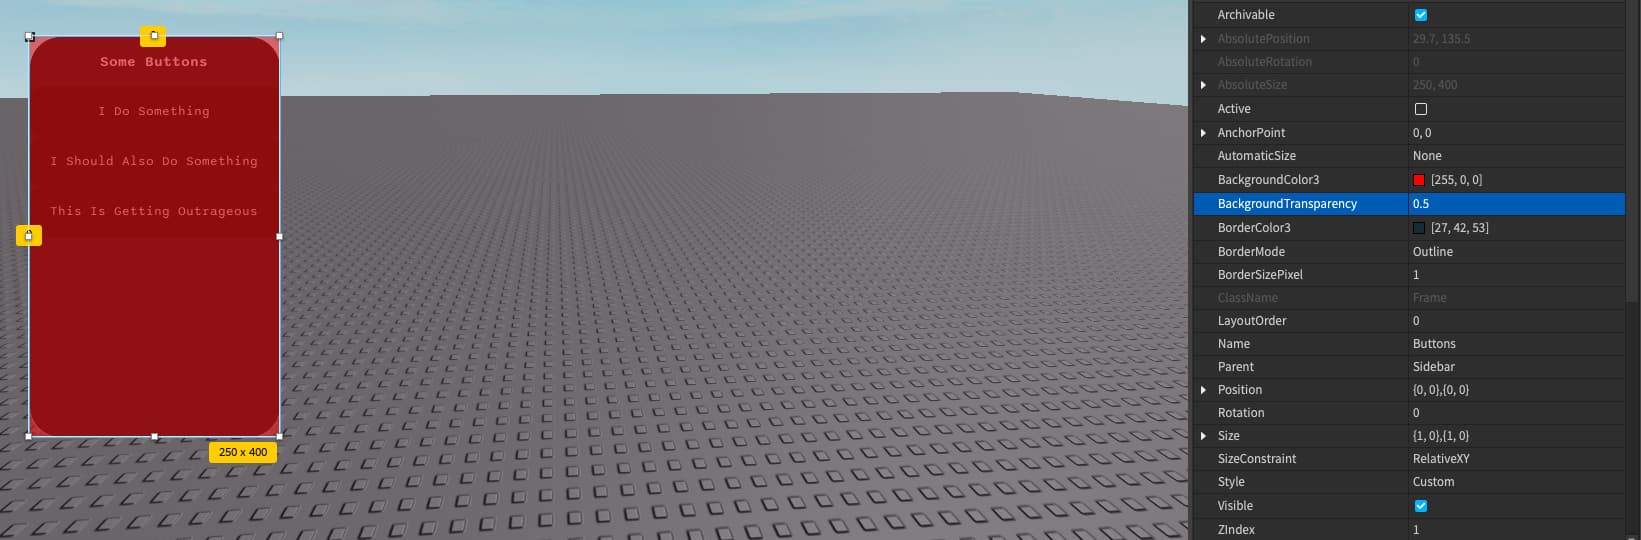
Let’s size down the frame, all you need to do is change the frame’s Y offset size to negative however tall the title is, since our title is sized 50 on the Y axis ({1, 0}, {0, 50}) we’d need to change the Y’s offset size to -50.

Ta-da!! Isn’t it pretty awesome? Now we can change BackgroundTransparency to 1 and put the buttons inside of the frame.

As you can see, they’re positioned weirdly. This is because we used offset to manually position each button below each other. Just add the UIListLayout in the “Buttons” frame and it’ll fix itself.

See? Good as new. Though it still looks a little off.
There’s a few properties you can tinker with within the UIListLayout that will change this and make your list 100x better.

Wowie, that’s quite a few settings to tinker with. The one I’m interested in right now however is “Padding”.
Padding uses both Scalar and Offset just like each of the 2 parts of a UDim2 (a position).
Since the FillDirection is vertical, if we changed the Padding to 0.5, 0 it would move each button downwards at about half of the frame it is in.
If we changed the Padding to 0, 5 however, it would move each button downwards by about 5 pixels.
To make things easier we’re going to be using the offset value instead of the scalar value, as the scalar value needs decimals to work properly.
I will be changing Padding to 0, 10 which should shift the buttons away from each other by about 10 pixels.

Looks better already, let’s change the red frame’s BackgroundTransparency to 1 and see how it looks.

Yup, looking nice. We’re missing something though, what could it be?
Come on.
…
You can do it.
…
Did you get it?
…
No?
…
Oh well, what we’re missing is UIPadding. There’s no breathing room for the buttons, they’re getting kind of claustrophobic.
Let’s add it and see what happens.

Err… Nothing happened. Why? Because there’s properties we need to change.

Don’t let the numbers scare you, they’re the same concept as UIListLayout’s padding. The difference being you can manipulate each side.
As with UIListLayout, each PaddingDirection property is a scalar, and offset value.
If you change these values, think of it like it’s adding an invisible wall to that side and changing its size accordingly.
I’m going to be changing all of these to 0, 15 excluding the top, but you can tinker with that value if you really want to.

Here’s what it looks like after, looks great! You can change any of the points I’ve mentioned here to your liking, I just wanted to demonstrate the usage of UIListLayout to those who haven’t heard or used it.
UIGridLayout
UIGridLayouts are just UIListLayout, but with columns and rows, they can be used for character selection screens, inventories, anything that requires more than 1 line of elements.
I will not be explaining everything to a tee, as I’ve already explained mostly everything in the UIListLayout subsection.

Here’s a basic container, I’m doing the same setup as I did last time; just with a bigger area, and a UIGridLayout.
UIGridLayouts are special, because they have some interesting properties to keep everything consistent. Such as CellSize, which will be the size of each element within the grid.
I’ll keep it default as there’s no need to change it for a simple Character Selection interface, which is {100, 100}.

Here, I changed the CellPadding to {0, 15}, {0, 15}, this is a UDim2 value just like the Position and Size of a UI element, so it goes like scalar X, offset X, scalar Y, offset Y, in that order.
I also just added a few ImageLabels, and added UICorner with 1, 0 set on the radius to make it a perfect circle for the “character buttons”. Using a placeholder image for them as well.
I will be setting FillDirectionMaxCells to 3, that way the rows cap out at 3 buttons, but it will add more below if needed, I also set HorizontalAlignment to Center that way it doesn’t look odd with the lack of buttons.

Here’s what 9 of these buttons looks like, let’s remove the red frame and see what it looks like.

Simple but slick! I changed PaddingTop for the buttons into 0, 15 to make it more centered, other than that I didn’t change anything else.
Conclusion
That will be all for now! I plan on adding more to this post as time goes along, but I hope everyone enjoyed the read and learnt a thing or two.
Here's a few helpful posts that will assist you if you need any other information!
Thanks for reading! And remember, do not underestimate the power of Anchor Points >:3