Introduction
Hi there, my name is TreySoWavvy and I am an LUA Programmer and a 3D Modeler.
I have noticed a lot of new/old developers are switching over from 2D to 3D aspects in their gameplay such as 3D armor, holstered weaponry, and other addons to make their characters pop. This is a tutorial on the 2 methods I use for offsetting models from the body of the character. This can be used in a variety of applications from FPS games to Fantasy RPG ones (in other words my game and most likely yours) Below are some examples of the applications:
- Weapons meant to be visible on the body (swords, pistols, lightsabers)
- Custom 3D Armor & Clothing. (Attack on Titan Cloaks for example)
- Addons / Accessories for aesthetics (holsters, bandages around the arm, etc)

The Concept
I want you to remember that there are two types of Accessories: Static and Dynamic.
- Static Accessories (Welds): Don’t move and welded in place until changed. Good for clothing and other addons that arent meant to be moved or manipulated directly.
- Dynamic Accessories (Motor6Ds): DO move and are meant to be manipulated directly. Good for weapons that can move, slide, and rotate while attached to the body. (i.e a sword being gripped by a player.)
Understanding Accessories And How They Work
Accessories are an instance that attaches a premade model to the body at a fixed offset determined by 2 Attachment Instances. 1 Attachment is owned by the Accessory itself, and the other is owned by the instance the Accessory is Attaching itself too. The prime example would be a hat and the character wearing it. Roblox will then automatically generate a Weld Instance using those two Attachments as C0 and C1 offsets, essentially doing the work for you.
NOTE: This automation only applies to Static Accessories, I will provide a method to doing this with Dynamic ones
Initial Setup | Manipulating Attachments In Rigs
The benefit of using a Rig’s attachments is that you can create your own and are not limited to the defaults that come with the rig. This essentially means you can have an infinite number of attachment points although having more than a key few is a redundant practice. Roblox’s R6 and R15 rigs come with a set amount of Attachments used by the catalog items and body joints which we will be using today. If you feel like adding your own later on by all means go crazy.
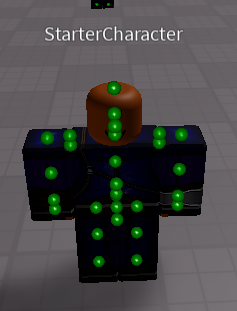
1.) Constraint Details: Allows you to see attachments and constraints in a 3D space. Turn this on to see what you’re working with. (Attachments are green balls by default)
2.) Draw On Top: Renders those attachments and constraints on top of the instances they are parented to. Makes selecting them so much easier.ATTACHMENT NOTE: Do NOT have multiple attachments with the same name, results may be unsatisfactory. Use concise names you can refer to and make sense.

Now that Constraint Details is turned on, your Rig should look something like this with the outer attachments shown:
If you have Draw On Top enabled, It should show the attachments hidden inside the body parts themselves like so:
Roblox covers most of the necessary attachment points for you already, but should you need to add your own:
- Add an Attachment to a body part.
- Give it a unique name that you’ll use inside your accessory.
- Use the Default Move tool to offset the attachment from that body part in whichever way you need! Plugins like F3X cannot manipulate constraints!
- Set the Attachment’s WorldOrientation to (0, 0, 0)
Why should I keep the WorldOrientation Property at (0, 0, 0)?
It’s actually simple. Roblox uses the properties of the Attachment to offset your Accessory from the body. Since the Attachment Orientation won’t be the same as the Accessory’s Orientation, you are essentially creating a rotation for your Accessory! In most cases, we don’t want this!

Static Accessory Setup
Below is the proper checklist on how to properly set up / convert a model into an accessory, Using the F3X plugin.
- Weld all the parts of the model together:
- Make sure all the parts are Unanchored. We don’t want the player stuck in place.
- Make sure collisions are turned off for all parts. We don’t want the weapon colliding with the environment.
- Make sure at least one of these parts is named (Handle). (Similar to creating Tool Objects)
- Right Click on the Handle Object and create an Attachment Object inside of it.
- Create a new Accessory Object, and parent all parts to the accessory.
- Congrats, Now you have created your own accessory in Roblox.


Dynamic Accessory Setup
- Repeat all the steps above for Static Accessories, Except keep all the parts grouped as a model and not an accessory.
- The reason is that Roblox will override ANY welds (and motors) you create for that accessory by default and make their own, so we have to use a Model Object and simulate an Accessory Instead.

Setting Up The Offset
I’m going to attach this spear, to the back of this rig at an angle shown by the red line.
Move your spear into position and give it the proper offset using editing tools Without breaking the welds holding the parts together. F3X does this nicely but Default Build Tools can work too.
If you remember in the earlier screenshot, the Handle Object had an Attachment inside of it, we will be using that attachment now to tell Roblox to keep this spear at this position on the back of a rig.
To properly setup an accessory attachment so the rig can use it, you must:
- Rename the Handle’s Attachment to match the name of Any Attachment within the body parts of the Rig. Can be the default ones shown above or one you created.
- Copy and paste the WorldOrientation from the Body Attachment → Accessory Attachment so they match rotations.
- Copy and paste the WorldPosition from the Body Attachment → Accessory Attachment so they match positions in the world.

- Now Both attachments share a position and a rotation.
- Congrats, you have effectively created the C0 and C1 for the Welds we will use later.


IMPORTANT NOTICE: Remember to make sure that both attachments have the same name, if the names are off it won’t weld, and if it’s the wrong attachment it will look for it and attach it there instead.
Adding Static Accessories To The Character
Static accessories require minimal changes beyond this point, all we have to do now is write some code to give a copy of this attachment to a character. Once the accessory is added it really doesn’t require any further changes, like most of Roblox’s Catalog items. In order to accomplish this, we will be using theHumanoid:AddAccessory(Instance)method. It takes an Accessory as its first argument and handles everything else from there.
Here is a very simple script used to give me the spear when I respawn:
--| When the player respawns, Use AddAccessory to give them the spear owned by this script.
game.Players.PlayerAdded:Connect(function(Player)
	Player.CharacterAdded:Connect(function(Character)
		Character.Humanoid:AddAccessory(script["Royal Guardsman Spear"]:Clone())
	end)
end)
The result of Static Accessories will essentially be the same as normal Catalog ones. If this is what you needed then this tutorial is done for you. For the rest of you who need more dynamic and controlled accessories, keep reading.
Adding Dynamic Accessories To The Character
For the rest of us more experienced scripters and game designers, sometimes we need more control over our accessories that a simple weld can’t really handle. My workaround for this issue is simple, using a Model Object and simulate an Accessory Instead and replacing the Weld Roblox creates with a Motor6D instead. The reason I do this is to give me the option to animate the weapon ALONGSIDE the character using it as well. This is especially good for weapons that you wish to move along the body i.e sliding the spear grip relative to the hand forward or spinning a knife in my hand.
If you’ve already worked with Motor6Ds then you know what I am referring to here, we are taking THAT process and making it slightly easier to manage. The benefits of dynamic accessories are that when they are attached to characters, you can animate them alongside the character and make your animations more fluid and realistic. Below is a good function I found/remade that creates Pseudo-Accessory (as we will call it) using the Model and Motor Instances:
local function AddCustomAccessory(Model, Accessory)
	Accessory.Parent = Model
	local HandleAttachment = Accessory.Handle:FindFirstChildOfClass("Attachment") -- Find accessory attachment
	local CharacterAttachment do -- Find character attachment
		for _, v in ipairs(Model:GetDescendants()) do
			if v.Name == HandleAttachment.Name and not v:FindFirstAncestorOfClass("Accessory") then
				CharacterAttachment = v
				break
			end
		end
	end

	--| Destroy any previous welds.
	for _, v in ipairs(Model:GetDescendants()) do
		if v.ClassName == "Weld" and v.Name == "AccessoryWeld" then
			v:Destroy()
		end
	end

	--| Replace the weld with a Motor6D instead.
	local AttachmentWeld = Instance.new("Motor6D")
	AttachmentWeld.Part0 = CharacterAttachment.Parent
	AttachmentWeld.Part1 = HandleAttachment.Parent
	AttachmentWeld.C0 = CharacterAttachment.CFrame
	AttachmentWeld.C1 = HandleAttachment.CFrame
	AttachmentWeld.Name = Accessory.Name
	AttachmentWeld.Parent = Accessory
end
By using this function on a Pseudo-Accessory, we can essentially create our own accessories without the actual object class. I recommend in your game you have a folder inside the character model that stores these “Accessories”. Since they are models they don’t need to stay parented DIRECTLY to the character unlike accessories, so you can have some organization there.
Conclusion
Accessories are a useful approach to game development that should be encouraged to intermediate developers to look into for various aspects of your gameplay, they are a cleaner and more organized method to welding things to your character and allow you to set, get, and change the offsets easily without keeping a bunch off offsets stored somewhere. Psuedo-Accessories provide more functionality and allow you to properly animate your tools with your characters adding more pop and realism.
If you have any questions and concerns about this guide for game application feel free to respond to this thread and I’ll be happy to help you.
Changelog
[3/4/21]
- Added proper formatting, cut out a lot of unnecessary details and humor.
- Fixed my unprofessional way of speaking in this tutorial, I apologize to whoever read V1.
- Added the concept of “Psuedo Accessories”, and explained how they work.