Congratulations on your purchase. Here’s how to install CheckMeIn 3.1.
Enable Http Requests
Before doing anything, you should enable Http Requests! If you're not sure how to do this, please view the images.

Open the required windows in Roblox Studio
To install CheckMeIn, you will need to open the following windows:- Explorer
- Properties
- Toolbox

Need help? Please go to the bottom of this post.
Inserting CheckMeIn
To insert CheckMeIn, use the CheckMeIn Suite plugin. You can take the plugin at the Portal. Then, follow the instructions in the post linked below.
CheckMeIn Suite Installation
Configuring CheckMeIn
Configuring CheckMeIn can be tedious, but if you pay attention, it's not all that complicated.Now onto the Configuration module. You can find the Configuration module inside of the CheckMeIn folder. Go ahead and open the script.
Room Types
Room Types are the different types of room you (will) offer at your hotel. You can add as many as you want.The room types are added / modified according to the following template:
- No gamepass required:
['My Room Type Name'] = false; - Gamepass required:
['My Premium Room Type'] = {gamepassId};
According to the default configuration, ['Premium Suite'] has its gamepass set to {1};. This is simply an example and you should change it to your own gamepass.
Here’s a finished example of a Room Type configuration:

PC Settings
PCSettings sets the receptionist GUI permissions.Example configuration:
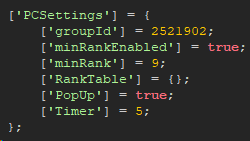
['groupId'] should be set to your group ID
['minRank'] should be set to the minimum rank that can use the receptionist system. (0-255)
Advanced Rank Setup
If a rank higher than your receptionist rank cannot use the system for whatever reason, you should use the ['RankTable'] feature. This feature is quite easy to setup. Just enter every rank (0-255) that can use the receptionist system inside of the table. Here’s an example:
![]()
After you’ve configured the rank table, set ['minRankEnabled'] to false; to use the RankTable instead of minRank.
PopUp Configuration
Pop ups are created to prevent abuse by staff. Before checking someone in, the system will send a confirmation to the customer. If the customer accepts, the check in is completed. If you’d like to use this feature, make sure to set ['PopUp'] to true;. If you’d rather not use this feature, set it to false;.
['Timer'] sets the time (in seconds) the customer has to respond to the prompt. If the customer does not reply to the prompt, it is automatically declined.
Need help? Please go to the bottom of this post.
Staff Card
The name of this part of the configuration is quite ironic. CheckMeIn 3.1 doesn't actually have a staff card. Instead, staff should press the black pad on doors to open them.Regardless, the staff card configuration manages who can open the doors.
Note: Anyone who has this permission will be able to open all CheckMeIn doors in your hotel.
Example configuration:

All of these entries are also explained in the PC Settings section, so please refer there for instructions.
['Enabled'] turns the ['Staff Card'] section on or off. If it’s off, the system will use ['PCSettings'] for rank information instead.
Need help? Please go to the bottom of this post.
Self Check In
The self check in system allows players to check themselves in, without assistance from an employee.Example configuration:

['Enabled'] turns the self check in system on or off.
['Gamepass'] should be set to {gamepassId}; or false; if no gamepass is required.
['RoomTypes'] allows you to narrow down the self check in experience to a select number of room types. If you want all room types to be displayed, set this value to false;.
If you want (a) specific room type(s) to show, set this value to {"Room Type","Other RoomType"};. Room Type and Other Room Type should be the exact (case sensitive) names of the room types you want to show in the GUI.
Need help? Please go to the bottom of this post.
Enterprise-only features
['AnimateDoorsOnClient'] should always be set to true;, as it leads to a better experience. Only disable this feature if you’re having issues.
Points
Allows employees to gain points per check in/out.Example configuration:

['Enabled'] turns the Points system on or off.
['Award'] sets the amount of points gained per check in/out.
['Datastore'] is the name of the datastore where CheckMeIn points are stored. For security reasons, it’s recommended to change the name of this data store.
WARNING: Changing the name of the ['Datastore'] value will reset all saved data. You can always change back to an old Datastore name to restore data from a certain time.
['Function'] and ['PointsAwarded'] should not be touched unless you’re a programmer. This tutorial does not cover these functions, and you may contact me personally for instructions on how to use them.
Doors
Now that you've set up the main configuration, it's time to set up the doors.Assistance
Please make sure to read the entire manual before proceeding. Thanks :)I still need help
Can’t figure something out? No worries, free support is included with every CheckMeIn license. Please select your age group for relevant support instructions.
I'm over 13 years old.
You can join our Discord server! You should be able to see the link on our group page.
I'm under 13 years old.
Tough luck, you’re not old enough for Discord yet. Don’t worry though, you can have a guardian contact me and I’ll do my best to help you.
My Contact Information: (ranked from fastest to slowest response)
1 Tim#6198 on Discord
2 @windocats on Twitter