About
Hello, my name is Alex. Otherwise known as EnDarke. I am here to talk about many common mistakes you can make and any ways you can improve your Low Poly Models!
NOTE: This is for helping through Blender ONLY!
FIXES
There are a couple common mistakes that most new and some experienced modelers run into. The absolute most common that I’ve seen people run into would be missing faces & the mesh isn’t importing.
Flipped Normals / Invisible Faces
A lot of the time, you will run into an issue when importing and you will notice that a face or many are missing! Fear not! There is a solution to this issue!

Head into Blender, find the same faces that are going invisible which should look something like Down below. You will notice it looks almost like a grey windbreaker jacket, that is the face that we are here to fix!

Go into edit mode by pressing: TAB
Select the face(s) that look like that or that are disappearing and press the following:
- Blender 2.79 and before: Ctrl + N
- Blender 2.8 and later: Shift + N
If that DOES NOT work, at the bottom left (both have it) there will be a box with a checkbox in it, if you do not see it on Blender 2.8+ you there should be a drop down box that looks like:
![]()
Click that and there should be a checkbox in it, check or uncheck that and it should be fixed and you are free to import!
Mesh not importing
Another common mistake is your mesh isn’t appearing whenever you try to import it. There’s a fix!
Whenever you finish importing it will most likely look something like this (Wait a couple seconds it will move):

The way you can fix this, and it is quite simple. Check the output and it should look something like this:
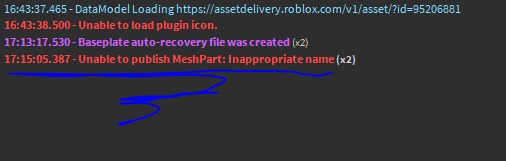
The reason why you are unable to import your mesh is because it’s name has been filtered out! I suggest making sure you don’t have any typos or try renaming to a synonym. UNLESS it is really an inappropriate name then why are you doing that?
Tips and Tricks to Low Poly Modeling
These are accessible through Blender 2.79 and 2.8+. I personally still use Blender 2.79 because I like having keybinds and less time wasting click around, but that’s just my preference. Blender 2.8+ is better to learn for beginners because it’s all right in your face and no need to go searching around for anything.
NOTE: BLENDER (Latest update) IS AVAILABLE ON STEAM!
Making a good Tree Shape
Making a tree is probably the most essential thing you can have in a Low Poly build / showcase, it’s absolutely everywhere! Now I am going to teach you my method on creating great trees!
-
Start off with making a Plane: Shift + A > Mesh > Plane
-
Next, you will go into Edit Mode: TAB
Select ALL vertices: Ctrl + A -
Once you have all vertices selected you will merge them into 1 vert. ALT + M > At Center
Next, make a tree shape by pressing: E (Extruding), clicking then pressing: G to move the vert around, continue that till you have a tree like shape like this.

-
Once you have your tree shape, head over to the modifiers tab on the right side of the screen and add the modifier: Skin. Once that’s done, it should look like this:
-
Next, add a modifier called: Subdivision Surface
It will look something like this:


Looking great! Now this is where things start to catch some eyes!
-
Head into wireframe mode! Trust me, it looks weirdly cool and I don’t understand why either

Blender 2.79: Z
Blender 2.8+: Z > Wireframe -
Select a vertex, or multiple and you can size the by NOT USING S but actually with: Ctrl + A
Looks pretty cool huh
-
Select all of the branches as once using Box select or Circle Select:
Box - B
Cirlce - C
To DESELECT with either of them, hold shift while selecting. -
Once selected, size them down (again with Ctrl + A).
-
Next, select the lower areas (The Trunk of the tree), and make the size look like a normal tree, big at the base but skinnier as you go up!
If you have followed all of those steps it should look like this when you have completed the tasks and went back to Object mode with in Blender 2.8+: Z > Solid and just Z with Blender 2.79!

-
Next, go back to the modifiers tab and select the modifier: Decimate
Now drag the bar that says Ratio down till you are comfortable. -
Apply all modifiers if you haven’t already done so.
-
Next, add an Ico Sphere! Shift + A > Mesh > Ico Sphere
-
Head into Edit Mode and move vertices around. Duplicate and change up the shapes of the Ico Sphere and place them around the branches.
Woohoo! You got yourself a completed tree!

Making a Low Poly Model more Low Poly looking
Yes! There is a way to make your Low Poly model look more Low Poly. In my opinion through this way, it would make all low poly models look 10x better! It creates more triangular faces on the mesh creating a higher quality low poly.
So I have here a model I’ve created in the “Making a good Tree Shape” tip/tutorial above, and I am going to make it overall look MORE Low Poly!
-
First, you are going to go to the modifiers tab and add the modifier: Subdivision Surface. I KNOW, it looks fairly weird and you don’t know why I am talking about it, but bare with me!
It should look something like this:
-
Next, add another modifier: Triangulate. This modifier will take all faces and turn it into 2 or more triangular faces without changing the tris count, isn’t that awesome!

Again, it will look something like this:
-
Last and final step! (Yeah I know, wow for something so cool of a change it’s so simple yet so bizarre). Add the modifier: Decimate and drag the bar that says Ratio down to however you feel comfortable (I personally think around 0.1-0.15 is the sweet spot for these) and BOOM! you got yourself a better looking Low Poly model!


This probably isn’t the best representation of doing this, but feel free to try it out yourself and see the results!