With the recent introduction of Future is Bright 3, the option to use PBR Textures (Physically Based Render) was enabled by using SurfaceAppearance. These textures allow calculating the projection and reflection of light on a surface in real time giving a hyper realistic effect (Like the default Roblox materials).

This tutorial will explain you how to create your own simple PBR textures without using special tools:
-
Firstly, in Roblox Studio, open the File section and click on Beta Features. Find there the Advanced SurfaceAppearance Textures feature, check it and save.

Then the Studio will restart so click on Restart. -
Already restarted, go into your game, and put a new Mesh Part into the Workspace. Now you will be able to find SurfaceAppearance into Mesh Part’s Insert Object section.

-
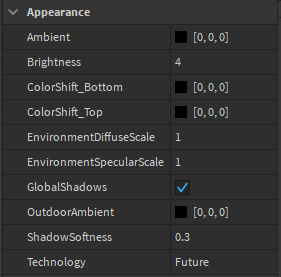
Now, I recommend that you go to Lighting and enable Future Technology, but if you want to save resources, you can enable ShadowMaps. Also set EnvironmentDiffuseScale and EnvironmentSpecular to 1 for better light behavior.
Doing this will produce a more realistic result as the sun has more realistic behavior in these modes. -
To start baking our textures we are going to need an image editor, I recommend Photoshop but it can be another, and a software called Materialize. Don’t worry, it’s free and very small. Download link here: Bounding Box Software - Materialize
-
Open the image editor, create a new image and set the size to 1024x1024px. If you have a mesh open the UV Map.


Before continuing a brief explanation of what we will do next. Height Map is a map where the depth of a surface is represented in a gray scale. Roblox doesn’t support this but Materialize is able to render Height Maps in Normal Maps.
-
Now paint with a black brush or other tools over a white layer. Something like this:
Save your image as .jpg or .png. -
Go to Materialize and look for the Height Map section. There will be four letters, you are looking for the letter o.

A window like this will appear, so only search your Height Map and open it.
If your Height Map doesn’t load, it means you need to download DirectX drivers. Download link here: https://www.microsoft.com/en-us/download/details.aspx?id=35 -
After open it, look for the Normal Map section and click on create.
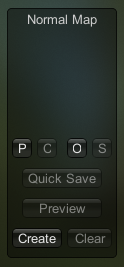
A window with a lot of settings will appear, but you will only have to focus on this:

You can leave it as default or play with it. But when you’re done, click Set as normal map. Then, to export it click on the letter s in the Normal Map section.


Look we now have a nice Normal Map clicking on Show full material:

You can clear the Height Map now, it will no longer be necessary.
-
Create Edge and AO maps and export them. Then open the edge map in your image editor and paint over it. This will be the Color Map, the texture without effects.
-
When you finish making your Color Map, we will now give an Ambient Occlusion effect thanks to the AO Map. So put your AO map on a layer above your texture and if you are in Photoshop, set the blending mode to Multiply and adjust the transparency to your liking. In my case. In my case the result is this:
-
Now create the Metallic and Roughness Map. You can use Materialize to make the base of them. Here is a small guide to how the Metallic and Roughness Maps works:

-
Metallic Map: The black areas on the Metallic Map represent non-metals and the white areas represent metals. In nature, materials are classified into Metals and non-metals, so intermediate tones are generally used to simulate dirt or grunge.
-
Roughness Map: In a roughness map, black pixels correspond to a maximally smooth surface and white pixels correspond to a maximally rough surface. Reflections on smooth surfaces are sharp and concentrated. Reflections on rough surfaces are more blurred and scattered.

Note
Note that Materialize instead of Roughness Map has Smoothness Map. This means that to get results similar to those seen in Materialize you will have to invert the Smoothness Map before importing it into Roblox Studio.

- Finally, open Roblox Studio and open your game. Now find your MeshPart and Insert a SurfaceAppearance and go to the Properties.

Also go to the View section, open the Game Explorer and import the Color, Metallic, Roughness and Normal Map. Already imported, find them in Game Explorer and copy the link and paste it in the corresponding space of properties. Note that with out a mesh the Surface Appareance will adjust to all the faces.

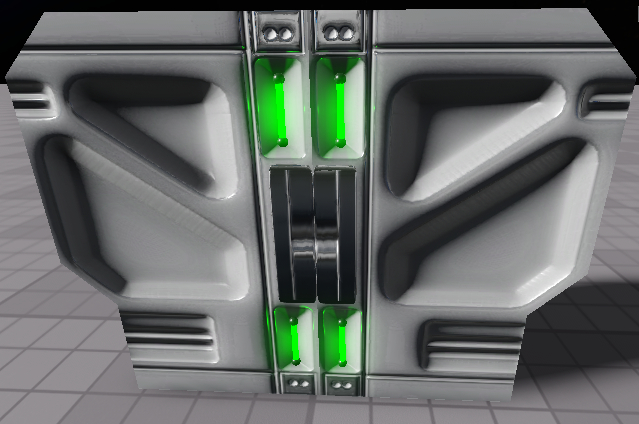
And that’s it, my texture was for a Metal Door Model so here is the result:

With a bit of decoration and with help of Future Lightning the final result is this: