Hi Creators,
Today, we’re introducing a new WrapDeformer instance and associated APIs so you can modify 3D meshes with skinning, joints, and FACS data more easily in your published experiences.
Using inspiration from some of the groundbreaking Layered Clothing work on the platform, the new WrapDeformer instance uses cage meshes to allow you to deform meshes and have skinning weights and FACS pose data automatically modified to match. Cage meshes can also be much lower resolution than the rendering mesh, and thus easier to deform.

Using the WrapDeformer Instance
The general principle of the WrapDeformer is to deform its parent MeshPart’s geometry mesh based on the difference between the cage mesh specified in the child WrapTarget and the cage mesh of the child WrapDeformer.
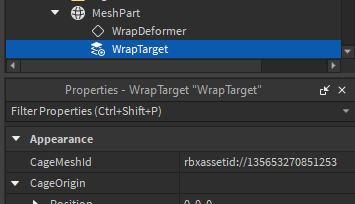
To deform a MeshPart, ensure it has both a WrapTarget and a WrapDeformer instance as children. The WrapTarget.CageMeshId and the WrapDeformer.CageMeshId property will point to the respective cage meshes and the WrapDeformer instance will then automatically deform the MeshPart instance’s mesh geometry.
![]() Note: The
Note: The CageMeshId properties will be deprecated soon in favor of CageMeshContent that is based on the new Content type.
![]() Note: UV values of the
Note: UV values of the WrapDeformer cage mesh vertices should match those of the WrapTarget cage mesh vertices. The two cages can have different numbers of vertices and even different topologies, but the UV coordinates have to match.
Now, let’s take a look at a few examples of how you might use the new WrapDeformer instance. All these examples are included in the example place file available at the end of this post.
Example: Static WrapDeformer Deformations
Let’s take a quick look at how this would work with a trivial example first: deforming a sphere with a static deformation. For a static deformation, we simply set the CageMeshId properties of the WrapDeformer and WrapTarget instances to existing mesh asset Ids.
![]() Note: The
Note: The CageMeshId property will be deprecated soon in favor of CageMeshContent that is based on the new Content type.
The WrapDeformer instance deforms the parent MeshPart and produces the deformed Sphere shown below (“Statically Deformed Sphere”)
Example: Dynamic WrapDeformer deformations with EditableMesh
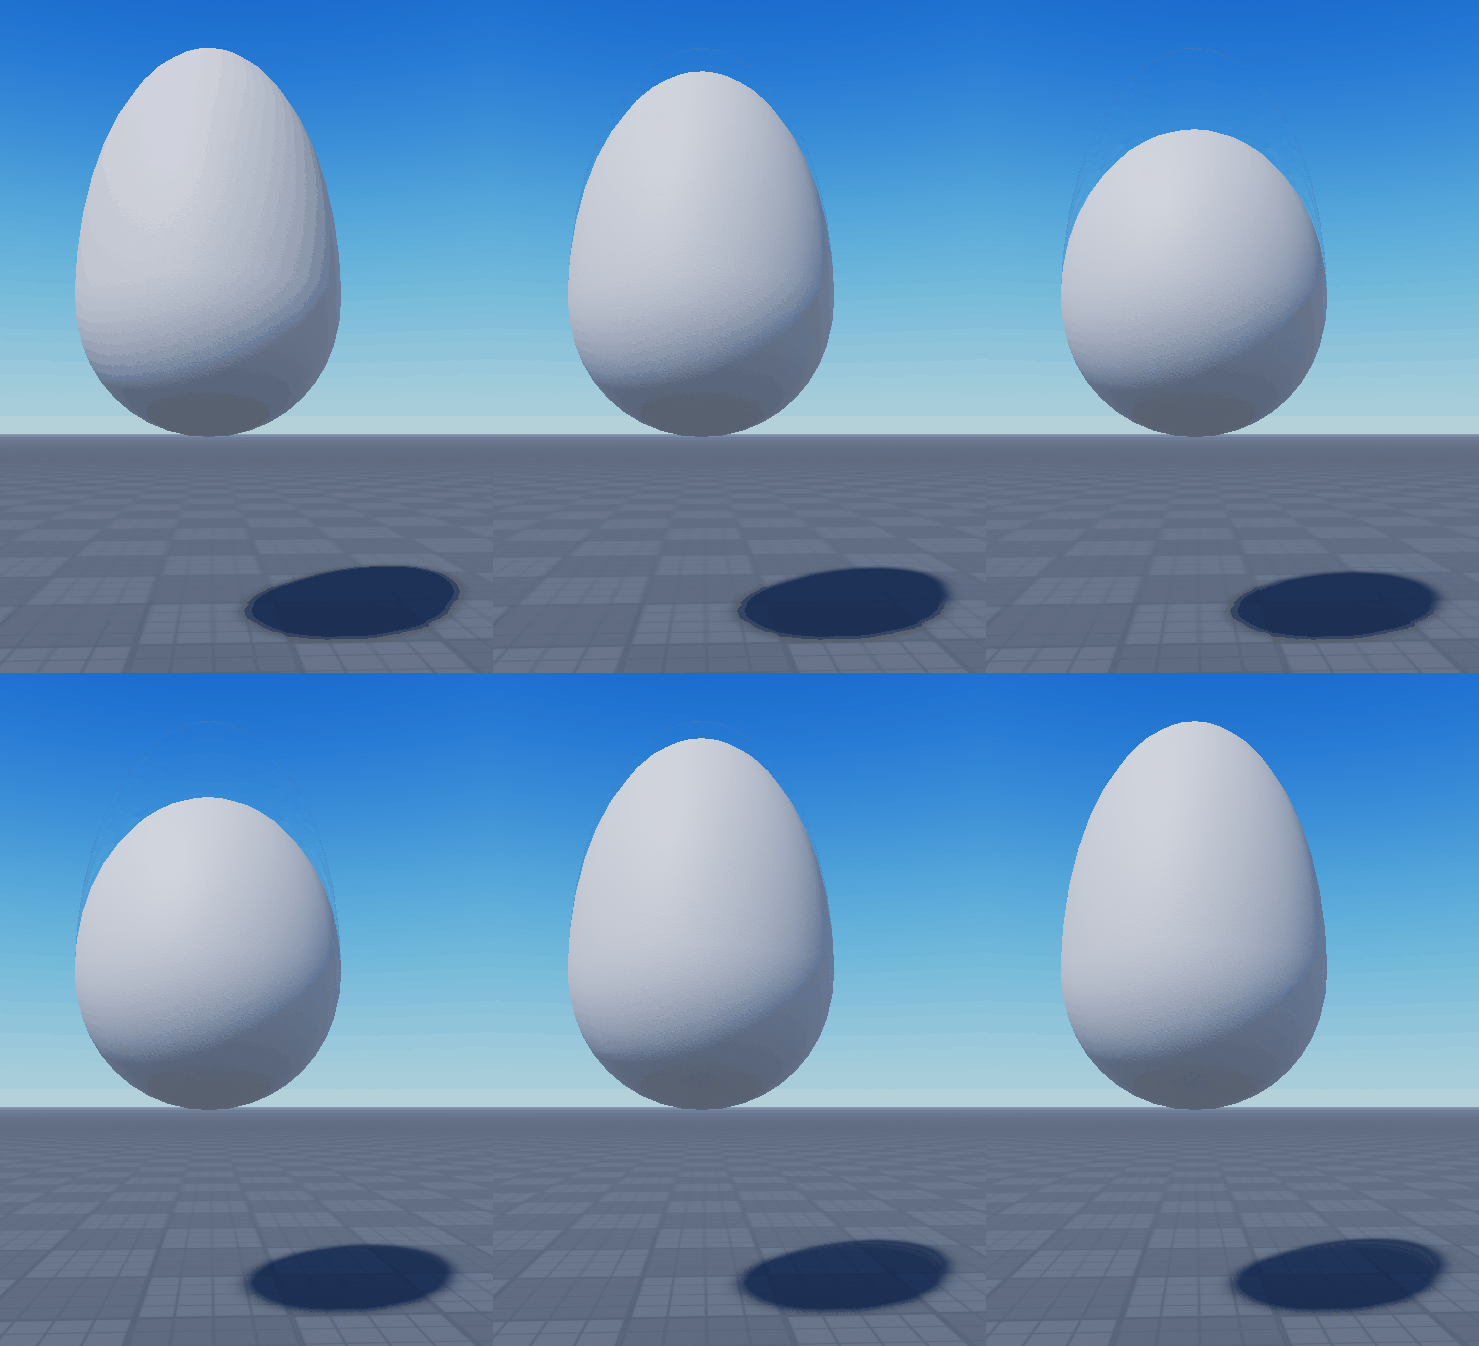
While static deformations are useful, WrapDeformer instances have a CageMeshContent property that can be driven directly from an EditableMesh object. As the EditableMesh is used to modify the CageMeshContent, the WrapDeformer live-deforms the rendered MeshPart geometry while maintaining all the underlying skinning and FACS data.
The following code snippet starts with a MeshPart that already has a WrapTarget instance under it.
The steps it follows are:
-
Adds a
WrapDeformerinstance as a child of theMeshPart. -
Creates an
EditableMeshobject using theContentfrom the existingWrapTargetinstance’s cage mesh using
AssetService:CreateEditableMeshAsync. -
Sets the
WrapDeformerinstance’sCageMeshContentto the newEditableMeshso they are linked using:
wrapDeformer:SetCageMeshContent(Content.fromObject(cageMeshEM)) -
At this point, any vertex position changes to the
EditableMeshupdate theWrapDeformercage mesh which in turn is live-deforming the parentMeshPart. -
To illustrate this, the snippet then performs a “stretch” operation on the
EditableMeshvertices in a loop which live-deforms the original sphere mesh.
The resulting dynamically deformed sphere looks like this:
Click to expand for the full code snippet:
-- Get handles to the parent MeshPart and sibling WrapTarget
local meshPart = script.Parent
local wrapTarget = meshPart.WrapTarget

-- Get Services
local AssetService = game:GetService("AssetService")
local RunService = game:GetService("RunService")

-- Create a WrapDeformer instance and put it under the MeshPart
local wrapDeformer = Instance.new("WrapDeformer")
wrapDeformer.Parent = meshPart

-- Create a new EditableMesh object from the WrapTarget's cage mesh
local cageMeshEM = AssetService:CreateEditableMeshAsync(wrapTarget.CageMeshContent)
-- Create a copy of the same EditableMesh object for the animation
local cageMeshEMCopy = AssetService:CreateEditableMeshAsync(wrapTarget.CageMeshContent)

-- Link the WrapDeformer's CageMeshContent to the editableMesh
wrapDeformer:SetCageMeshContent(Content.fromObject(cageMeshEM))

-- Function that updates the positions of the vertices
-- in an editable mesh with a "vertical stretch"
function updateWrapDeformerCageMeshVerts(verts, t, duration)
	local alpha = math.clamp(t / duration, 0, 1)
	alpha = math.sin(alpha * math.pi * 0.5)
	for i, vertId in ipairs(verts) do
		local p0 = cageMeshEMCopy:GetPosition(vertId)
		local p1 = Vector3.new(p0.X, p0.Y + math.clamp(p0.Y, 0, 100)*0.9*alpha, p0.Z)
		cageMeshEM:SetPosition(vertId, p1)
	end
end

local duration = 1
local t = 0
local verts = cageMeshEM:GetVertices()

-- Actually animate the verts in a loop
while true do
	repeat
		t += RunService.PreSimulation:Wait()
		updateWrapDeformerCageMeshVerts(verts, t, duration)
	until t >= duration
	repeat
		t -= RunService.PreSimulation:Wait()
		updateWrapDeformerCageMeshVerts(verts, t, duration)
	until t <= 0
	t=0
end
Example: Dynamic deformations of a rigged, skinned and animated Mesh
The previous illustrative example showed how the WrapDeformer instance cage mesh could be dynamically driven with an EditableMesh but you would be better off just using an EditableMesh directly on the sphere in the above case.
The value of WrapDeformer is more apparent when the MeshPart contains rigging and skinning data and is animated. In the example below, we start with a rigged and skinned mesh of a palm tree and then do the same “stretch” deformation on it by modifying the WrapDeformer cage mesh dynamically with an EditableMesh. In this case, you will notice that in the swaying animation, skinning and rigging data on the palm tree are properly deformed as well.

With this powerful workflow that combines WrapDeformer and EditableMesh you can start to imagine some interesting use cases. For example, you now have the tools to modify a fully rigged and skinned Roblox avatar!
Example: Blend shape (“shape keys”) Workflow
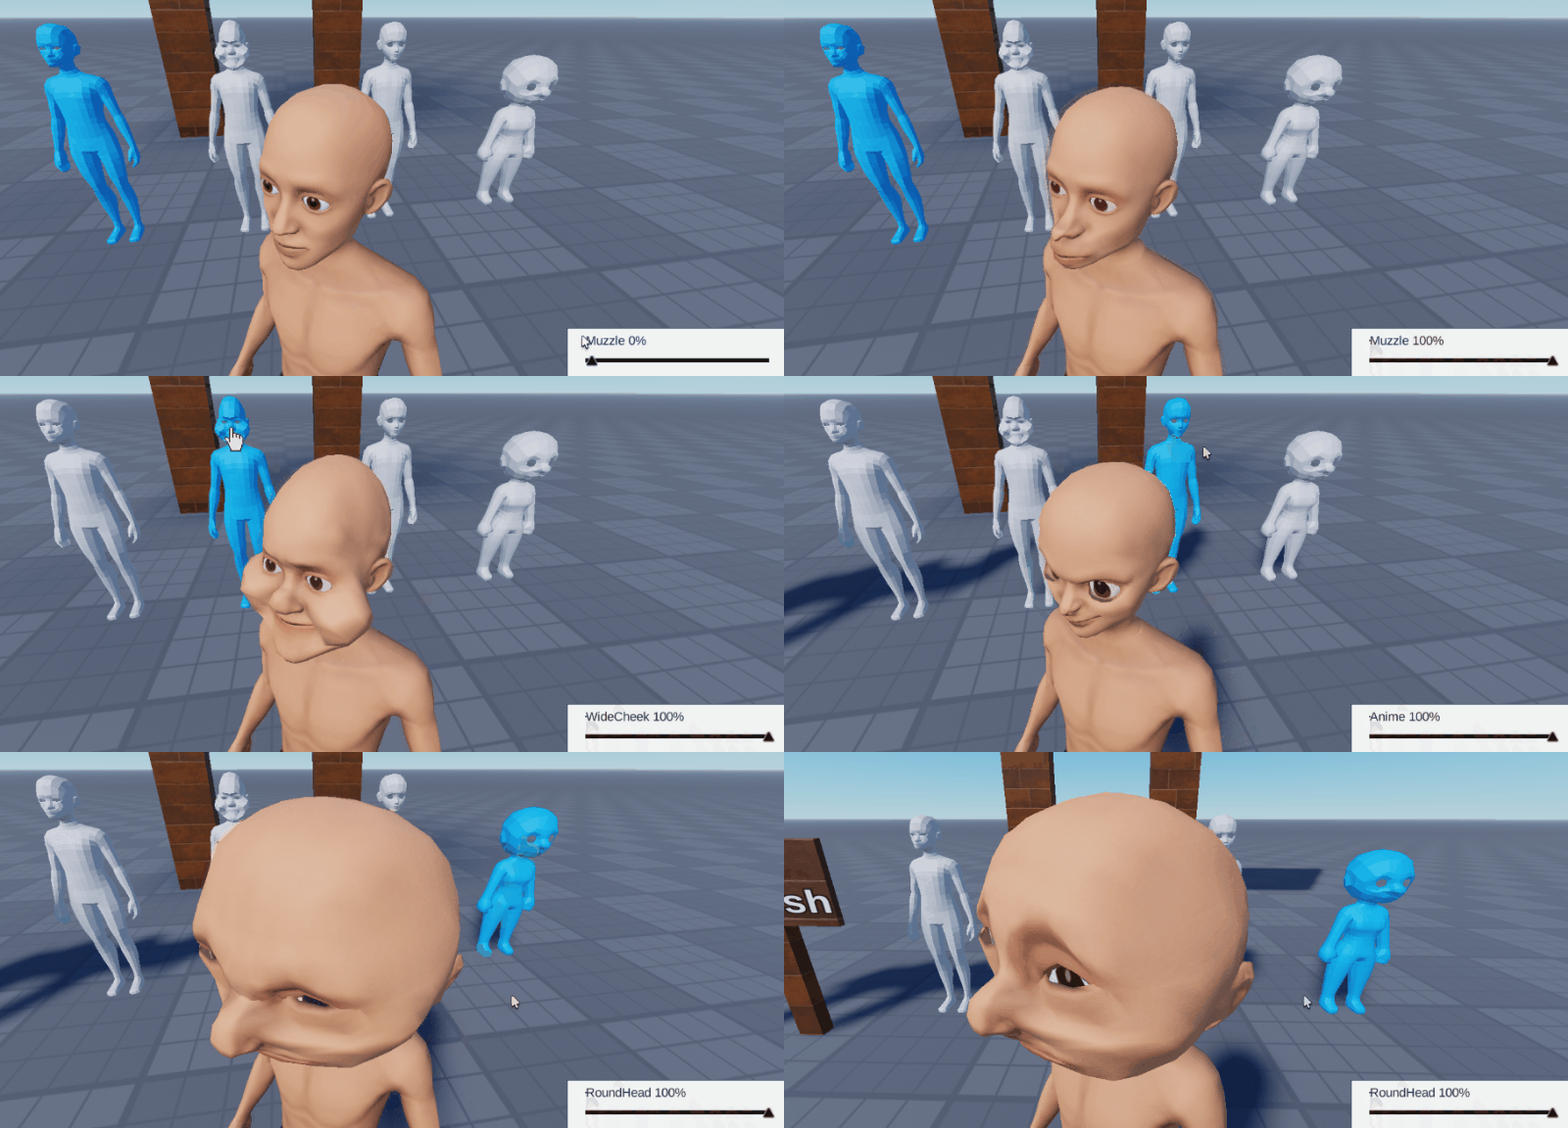
A common workflow when working with mesh deformers is to use Blend shapes (a.k.a., “shape keys”). In this workflow, you define a baseline mesh and one or more target meshes and then interpolate between them to get a variety of shapes. This workflow requires creating a correspondence (mapping) between vertices in the baseline mesh and the same vertices in the target mesh so you can smoothly interpolate positions between them.
If you were to use an external tool like Blender to create a baseline cage mesh and then deform the vertices to create one or more target cage meshes, you would upload each of these as a separate mesh asset and then try to interpolate between them using EditableMesh. A common problem you might encounter with this workflow is that the vertex IDs of one EditableMesh object may not correspond to the same vertices on the other, giving you undefined behavior when you interpolate between them.
A great way to resolve this problem is to leverage the UVs across all the uploaded mesh assets since UV coordinates are generally stable when you create such “shape keys” from the same underlying mesh in external tools. With this method, as long as each of the meshes (or “shape keys”) have the same topology (i.e., number of vertices and connectivity between them) and UVs, you should be able to build a correspondence map between their vertices using the following steps:
- Upload each of the meshes to Roblox as separate assets and ensure they have the same topology and UVs.
- Load the baseline mesh and the target mesh into their own
EditableMeshobjects. - Iterate through all the UVs of both
EditableMeshobjects and compare them. - If the UV coordinates match, add the vertices as a pair to a table to store their correspondence.
- When you are modifying vertex positions on the baseline mesh, you can then use this table to look up the position of the corresponding vertex in the target mesh to interpolate between them.
You can download the source cage meshes used to create this demo here:
cages.zip (715.7 KB). These cage meshes represent a lower resolution version of the avatar where each vertex has a unique UV value. Each cage mesh has been edited to be a target shape for the avatar. The unique UV values allow for a consistent mapping between the different cages. The WrapDeformer uses the difference between the Vertex Positions (mapping individual vertices via UV value) of the WrapTarget CageMesh and its assigned cage to drive the deformation.
Click to expand for a code snippet that follows the above steps, and returns a table of corresponding vertices
-- Returns a table of corresponding vertices between two EditableMesh objects
-- by comparing UV coordinates
function getCorrespondingVertices (editableMesh_MorphA, editableMesh_MorphB)
	local uvs_MorphA = editableMesh_MorphA:GetUVs()
	local uvs_MorphB = editableMesh_MorphB:GetUVs()

	local uvcoordinates_A = {}
	local uvcoordinates_B = {}
	local vertSets = {}

	for i, uvid_A in uvs_MorphA do
		local uv_coordinate = editableMesh_MorphA:GetUV(uvid_A)
		uvcoordinates_A[uvid_A] = uv_coordinate
	end

	for i, uvid_B in uvs_MorphB do
		local uv_coordinate = editableMesh_MorphB:GetUV(uvid_B)
		uvcoordinates_B[uvid_B] = uv_coordinate
	end

	for id_A, uvcoord_A in uvcoordinates_A do
		for id_B, uvcoord_B in uvcoordinates_B do
			if uvcoord_A == uvcoord_B then
				local vert_A = editableMesh_MorphA:GetVerticesWithAttribute(id_A)
				local vert_B = editableMesh_MorphB:GetVerticesWithAttribute(id_B)

				local pos_A = editableMesh_MorphA:GetPosition(vert_A[1])
				local pos_B = editableMesh_MorphB:GetPosition(vert_B[1])
				vertSets[vert_B[1]] = {pos_A, pos_B}
			end
		end
	end
	return vertSets
end

-- Assuming two editableMesh objects named baselineEditableMesh and targetEditableMesh
-- Get and store the table of vertex correspondence and set a morphAmt between 0 and 1
local vertsSet = getCorespondingVertices(baselineEditableMesh, targetEditableMesh)
local morphAmt = 0.5

-- Iterate through each of the verts, and set their position to be 50%
-- between the baseline and target vert position
for vertID, v in vertsSet do
	local newpos = v[2]:Lerp(v[1], morphAmt)
	baselineEditableMesh:SetPosition(vertID, newpos)
end
Example place file
Download the file here: WrapDeformerDemo_v7.rbxl (585.0 KB)
Usage Instructions
- Download and open up the RBXL file in Studio.
- Hit Play.
- The Static WrapDeformer and WrapDeformer + Rigged, Skinned & Animated MeshPart sections are just for viewing and are not interactable.
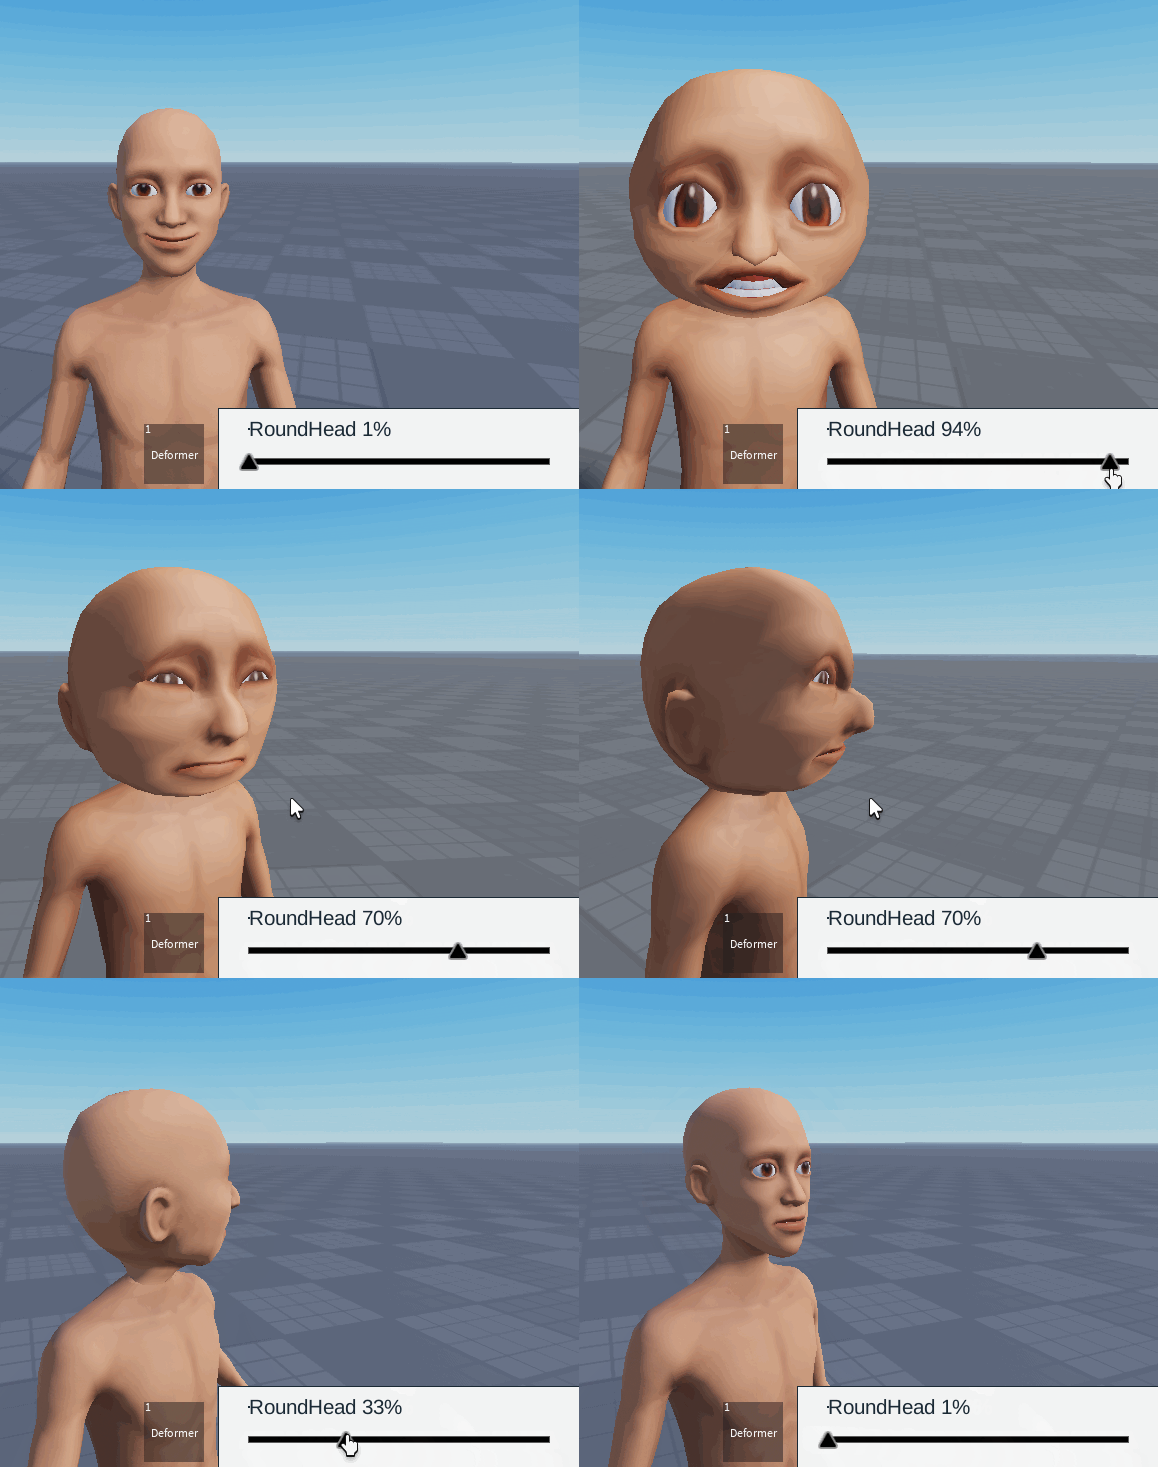
- For the Blend Shape Workflow section, click on any of the avatar cage meshes to select it.
- Use the slider at the bottom right to morph your own avatar’s head to the target cage mesh you selected.
- It helps to use the mouse scroll wheel to zoom into your own avatar’s head so you can see the changes live as you move the slider.
- You can switch to a different cage mesh at any time to compare them.
- Once you select a cage mesh, your avatar’s head will start cycling through a variety of emotes to show how the
WrapDeformerdeals with animated joints / skinning weights.
Notes
-
Under Workspace, you should find three folders that contain all the instances for each of the above examples
-
Workspace > Simple WrapDeformershows how a Sphere can be deformed statically with aWrapDeformer. -
Workspace > SkinnedAnimatedMeshshows how an animated, skinned and rigged palm tree can be deformed dynamically. -
Workspace > BlendShapeWorkflowcontains a group of cage meshes that can be used as shape keys to deform the user’s avatar.
-
-
Simple WrapDeformer
- To see an example that shows how to use an animated (via script)
EditableMeshto drive aWrapDeformercage mesh that deforms a sphere take a look at
Workspace > WrapDeformer > DynamicallyDeformedSphere > WrapDeformerScript.
- To see an example that shows how to use an animated (via script)
-
SkinnedAnimatedMesh
-
Workspace > SkinnedAnimatedMesh > PalmTree_Rigged_Anim_Deform > PalmTree > PalmWrapDeformerScriptis identical to the aboveWrapDeformerScriptbut is applied to an animated, rigged and skinned palm tree mesh.
-
-
Blend Shape Workflow
- To see how the Blend Shape workflow is achieved, take a look at
StarterGui > ScreenGui > LocalScriptas a starting point. - The sibling
morphFuncsscript contains the thegetCorrespondingVerticesfunction that uses the UV coordinates of twoEditableMeshobjects to determine corresponding vertices between them. - Due to permissions restrictions on animations, you will need to manually publish the palm tree animation under your own account and replace the ID in a couple of scripts before you can play the animation.
- To see how the Blend Shape workflow is achieved, take a look at
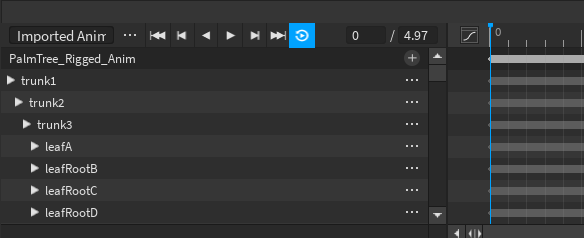
Click for instructions to publish the tree animation under your own account
-
First, open the Animation Editor after selecting Avatar in the ribbon.
-
With the Animation Editor panel open, select the
Workspace > SkinnedAnimatedMesh > PalmTree_Rigged_Animmodel in the hierarchy. -
When selected, you should see the imported animation populate in the panel.

-
Once the animation has loaded, you can publish it by selecting the three dot menu and then the Publish to Roblox option.

-
After completing the publishing process, make sure to copy the Asset ID that is generated and then replace the animation id on Line 3 in the following two scripts:
Workspace > SkinnedAnimatedMesh > PalmTree_Rigged_Anim > AnimationController > ScriptWorkspace > SkinnedAnimatedMesh > PalmTree_Rigged_Anim_Deform > AnimationController > Script
Best Practices
- When using the WrapDeformer on a Dynamic Head with Skinning and FACS data, there is a limit to how much it can be deformed while maintaining the quality of the facial expressions. To maintain quality, the deformation should be smooth, and the semantic meaning of the vertices should not change.
Known Issues
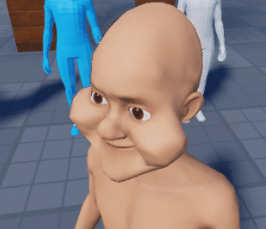
- Heavy deformation of the face can lead to skinning artifacts around the eyes and mouth during some FACS animations. This will be fixed shortly in an upcoming release, though best practices should still be followed.
What’s Next
Avatars and other skinned meshes play such an important role on Roblox, breathing life into so many experiences. We hope with WrapDeformers you now have a new tool in your toolbelt to manipulate and customize them in your experiences. Feedback is always welcome and we can’t wait to see what you will create by combining the power of WrapDeformer instances and EditableMesh objects.
Thanks,
@BloxMachina, @Sir_Bedevere, @TheGamer101, @ContextLost, @L3Norm, @LowDiscrepancy, @monsterjunjun, @c0de517e, @FarazTheGreat, @syntezoid, @portenio, @FGmm_r2, @gelkros


