![]() Hello, and thank you for checking out my first community resource! I don’t know how useful this could be to other developers (due to its flaws and imperfections), but I must say, welcome to…
Hello, and thank you for checking out my first community resource! I don’t know how useful this could be to other developers (due to its flaws and imperfections), but I must say, welcome to…

 What’s This?
Have you wanted your experience to have characters similar to Roblox’s girl bundle, but with better proportions, or do you just want characters that look like somewhat “off” Robloxians? Well, you might find this useful.
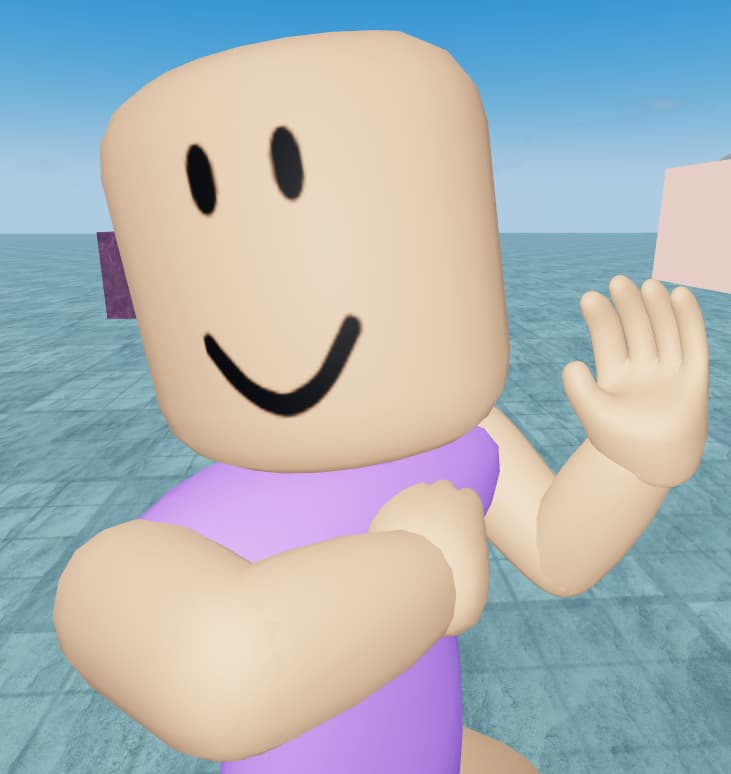
This is my attempt at making a completely custom R15 character model in Blender, loosely based on the proportions of the woman torso, girl arms (though thinner), girl legs, and an almost 1:1 imitation of the standard head mesh, but optimized to look the best from its front!
This character uses all of the standard attachments, so it supports most rigid accessories and layered clothing (I think). Most head accessories and hair should look fine here, but anything modeled around the default head mesh may hang down in front of the head. It also has grip attachments to carry tools, but its placement may be inaccurate. Don’t let any of this discourage you from trying out this resource, however!
Here’s a picture showing all 15 meshes that comprise this character model:

(This face texture was drawn by @rafa902O15 for Project Magical Mary.)
This character model won’t mesh well with some genres like first-person shooters, but can work well for roleplaying experiences, including Royale High clones, neighborhood/housing experiences, and anything that revolves around having a job at a café, restaurant, or bakery!
This model works as expected with Rthro scaling, so every body part will change size like you expect. Smaller characters’ hands become chubbier, which is perfect for games with playable infants or toddlers.
 History
So, why did I create my own character model/bundle? Well, y’know what someone has surely said at some point: strange situations lead to equally strange creations. In September last year, Roblox almost lost their mind, wanting to add extra rules mandating pushy prompts to buy accessories, and limitations on the assets that developers could use in their experiences, which included Roblox’s own meshes.
This insane (and still inevitable) update made me begin thinking of how it could screw my planned experience, Project Magical Mary, over. Among other thoughts, I started fearing that players might not be allowed to use Roblox’s official R15 bundles like the woman and girl sets, which I wanted to use.
Later in that topic, I made a reaction post, which isn’t any less baffled than I am now. In it, I said this:
My reaction was pretty crazy, but unlike most of my projects, I actually went through with my claims and made my own character model.
 Download

If you would like to use this character model in your experience, you can add it using one of the two links below. Please consider giving credit to me if you use this character model, though.
What will be done if Roblox's asset permissions are expanded to affect meshes?
The RBXM files found in the “advanced” download (and the Creator Store model) use meshes that were submitted to Roblox under my Magical Mary Fan-Group. Because of this, they will always be usable in my experiences, but if Roblox expands asset privacy to more assets than sounds, this could render this character model unusable and may break your experience! If Roblox makes this mistake, send me a message on the DevForum notifying me about the changes, and I’ll try to make all of the body messages accessible to the public.
If that’s impossible, I’ll try to grant your experience access to any relevant assets. This may have the same frustrating restriction as sounds where Roblox won’t allow me to do that without editing permissions, so you might have to trust me and temporarily give me the “edit experiences” permission, just so your experience can use my meshes. (That shouldn’t be necessary at all just to give arbitrary experiences permissions, but I digress!)
Simple
If you just want to import the latest and greatest release of my model to your experience, you can get the model from the ![]() Creator Store. Import it into Studio and you can use it as a rig (in the workspace) or a replacement character (by putting the model in StarterPlayer).
Creator Store. Import it into Studio and you can use it as a rig (in the workspace) or a replacement character (by putting the model in StarterPlayer).
Sadly, StarterCharacter replacements don’t automatically use the player’s clothes and accessories, so they will show up as bare mannequins with light skin tone, a light purple torso, and pink legs unless you write a script that gets their HumanoidDescription and manually grabs their body colors, face decal, and accessories from it. Here’s a modified version of the code that I use in my experience now:
local Players	= game:GetService("Players")

local DefaultId	= 131568269	-- Player user ID that will be used in local multiplayer tests. (Code otherwise errors due to negative user IDs.)

--[[
	ImportRBLXAccessories (takes Model reference and three strings, returns nothing)
	Splits the provided comma-separated string into an array, then tries to load each catalog item
	using InsertService and parent it to the player's Character.
]]--
local function ImportRBLXAccessories(_character : Model, _list : string, _instType : string, _label : string)
	if _list:len() > 0 then
		for num, item in _list:split(",") do
			local temp_catalogAsset										= game:GetService("InsertService"):LoadAsset(tonumber(item))
			local temp_realItem											= temp_catalogAsset:FindFirstChildOfClass(_instType)
			if temp_realItem then
				temp_realItem.Name = _label .. num
				temp_realItem.Parent = _character
			end
			temp_catalogAsset:Destroy()	-- Remove the unnecessary Model container created upon importing.
		end
	end
end

--[[
	NEW CODE FOR CUSTOMIZING NEW CHARACTER MODEL
	To test the new, completely custom R15 character model, all players use this character, with no way to opt out. One
	potential issue with it is that they aren't wearing anything, which could be bad. Let's use this player's
	HumanoidDescription to "customize" the character with their skin tone and 2D clothes.
]]--

local function CustomizeCustomCharModel(_character : Model)
	--[[
		Negative user IDs are used when doing a local multiplayer test, so a set user's ID is used during those.
		Otherwise, actual user IDs are used.
	]]--
	local UserId				= Players:GetPlayerFromCharacter(_character) and Players:GetPlayerFromCharacter(_character).UserId or DefaultId
	local RobloxHumanoidDesc	= Players:GetHumanoidDescriptionFromUserId(UserId)

	if RobloxHumanoidDesc then	-- The starting character's HumanoidDescription is useless, so let's retrieve the player's real one!
		local BodyColors							= _character:FindFirstChildOfClass("BodyColors")
		local CharHumanoidDescription				= _character:FindFirstChildOfClass("Humanoid"):FindFirstChildOfClass("HumanoidDescription")
		if BodyColors then
			BodyColors.HeadColor3						= RobloxHumanoidDesc.HeadColor
			CharHumanoidDescription.HeadColor			= RobloxHumanoidDesc.HeadColor

			BodyColors.TorsoColor3						= RobloxHumanoidDesc.TorsoColor
			CharHumanoidDescription.TorsoColor			= RobloxHumanoidDesc.TorsoColor

			BodyColors.LeftArmColor3					= RobloxHumanoidDesc.LeftArmColor
			CharHumanoidDescription.LeftArmColor		= RobloxHumanoidDesc.LeftArmColor

			BodyColors.RightArmColor3					= RobloxHumanoidDesc.RightArmColor
			CharHumanoidDescription.RightArmColor		= RobloxHumanoidDesc.RightArmColor

			BodyColors.LeftLegColor3					= RobloxHumanoidDesc.LeftLegColor
			CharHumanoidDescription.LeftLegColor		= RobloxHumanoidDesc.LeftLegColor

			BodyColors.RightLegColor3					= RobloxHumanoidDesc.RightLegColor
			CharHumanoidDescription.RightLegColor		= RobloxHumanoidDesc.RightLegColor
		end

		-- Give this player their 2D clothes, if any of the catalog IDs are defined.
		if RobloxHumanoidDesc.Shirt > 0 then
			local temp_shirt									= game:GetService("InsertService"):LoadAsset(RobloxHumanoidDesc.Shirt)
			temp_shirt:FindFirstChildOfClass("Shirt").Parent	= _character
			temp_shirt:Destroy()
		end
		if RobloxHumanoidDesc.Pants > 0 then
			local temp_pants									= game:GetService("InsertService"):LoadAsset(RobloxHumanoidDesc.Pants)
			temp_pants:FindFirstChildOfClass("Pants").Parent	= _character
			temp_pants:Destroy()
		end
		if RobloxHumanoidDesc.GraphicTShirt > 0 then
			local temp_torsoGFX									= game:GetService("InsertService"):LoadAsset(RobloxHumanoidDesc.GraphicTShirt)
			temp_torsoGFX:FindFirstChildOfClass("ShirtGraphic").Parent = _character
			temp_torsoGFX:Destroy()
		end

		-- If this player isn't using the local "face.png", let's give them their actual face texture.
		if RobloxHumanoidDesc.Face > 0 then
			local temp_faceDecal : Decal						= _character:WaitForChild("Head"):FindFirstChild("face")
			if temp_faceDecal then
				local temp_faceCatalogAsset						= game:GetService("InsertService"):LoadAsset(RobloxHumanoidDesc.Face)
				temp_faceCatalogAsset:FindFirstChildOfClass("Decal").Parent = _character:WaitForChild("Head")
				temp_faceCatalogAsset:Destroy()	-- Remove the unnecessary Model container created upon importing.
				temp_faceCatalogAsset.Name						= "face"
				temp_faceDecal:Destroy()	-- Destory the original face texture; We've imported its replacement.
			end
		end

		ImportRBLXAccessories(_character, RobloxHumanoidDesc.BackAccessory, "Accessory", "BackAccessory")
		ImportRBLXAccessories(_character, RobloxHumanoidDesc.FaceAccessory, "Accessory", "FaceAccessory")
		ImportRBLXAccessories(_character, RobloxHumanoidDesc.FrontAccessory, "Accessory", "FrontAccessory")
		ImportRBLXAccessories(_character, RobloxHumanoidDesc.HairAccessory, "Accessory", "HairAccessory")
		ImportRBLXAccessories(_character, RobloxHumanoidDesc.HatAccessory, "Accessory", "HatAccessory")
		ImportRBLXAccessories(_character, RobloxHumanoidDesc.NeckAccessory, "Accessory", "NeckAccessory")
		ImportRBLXAccessories(_character, RobloxHumanoidDesc.ShouldersAccessory, "Accessory", "ShoulderAccessory")
		ImportRBLXAccessories(_character, RobloxHumanoidDesc.WaistAccessory, "Accessory", "WaistAccessory")
	end
end

-- This isn't the best way to handle this (because of possible memory leaks) but this connects the function above to players' characters loading.
Players.PlayerAdded:Connect(function(_player)
	_player.CharacterAdded:Connect(CustomizeCustomCharModel)
end)
I apologize for how awkward and complicated that this resource can be, but if you create a modified version of the character model, you’ll have to apply the modifiers, reduce each part’s polygon count, flip the left arm/leg’s UV maps horizontally, and copy all of the attachments from one of the official versions after you import it into Roblox Studio.
https://www.dropbox.com/scl/fi/zbabelrg5bxbgxy3crlc1/Mary-s-Custom-Character-Model.7z?rlkey=4b7wuih01ffyocm35abwxvrfx&dl=0
 The Flaws
Making a custom character is really complicated (and would be way harder without the documentation made by DevForum users), and you may notice the imperfections and flaws if you look closely at this model (especially older versions).
Version 3 (previously “v4”)
- Roblox seriously doesn’t use enough pixels for shoes in its clothing textures, allocating more pixels to the soles (under the shoes) than the other sides that players will see more often! Due to this, even the latest and greatest version has strange-looking shoes. Sorry, but this is the best I can do with R15’s limitations.
- The character’s neck doesn’t animate or bend, and may look odd when their head tilts or leans more than 45 degrees in any direction.
- Body accessories tend to float in front of or behind the player’s torso if they’re supposed to “wrap around” them. This can’t be fixed, as UGC accessories are modeled around one of Roblox’s bundles, like the default blocky or woman torso, so nothing will snugly fit my character model, but should look passable when the camera isn’t looking too closely. (My model is intended for my experience, which should use a very similar technique to Royale High for equipping custom clothes and accessories, so it wasn’t designed to actually wear anything from the “catalog” or Creator Store like this; It’s only supported so this model can function in most experiences without issues.)
 This version is even less optimized than older versions, coming in at around 9,044 triangles per character! This model may need a low-poly version; Would anyone like that, though?
- Characters scaled using Rthro character scaling (like in my experience)'s joints look glitchy, especially when they use a height scale over 1! I don’t think these issues can be fixed unless the caps (and therefore, the “smooth joints”) were removed, which would lead to the opposite issue, messing up shorter characters… Apologies if this particular bug makes your characters look weird.
-
- Their torso extends down between their legs, making them look strange when they bend in any direction.
-
- Additionally, their elbows and legs start to look “dislocated”, as each part’s “cap” stretches farther than it’s meant to, poking through the next part in series.
Versions 1, 2a, and 2b (formally “v1-3”)

 Hands’ pivot points/wrist attachments aren’t placed well. If either hand twists too much, it looks like it’s disconnecting from their arms. (This may have been fixed in v3.)
 Because of how Roblox’s UV layout allocates a very small area for feet/shoe texturing, shoes have horrible texture-mapping; The shoe tops are stretched! (This was sort of improved in v3, but Roblox’s leg UV map/layout leaves a lot to be desired.)
- Clothing UV mapping is far from perfect around the elbows and the upper/lower torso split; Clothes are cut off strangely at each seam, so no 2D clothing will look right until a later release.
- I don’t know the best way to handle the split between the upper and lower torso segments, so the character’s lower torso looks strange if they bend too far forward or backward.
- Version 2b of the character model is 8.5k triangles!
 For how much I tend to throw shade at unoptimized meshes, my own character mesh won’t be performant for weak mobile devices on servers that have more players or NPCs!
 Credits
Though I found out about character rig attachments and Humanoid’s R15 body part replacement method by myself, 2D clothing wouldn’t have been supported without @Corecii and @MackenzieFontana’s topics about R15 clothing UV mapping here in the DevForum!
- UV Map References for R15 & R6 Humanoid Body Parts to Support Clothing
- Classic Clothing UV Mapping Guidelines[R15]
 Enjoy!

I hope someone finds this resource useful for their project, and doesn’t mind the aforementioned flaws… As making a character model is complicated and time-consuming (to simplify, import, and copy over attachments to the model), I don’t believe I’ll make most changes based on constructive criticism in this topic, but hopefully that’s okay.
This character started as a personal resource, and I’ve made the source files public if anyone wants to modify and make their own version of this model. Also, you don’t have to use this if it doesn’t work for you.
Older Media Archive (view older versions of media from this post)
Header (v1)

Header (v2)

Mary drinking (v1)

 Polls
Polls
- 1
- 2
- 3
- 4
- 5
- 6
- 7
- 8
- 9
- 10
- Definitely!
- Maybe after some issues are fixed.
- I don’t know…
- No, it wouldn’t work for my experience.
- No, this isn’t a good resource.
 My Other Resources
If you enjoyed or found this character model useful, you may like the rest of my free resources! I believe that good resources shouldn’t be wasted, so I release any models or other resources before removing them from my experience, so others could make use of them. Additionally, if a model seems like it could be useful to developers, it will be put on the Creator Store, given it isn’t too specific to Project Magical Mary (like, if it has in-universe branding on it or details that must remain exclusive to it).
You can view all of my public resources on the ![]() Creator Store.
Creator Store.