Very cool, just tried v3. Worked awesome on the first try. Glad to see this getting updated still.
This took 11 min on a i7 9700KF @ 4.6ghz 8 core. 7k x 12k image.
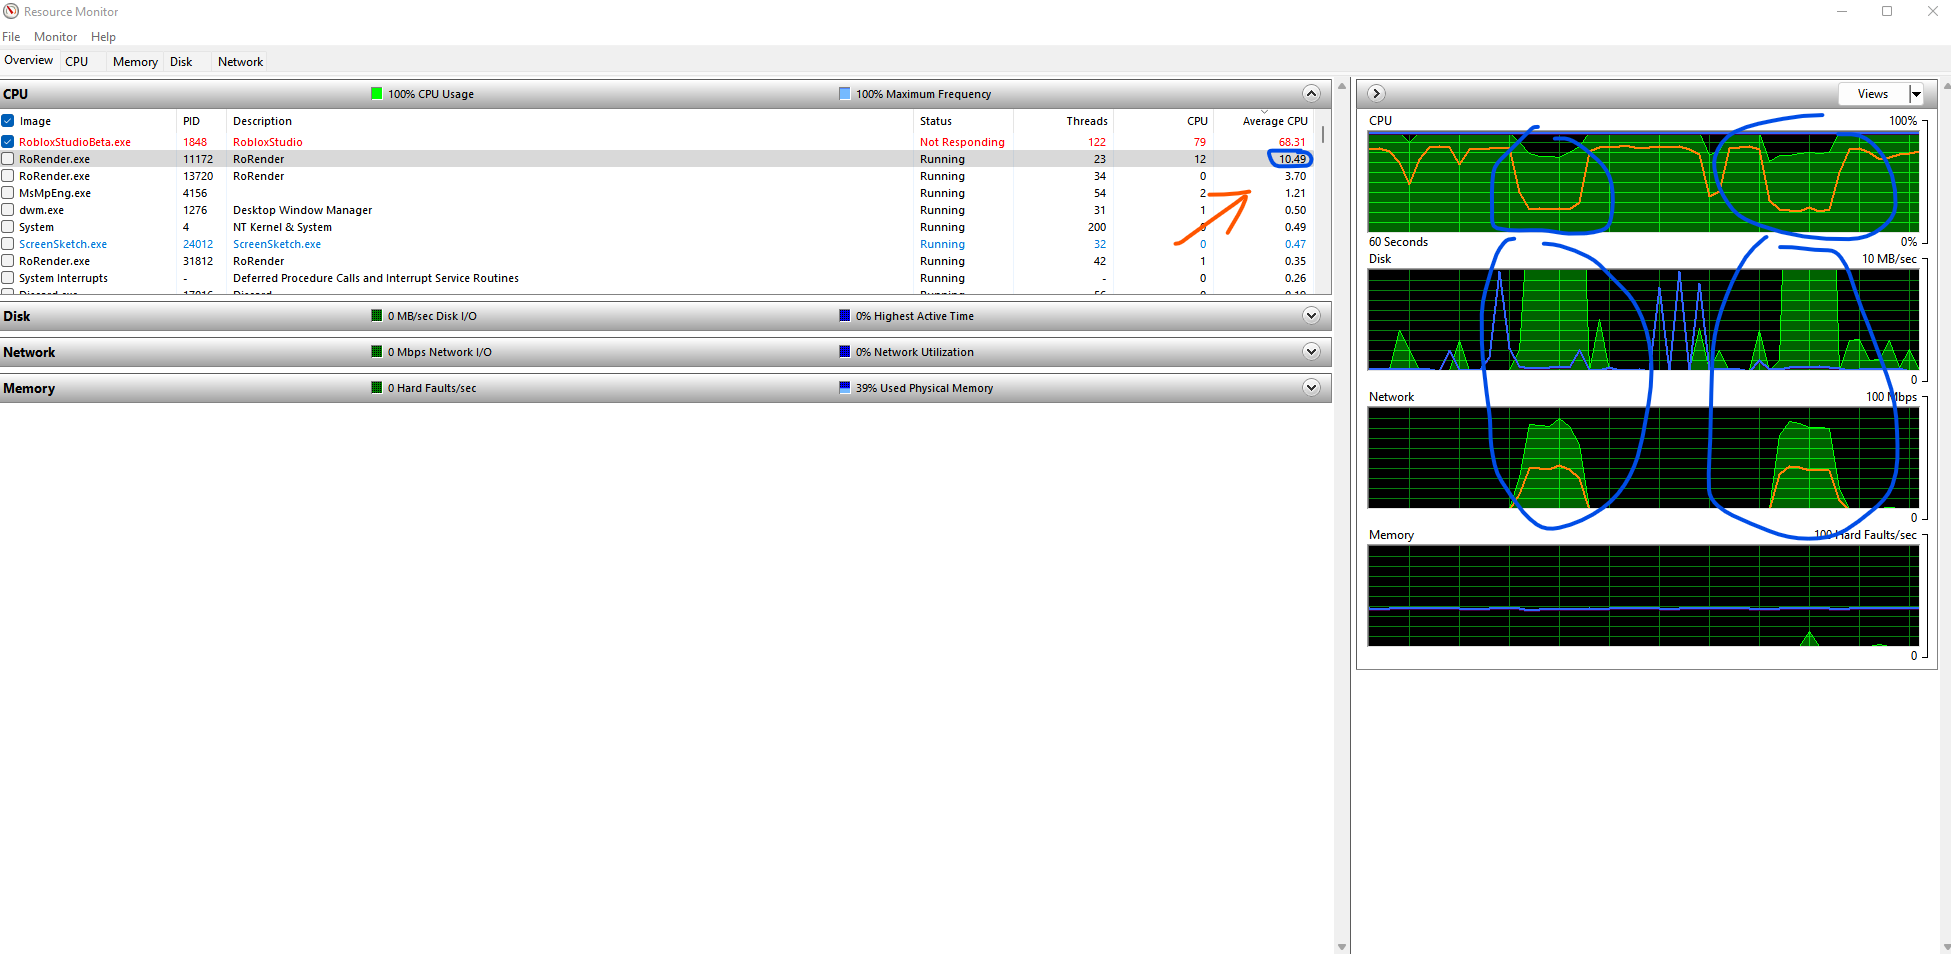
The only thing I could think of to improve is to send data while rendering, as it seems to pause rendering to send pixels. Could speed this up 20% maybe as the CPU isn’t getting full utilization 100% of the time. The orange arrow is pointing to the ro render application using 10% CPU avg, seems like a lot? Could reducing Rorender app CPU overhead improve studio render performance?
The CPU and disk usage is due to a few inefficiencies in the application which will be fixed in future updates.
Sending data while rendering is going to make a difference and we have plans on including that in future updates as well. It is not included in this one because without it Studio may stay unresponsive at all times making the PauseRender attribute useless. A solution to this is to have application tell Studio in response to SendData request to pause the render, and when want to unpause, doing it from Studio directly. This will require a few changes though so it will take some time.
Render looks great and was fast. I’m trying to use this with Plum’s minimap.
That tool requires you to write four values down: “Pixel Size X”, “Pixel Size Z/Y”, “Pixels/Stud”, and “Center Position”.
I could figure out Center Position by using the Position of Draggers.Center. However, I’m not sure how to find the previous values. Screenshots show as if the plugin used to display those values.
Is it possible to find these values or do I need to use an older version of RoRender?
It is working for me without any problems. You need to send a file which reproduces this error. Without reproducing the error somehow I cannot fix it properly. No one else has reported this issue yet.
The main values you need to configure Plum’s minimap are center position and the size of the map.
You can find center position by position of the Center part in the Draggers folder. The size can be found by checking the Scale property of the Mesh object inside Center part.
Just put these values in the Plum’s minimap config and it should work.
Something doesn’t seem to be working for me. It seems to be off by around 75 studs. I tried swapping the X and Y of Map.size in case that was the other way around, but it still seems off for whatever reason. I’m not quite sure why. Any other ways I can try and debug this?
I don’t know how Plum’s minimap works internally, it could be an issue with that. It is not possible for the MapSize and MapCenter to be wrong, as they are taken directly from properties.
If the MapSize is a Vector2, then when you paste in the size from Mesh.Scale, remove the middle value.
But, I really got the 404. Can you send your RoRender that works right now? When’s the last time you tried it just incase your just not updated on how it is?
I was able to complete a render using Ro-Render V3 in only 3 minutes for a map size of [4644.75, 1303.85, 5781.5]
I didn’t need to configure any transparent objects or textures. It rendered flawlessly as-is from setup.
Needless to say, I’m impressed with how good this plugin is and how useful it is for providing a map for me to use in Alianor III Anniversary’s radar system. Thank you for publishing this for us.
The specs - This just so no one thinks I’ve lied or that I’ve hidden anything or used something because this has happened many times already to me. 3 minutes does seem like an outlandish claim otherwise.
Relevant PC Specifications
Gigabyte Z690 UD AC for LGA 1700 Chipset
Power Supply - Seasonic Focus GX 850W PSU
Intel Core i9-10900F (10C/20T) - Hit 4.9/5.2 on All Core Turbo.
Kingston Fury RGB 32GB x 4 (128GB) DDR4 @ 3,200MHz
Zotac Gaming RTX 3060ti OC - 8GB
Case: Corsair 4000D Airflow
Cooling Solution:
Be Quiet! Shadow Rock 3 - Fan Mount: Corsair SP120 RGB Elite
Corsair SP120 RGB Elite (3 Intake @ Front, 2 Exhaust @ Top)
Corsair Included Fan for 4000D Airflow @ Rear Exhaust
Dual Fans (Zotac Included @ GPU)
Files and ROBLOX Studio Installation stored on an Western Digital SN-550 SSD.
External Weather was at 78F/28C
In the end, I’d love to include it but ROBLOX’s image compression limits and the floating point inaccuracies incurred by UDIM/UDIM2 mean I cannot accurately display the player position when scaling the map accordingly. Even with a 9291x9291 cropped variation of the image - it’s too inaccurate as UDIM2 is cutting off 4-5 decimal places that the player needs to understand where they are.
Sometimes it’s 4 studs off, sometimes it’s 8 studs off, sometimes it’s correct and it depends on how far away from map centre (or any whole number away on the X/Y) you are. It sucks but this is just how it is.
You could try splitting the image into 4 parts, insert each into its image label of the correct size, put all image labels inside a frame, and edit the position of that instead.
You could use offset to position the minimap (for more accuracy) and also manually detect for viewport size changes and manually change position according to that.
Viewport frames are also an idea by using parts and camera right above them, with a small FOV. This will also allow rotation of the map (which cannot be done with Frames as clip descendants does not work with rotated frames).
Because of the size of the map, the size of the images. There are noticeable splits or overlaps or it’s misaligning badly due to floating point imprecision.
ROBLOX’s implementation of float handling just isn’t where it needs to be for the precision I need to handle the map sizes I’m working with for a game.
Additionally to this, I wanted to get room interiors done as overlays to the map but with those techniques, it’s unfeasible.
I’m unfortunately better off using viewport frames for the precision I’d need, even though I don’t want to do that due to the overall map layout for the basic design would take well over 5,000 parts. A bad alternative to an equally annoying problem that show’s ROBLOX’s shortcomings as a game engine.
The main map for reference takes well over 25,000 parts spread over a large diameter (4644.75, 1303.85, 5781.5).