[Update] June 13, 2022
The Animation Curve Editor is now out of beta and in full release. Thanks so much for your feedback through the beta!
Hello creators! We’re excited to announce the beta release of our new Animation Curve Editor within the Animation Editor plugin. The Curve Editor is a new optional curve-based animation editing interface that complements the existing Dope Sheet view and allows you to have finer grain control over your animations.
In this beta, you can:
- Access our new Curve Editor, which provides a robust UI and additional animation tools and features specific to curve-based animations
- Convert existing animations to use in the Curve Editor
- Save and export animations for use in any experience
Using the Curve Editor
Once enabled in Studio, you can switch to and from the Curve Editor at any time. To switch to the Curve Editor:
- Open up the Animation Editor plugin
- Select the Curve Animation Icon

at the top of the Animation Editor panel. - If you have a Keyframe animation already loaded, your new channel-based animation will save under a new name with a “[CHANNELS]” suffix.

After you switch to the Curve Editor view, the button turns into an icon with diamonds. Clicking on it again will bring you back to the Dope Sheet view.
![]()
Track List
Similar to the original KeyFrameAnimation Dope Sheet mode, you can find the tracklist on the left side of the Animation Editor. All track operations are also available in the Curve Editor mode. This includes adding a new track, selecting tracks, expanding tracks to reveal their components, deleting tracks, etc. Similar to Dope Sheet mode, you can set a value for a track at the current position of the timeline by typing a value in the number field or using the number box slider. If no keyframe is defined at that time, the Animation Editor creates a new keyframe with the specified values.
Selecting tracks in the Track List displays their graphs in the Curve Editor. If a composite track is selected, its components will be displayed. For instance, when selecting the Head.Position track, the X, Y and Z components of that Position track appear.
Keyframes
Like the Dope Sheet view, you can perform operations on selected keyframes in the Curve Editor… You can click a keyframe to select it, and unselect a keyframe by clicking anywhere else on the timeline. You can select multiple keyframes by holding Ctrl or Shift. If the clicked keyframe is already selected, it will be removed from the selection
You can also select one or more keyframes by clicking and dragging the mouse. A highlighted rectangle displays the selection while holding the mouse button:

Selecting one or more keyframes highlights the adjacent curves of the same track(s), and displays their tangents:

Operations
You can move selected keyframes (change their value, their timestamp, or both) by dragging them. If you are changing the time or value of multiple keyframes, all selected keyframes adjust by the same offsets.
Additionally, if you select multiple keyframes that do not share the same timestamp, scaling bars will appear on both sides of the selection. Dragging these bars will change the “duration” of the selection, making the corresponding section of the animation go faster or slower:

Each keyframe has a contextual menu that offers a few additional options:

| Context Menu Function | Description |
|---|---|
| Delete Selected | Deletes the selected keyframes. |
| Cut / Copy / Paste Selected | Cut / Copy / Paste the selected keyframes to copy it somewhere else in the animation. |
| Reset Selected | Resets value of selected keyframes to 0. |
| Change Duration | Displays a dialog box that will allow the user to specify the duration of the selected segment as a number of frames or seconds. You can set your Timeline Unit preference in the Settings menu by pressing the Gear icon on the top right of the Animation panel. |
| Interpolation Mode | Sets how each keyframe interpolates to the next. Cubic (default), Constant, Linear |
| Use Auto-Tangent | Clears the tangents specified by the user and replaces them with automatic tangents. |
| Generate Curve | Creates an animation curve to interpolate Bounce/Elastic, In, In/Out, and Out direction curve interpolation. |
Bounce and Elastic Easings
Bounce and Elastic easings are not available in Curve Animations and are replaced with the options in the Generate Curves menu, allowing you to choose between Bounce/Elastic, In, In/out, and Out direction curve interpolation. Generating a curve removes all intermediate keyframes and replaces them with the keyframes needed to produce the desired easing.

Tangents

Tangents are two handles that control the interpolation before and after the keyframe. You can set tangents by clicking and dragging the handle to adjust the curve, or by using Auto-Tangent. If manually set, the tangent appears as a white line and filled circle.
Both tangents of a keyframe can be fixed by the user, resulting in a discontinuity in the original curve:

Unset tangents are automatically calculated based on the existing curve and are represented as a white line and empty circle. Unset tangent will be automatically calculated using the following rules:
| Tangents Set | Calculation |
|---|---|
| One Set, One Unset | The unset tangent handle aligns with the opposite tangent. |
| Both unset | Both tangents automatically adjust depending on the adjacent keyframes to produce a natural curve. |
You can right click a tangent to open a context menu where you can reset the tangent to automatic mode, or to set it to zero which aligns the tangent horizontally:

The Auto-Tangent option in the Keyframes contextual menu will clear both tangents, making them both automatic.
Euler Angles and Quaternions
The original KeyframeSequence Animations only support rotations as Quaternions. Even though three angles (Euler Angles) were displayed in the track list, all three values were represented by a single orientation keyframe. With Quaternions, when adding a new keyframe to one channel, such as Rotation.Y, keys for the other rotation channels are created at the same time.
Using Curve-based animation, you can now work with three separate Euler Angle channels for each orientation, each with their own independent keyframes. This opens up additional levels of control for animators.
As the standard for curve animation, the Curve Editor uses Euler Angles by default but can also edit quaternions. Keep in mind that Euler Angles may be less stable under certain conditions, such as a Gimbal Lock.
Since KeyframeSequences work with Quaternions and Curves work with Euler Angles, the Animation Editor will convert the Quaternions to Euler Angles automatically during the conversion to curves. It is worth noting that the animation might end up being slightly different between keyframes, especially when the Euler Angles approach a Gimbal Lock situation.
If the user decides to work with Quaternions, then the conversion to curves will preserve those quaternions, and the animation will not be modified (beyond the additional keyframes required for converting the Bounce and Elastic easings). However, you may find that editing the curves when working with Quaternions can be limiting and very different compared to the way curves work with Euler Angles.
Changing Between Euler Angles and Quaternion
The rotation mode to use can be set in the Settings menu in the top right corner of the Animation Editor:

Using Euler Angles
By default, the Animation Editor uses Euler Angles. When opening any existing KeyFrameAnimation animation, a prompt will appear asking you to convert the existing animation into a curve-based animation using Euler Angles. When accepted, the animation is converted to Euler Angles and can be saved as a new animation.
Conversion
When converting a KeyframeSequence Animation to Euler Angles-based Curve Animation, all the tracks will be converted to Euler Angles Curves, using the preferred Euler Angles Order.
If the animation is already a Quaternion based animation, a prompt appears when switching to the Animation Editor allowing you to convert each rotation track individually to Euler Angle curves.
Default Order
When working with Euler Angles, rotation channels are represented by three channel values, representing the X, Y, and Z axis. By default, KeyframeSequence Animations use an XYZ order, and this is still also the default with ACE. You can choose a different order based on preference through the Settings menu by clicking the Gear icon in the top right of the Animation Editor panel.
When initially loading a KeyframeSequence or a Quaternion-based Curve Animation, changing the Euler Angles Order does not affect the animation. However, it does affect how the Quaternions of each keyframe are transformed into X, Y, Z angles in the tracklist, which may visually affect the order in the timeline without affecting the animation.
When changing the Default Order of an existing Euler Angle track, the parent Rotation track remembers the order used during the conversion. Therefore, changing the default Euler Angles Order in the Settings menu has no effect on the Euler Angles tracks.
Changing the Default Order of an existing Rotation Track after converting it to Euler Angles can change the way the animation plays, since the values of each keyframe are preserved.
Note that it is impossible to convert back from Euler Angle tracks to Quaternions, though both are supported in the Animation Editor.
Using Quaternion Curves
While Euler Angles are the curve-animation standard and provide the most features, Quaternions can provide unique advantages. In some cases, animating a part with a single Quaternion curve can be much easier than adjusting the X, Y, Z angles individually
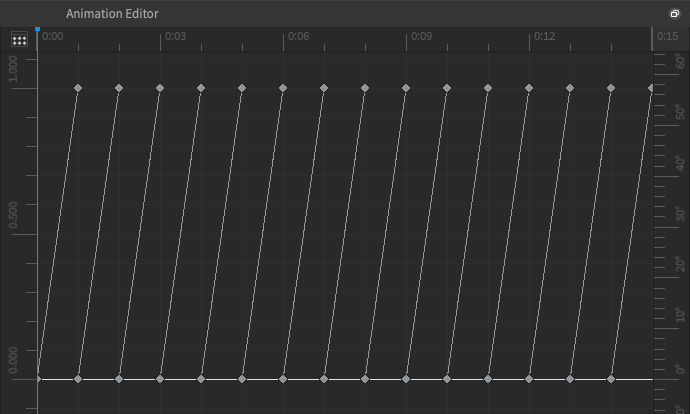
Quaternion curves interpolate from 0 to 1 over a set time. In the screenshots below, the same KeyframeSequence animation has been converted to Euler Angles, and to Quaternions:

With Euler Angles, the height of each dot represents its value over time. For instance, the top blue dot is a rotation around X of about 120 deg, the next one is 90 deg, etc.
With Quaternion curves, each segment goes from one orientation to the next, and the value of the line shows the interpolation factor between them. In this case, for instance, the animation starts from an orientation A, then linearly goes to orientation B. Once it is at B, it starts over, from B to C. Then from C to D, and so on.
Using the Curve Editor, you can change the interpolation of these quaternion segments by adjusting their tangents and make unique animation adjustments. In the case below, it shows how the part will go from one orientation to the next. Imagine the shortest rotation between two orientations A and B. The graph shows that the part will slowly start that rotation, then accelerate towards B, overshoot it, then stop, and come back to reach B. Imagine now the shortest rotation between the same B and another rotation C. The part will leave B quite quickly, then overshoot C and have some elastic easing towards C.

When working with Quaternions, keep in mind the following unique properties:
- Each segment starts at 0 and ends at 1, no matter how twisted the curve between them can be.
- Even though the quaternion graph is disconnected, the two keys at a specific timestamp represent the same orientation in the animation.
- Since each segment is bounded between 0-1, it is not possible to move a keyframe vertically. A keyframe can only be moved horizontally across the time axis.
- When a keyframe moves, its counterpart on the previous or the next segment also shifts. For instance, if the keyframe B at 1.0 in the screenshot above is moved to the right, then the keyframe B at 0.0 is moved as well.

- When adding a keyframe to a segment, that segment will be split into two segments so that each one of them starts at 0 and ends at 1:

What’s next?
We are already very excited about this first release of the Curve Editor, but there’s more to come!
- Weighted tangents and the support of Bezier curves
- More controls when moving keys (changing only their time, or their value, but not both at the same time)
- More generated curves (sine wave, noise, …) and more parameterization
Shoutouts to @NotARobloxEngineer, @alpacatapir, @Bloxsometa and @HaloArbiter_101 for all their hard work! Please reach out with any feedback, questions or bug reports!

 You need to upgrade to Studio v524 and enable the Channel Animations beta feature.
