
Welcome to the world of Ro-Scale!
Check out our group!
Browse our catalog!
Thank you for your interest in Ro-Scale and the DCC system. Ro-Scale is the reinvention of the popular ‘Ro-Gauge’ miniature train system created by RedTrain in 2016, revitalized with my brand-new DCC system. This post will tell you how to use the DCC system, how to start building your own layout, how to configure your own locomotive, and all the features that give you – the place owner – control of how the layout operates.
Table of Contents
- Table of Contents
-
Your First Set
– The DCC Controller
– Couplers and their States
– DCC Addresses and Control -
Expanding your Railway
– Installing the DCC System
– Laying Track
– Ladder Track
– Special Track -
Building Rolling Stock
– Gliders and Couplers
– Core Locomotive Features
— Base Part
— BodyVelocity
— DCC Properties
— DCC Functions
— Cab Numbers
– Duplicate Scripts
– Scale -
Configuring and Controlling your Railway
– The Consist Tool
– The Programmer Tool
– Preventing Derailments with Collision Groups
– Limiting Permissions
– Making Trains Stop When Deselected
– Remote Switch Control
– Additional Locomotive Functions - Closing Statements
Your First Set
This is all the information an operator needs to know to get started driving trains. When you insert your first set, it will look something like this:

Included is everything required to set up the DCC system and enjoy without any additional editing. Simply walk over and pick up the tool, and you can start having fun with trains immediately.
The DCC controller
The controller is the way to control trains. With it you can select a locomotive to drive, tell it to go backwards and forwards and what speed, and use its functions like turning on/off the lights and sounding the horn.
When you pick up or select the controller tool, you will see a GUI appear on the right-hand side of your screen that looks like this:

The main parts of the controller are:
- Knob
- Address
- Reverser
- Functions
- Keyboard controls
Knob
The knob is the way to control the throttle of the locomotive. By default the knob is set to ‘drive mode’ which ranges from 0% to 100% throttle, but it can be toggled to ‘yard mode’ by pressing the Mode button. When the knob is in yard mode, it ranges from -100% to 100% speed, with the top being 0%. This mode is useful if you need to make many changes of direction. When the knob is in yard mode, its graduations change to reflect its range.
Address
The red address bar is a clickable text box. To select an address, click it and type the address and hit enter. If you do not hit enter, it will revert to the currently-selected address. When typing the address, only number characters are accepted, so if you accidentally type a non-number it will ignore that character and allow you to keep typing.
The second way to select an address is to click the Find Addrs button. Find Addrs displays cards above each locomotive telling you what its address is and its consist address if applicable. Clicking on a card (if it is gray) will select the locomotive so you do not have to type it with the keyboard.
Selecting a new locomotive to drive is as simple as repeating the previous steps. If you want to stop driving a locomotive, you must type address 0 into the address bar. Address 0 is a special address and represents a “null” address and no instructions are passed.
Reverser
The reverser consists of 3 buttons: Reverse, Stop, and Forward. The buttons relevant to the current state of the locomotive are highlighted in gray. When the throttle is set to 0%, the stop button will highlight. The forward and reverse buttons highlight to indicate the direction the locomotive is going, or will go when you turn the knob. When the knob is in yard mode, the reverse and forward buttons will change automatically to the direction the locomotive is traveling.
When you click one of the buttons, the throttle will change to reflect that button’s function. If the throttle is set to a negative value and the Forward button is pressed, the throttle will change to positive but stay the same speed. Same with the Reverse button. When the stop button is pressed, the throttle is set to 0.
Functions
The default two functions for all locomotives are actuating the lights and sounding the horn. Clicking the Lights button will toggle the lights, and clicking the Horn button will make the horn sound.
Keyboard controls
Each function listed above has an associated keyboard control. These controls are mapped based on hand positions for ease of use.
| Action | Key | Additional explanation |
|---|---|---|
| Throttle Down | Q | Subtracts 5% from throttle |
| Throttle Up | E | Adds 5% to throttle |
| Stop | Z | |
| Reverse | X | |
| Forward | C | |
| Lights | L | |
| Horn | H | |
| Knob Mode | V | |
| Select Address | F | Focuses the address textbox for typing |
| Find Addresses | R |
For reference ingame, the list is printed on the back of the controller model:

Couplers and their States
Couplers are the way train cars stay together and allow the locomotive to push and pull them as required. The couplers have 4 different states: yellow, red, green, and blue:

Yellow is the default uncoupled state. Any time two yellow couplers meet, they will form a connection and turn green.
Red is the disallow state. Red couplers cannot be coupled to, preventing any accidental coupling.
Green is the coupled state. Train cars will follow each other anywhere when their couplers are green.
Blue is the delayed state. When couplers are blue, the couplers can push each other around, but if one car pulls away, the coupler will separate, and when it does so, the couplers will go back to yellow.
If you click a yellow coupler, it will turn to red, and vice-versa. If you click a green coupler, it will turn blue, and if you click a blue coupler it will turn yellow.
DCC Addresses and Control
All locomotives are controlled based on either their DCC Address or their Consist Address – if they have one assigned. Consist Addresses supersede DCC Addresses; locomotives with a Consist Address will ignore any commands sent to their DCC Address and listen only to commands sent to their Consist Address. If a locomotive has a Consist Address set, its card will show it:

Locomotives that are consisted will not listen to function data unless their DCC Address is the same as their Consist Address. This is to prevent a chorus of horns any time the horn button is pressed.
Card backgrounds have 3 colors that indicate control of the locomotive. Green means that you are in control of the address, gray means nobody is in control of the address, and red means somebody else is in control of the address:

Only one person can control an address at a time to prevent fights for control. When using Find Addrs and clicking on cards, only gray cards will select the address.
Expanding your Railway
Tired of driving trains in circles? Ready to model the Horseshoe Curve in exacting scale? Here’s how to get started!
Installing the DCC System
There are three components that must be unpacked from the start set to install the system in a place:
- DCC Controller tool: goes in StarterPack (optional)
- DCCSystem folder: goes in ReplicatedStorage
- ROBLOXInteractionGiver script: goes in ServerScriptService

The only purpose of the DCCSystemInstaller is to move the DCCSystem folder into ReplicatedStorage, so it can be deleted. That is everything required to install the system. Now lets get building!
Laying Track
To help you with building your railway, a large collection of pre-built track pieces have been assembled. All track pieces are built on a 2 stud grid for maximum modular building.

Every piece is designed to work with my Track Snap plugin, which you can get here:
To use the plugin, simply click on the end of the track piece you want to move, then click on the end of the track piece you want to snap the track to. Using the plugin, you can build a railway empire in minutes:

This demonstration layout took no more than 20 minutes to make using the plugin.
Ladder Track
It is important to match pieces together properly when using Ladder Tracks to avoid errors and keep the tracks on the 2-stud grid. There are two packs of ladder tracks, 2x6 and 2x4. These values refer to the slopes of the tracks relative to the track they are branching from. The 2x4 pack has a sharper angle compared to the 2x6 pack which has a shallower angle.

When connecting ladder tracks, there is a side that connects to the “straight” track and a side that connects to the “ladder,” and these two must not connect to each other if you want to stay on the grid that the track pieces are built to.
In the image below, there are 3 colors of boxes: white, blue, and yellow. White represents the normal grid. Blue represent the left-side ladder. Yellow represent the right-side ladder. The straight piece is unique in that it work on both left- and right-side ladders:

As long as blues always connect to blues, yellows always connect to yellows, and whites always connect to whites (or any other track piece not in the set), everything will be golden.
Special Track
There are currently two track pieces with special functionality: decoupler magnets and turntables.

Decoupler magnets work the same as magnets for Kadee couplers in real model railroading. If a pair of coupled couplers stop over the magnet, they will be put into delayed mode. The only difference between real Kadee coupler operation and these decoupler magnets is couplers on the magnet that are not coupled will not be put into delayed mode, however they will be delayed normally if the couplers stop on the magnet after coupling.
The turntable is used to turn locomotives around in a yard or to put them on a roundhouse track. The turntable works exactly the same as my full-scale turntable:

Building Rolling Stock
If you want more than the default rolling stock for your model empire, this is how to set up one and all its features.
Gliders and Couplers
For every piece of rolling stock, locomotives and cars, there are these key elements:
- Glider parts
- RoGaugeCoupler parts
- IsRollingStock boolvalue
- AdvancedWeld script
The last two are not required, but they make a builder’s life much easier. IsRollingStock flags the model for adding to a CollisionGroup for the purpose of preventing derailments from noobs on the rails. AdvancedWeld can be replaced with the weld script of your preference, but I believe that Advanced Weld is the most comprehensive and user-friendly weld script out there.
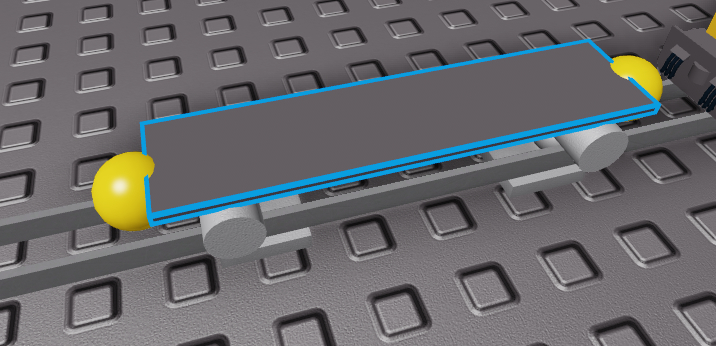
The gliders and couplers are as simple as I could make them. This is what they look like, visible and without meshes:

A Cylinder part rides on top of the rails, a Ball runs in the middle of the rails, and a Box runs below the rails. You will notice the box is 0.025 studs removed from the bottom of the rail. This is on purpose to allow smooth movement across tracks and up inclines.
Balls were chosen for the coupler parts because they have a constant size no matter what angle they are approached from, which makes them ideal for simple couplers using rod constraints. The coupler mesh is positioned so that two attached couplers appear to mate properly.
The automatic switching feature of switches relies on the presence of couplers. If a coupler is not present on one side of a piece of rolling stock, the switches will not automatically line up when that side approaches.
If you do not want couplers on both sides of a piece of rolling stock, you must add a part named RoGaugeCoupler without the coupler script at rail height to trip the switch sensors. Without the coupler script, the part will not couple to other couplers. For permanently-coupled stock, a RoGaugeCoupler part is only required on the outer ends of the stock.
Core Locomotive Features
There are a few features of locomotives that are shared (or expected to be shared) across all locomotives.
Base Part
There can only be one Base part per locomotive. DCC Address cards use the Base part as their adornment part and DirectionalLights use the Base part to determine which way is forward. It is standard practice to place all bodymovers and sound effects in the Base part.
BodyVelocity
Body Velocities, called BV in the system, are used to propel locomotives. They can be placed in any part in the locomotive, but it is standard to put it in the Base part. There can be multiple BV per locomotive. BVs use their parent part to determine the front, so if you have multiple BV parts in the same locomotive make sure they all face the same way.
DCC Properties
There are several properties that configure how the locomotive drives and how the locomotive is controlled, located in the DCCProperties configuration folder:

| Property | Value type | Function |
|---|---|---|
| Acceleration | float | Acceleration of locomotive in studs per second square |
| Deceleration | float | Braking speed of locomotive in studs per second square |
| MaxSpeed | float | Maximum speed of locomotive in studs per second |
| MaxPower | float | MaxForce of BodyVelocity |
| DirectionReversed | bool | Tells the locomotive to drive in reverse (backward if told to go forward, forward if told to go backward) |
| DCCAddress | int | The address of the locomotive |
| ConsistAddress | int | The consist address of the locomotive |
| UniqueDCCAddress | bool | Tells the locomotive to find an unused address |
The only property with a non-obvious function is UniqueDCCAddress. When the value is set, the locomotive attempts to find an address that is not in use by any other locomotive by adding 1 to its address until it finds a vacant address. This is useful for games where the same locomotive model can spawn multiple times; it allows new locomotives to operate independently from old ones.
DCC Functions
DCCFunctions are modules that give the locomotive more functionality than simply driving. By default, each locomotive comes with three modules: one for lights, one for horn, and one for sounds.

The HornModule and LightsModule do not need any editing between locomotives, but if you want new running sound effects you will have to edit the sounds module.
The horn effect is quite simple. If a sound named “HornSound” is present, the sound will be played when the function is activated. If a ParticleEmitter named “WhistleParticle” is present, it will be activated for the duration of the horn sound.
The LightsModule affects objects with the names DirectionalLight and OmniLight. These objects can be parts or lights. OmniLights will turn on any time the lights are enabled. DirectionalLights will turn on in the direction the locomotive is instructed to go. The Right side of the part is used to determine which direction the light should light up (this is so cylinders can be used without any modification), and the Base part is used as the reference frame.
When the lights are enabled, parts will change their material to Neon, and lights change Enabled to true. When the lights are disabled, parts will change their material to SmoothPlastic, and lights change their Enabled to false.
Cab Numbers
Because cab numbers are a good indication of the address of the locomotive, a feature is included to update the cab number of the locomotive to the address automatically. If you use SurfaceGuis for the cab number, all you have to do is name the text label “CabNumberLabel” and each CabNumberLabel’s Text will be changed to the address whenever it changes.

If you want to use a system other than TextLabels, the system is designed to interface with module scripts called CabNumberModule. CabNumberModules must return a function that accepts the cab number as a number. Every time the address changes, the function is called. You can then do whatever your heart desires with that number.
Duplicate Scripts
If your locomotives stutter in their movement and act sluggish, and possibly their running sounds are cutting out, the locomotive is probably suffering from duplicate scripts. This occurs whenever multiple DCCLocomotiveScript scripts attempt to control the same locomotive at once. Either this means that a duplicate script is in the same model, or one exists in a higher model than the locomotive.
To prevent issues with building, the DCCLocomotiveScript is designed to stop if its parent is Workspace, which should prevent many instances of duplicate scripts, but it cannot prevent all of them.
If duplicate scripts occurs, you must find the duplicate script and delete it.
Scale
Some people build using drawings to accurately re-create rolling stock in Ro-Scale. Most people use the track gauge to scale the drawings accordingly. With a 0.6 stud gauge, standard gauge trains must be scaled 0.127 studs per foot, or 0.00418 studs per millimeter.
Configuring and Controlling your Railway
As a group or place owner, you are interested in giving your group members the best possible experience driving trains. This section gives you tips and tricks to minimize griefing and streamline operations with new functions and features.
DCC Consist Editor
The Consist Editor is a simple tool to assign and break up consists. When locomotives are consisted together, they all operate in tandem. You can get the tool here:
When you first open the tool, it looks like this:
The address box works exactly the same way as the address box on the controller. Find Addrs does not work the same way, however.
To make a consist, the first step is to couple all the locomotives together. In some instances this is not necessary, but if the locomotives all have the same speed, they may never couple together when they are consisted together. Type the consist address you want into the address bar. It is recommended that you choose the same address as the lead locomotive, because locomotives that are consisted will not listen to function data unless their DCC Address is the same as their Consist Address.
Typing in the address 1425 – the default address of the MP15AC – draws a line between the controller and the locomotive, places a green halo around the card, and draws a number above the card:

The number above the card indicates its position in the list, with an accompanying number next to its entry. The order of the locomotives in the list (and consequently their number) does not matter. They are there to inform you which locomotive is which.
Clicking on a locomotive’s card will change its Consist Address to the selected address. If the locomotive’s Consist Address is already the selected address, it will remove the Consist Address. This is the way to add and remove locomotives from consists.
I have now clicked on all 3 locomotives and added them to the consist:

Setting locomotive 1425’s Consist Address to 1425 is redundant, but it is an option for those who want it.
The next step is to make sure all the locomotives will operate in the same direction. The arrow above the locomotive icon represents the DirectionReversed property, and points to the normal direction of travel of the locomotive. In the image above, we can see that locomotive 1425 is set to run in reverse. Since it is facing the same way as all the other locomotives, it needs to drive the same way as well. Clicking on the icon changes the direction:

With that, this consist is ready to roll!
DCC Programmer
The DCC Programmer is the tool used to change any of the properties in the DCCProperties folder. There are many features allowing you to set up trains just right, but sometimes you need to take a hands-on approach. You can get the tool here:
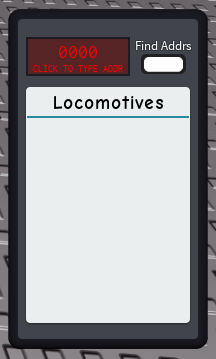
When you first open the tool, it looks like this:

To select a locomotive, click a locomotive’s card. When you do so, the red display will change to the FullName of the locomotive, which scrolls slowly if it is too long to fit in the display. All of the properties in the DCCProperties configuration folder will be listed:

There are only two types of properties that are allowed to be edited, for the purposes of user security: number values and boolean values. If a different type appears, its value will be shown in gray instead of black to indicate it cannot be edited.
To edit a value, click on it. If it is a boolean value, it will toggle between “true” and “false.” If it is a number, type the new desired value. If the value is not formatted as a number when you accept, it will be rejected, unlike the address boxes which filter out non-numeric characters.
The observant of you will notice that this locomotive’s ConsistAddress is not set and the value is 0. That is true: a ConsistAddress of 0 means its ConsistAddress is not set. The programmer is capable of consisting locomotives by changing the ConsistAddress value directly, if you wish.
When you are done editing the properties of the locomotive, press the Release Loco button.
Preventing Derailments with Collision Groups
Players standing on rails can derail trains. To prevent these derailments, a script was created that uses CollisionGroups. You can get the script here:
Because some games may have other scripts that use CollisionGroups, the script has the ability to disable setting character part collision groups. By setting the ExistingPlayerGroup value to the name of the group that the other script uses, the script will automatically disable setting the collision group of character parts, and will set that collision group to not collide with rolling stock.
The rolling stock is identified by the IsRollingStock value. If you don’t include it for whatever reason, this is the reason why you should!
Limiting Permissions
Perhaps you do not want just any player to be able to drive your trains, switch your tracks, or program them. All the tools and interactive elements have a built-in permissions system that interfaces with a module called ‘DCCPermissions’ in ServerScriptService. You can get an example script here:
Actions are divided into 6 classes:
- Program: able to use the programming tool to change locomotive properties
- Consist: able to use the consist tool to change consist address and direction
- Address: able to require and relinquish locomotive addresses
- Control: able to use throttle and functions of locomotives
- Switching: able to manipulate switches and turntables
- Coupling: able to manipulate couplers
When the user performs an action, the script controlling the item they are attempting to interact with asks the DCCPermissions module if the player is allowed to perform the action. If no DCCPermissions module is found, then all actions are allowed. The DCCPermissions module returns a table with a function called GetPermission which accepts a player object and a string representing the action.
Since the interface is so simple, how you divide up permissions is completely up to you. You can make it by group rank, or if their roblox account is old enough, or even if they have a specific letter in their username.
Making Trains Stop When Deselected
By default, when you release an address, the associated locomotives keep going at the last speed you told them to. This mimics the behavior of real DCC systems, but may not be what you want for your model railroad.
To make locomotives stop when their address is deselected, simply set the StopLocosOnRelinquish property to true.

Remote Switch Control
Switches can be remote-controlled by changing the State value inside the SwitchController script.
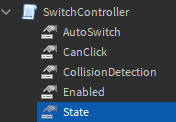
When the value is set by a different script, the switch will attempt to throw that direction. If there is a train on top blocking the switch from throwing, it will not throw and State will be set back to the previous value. If there is no train, the switch will throw and State will stay its new value.
If a player clicks on the switch, and it throws, the State value will change to the new state.
To make a switch panel, all you have to do is make a script that changes the State value of a specific switch when the player presses a certain button. If you want to go more advanced, watch the .Changed property of the State value so the button color or position changes to the switch’s current state.
If you want to disallow control from players clicking on the switch stands, you can delete the ClickTarget part(s), or you can set the CanClick value to false.
Additional Locomotive Functions
Adding new functions to a locomotive is simple and requires very little editing. The only scripting required is to create a module that activates the bell on the locomotive.
The first step is to copy one of the buttons in the Functions frame and give it a new name. The name of the button – up to the word “Button” – serves as the “key” that is sent any time the button is clicked. The “HornButton” button’s key is “Horn” and the “LightsButton” button’s key is “Lights.” The image below shows the location of the Functions frame inside ControllerGui, located inside the DCC Controller tool.

For this demonstration I will create a Bell button. I first copy one of the buttons and set its name to “BellButton,” which makes its key “Bell.”

There are two button types: Triggers and Toggles. The horn button is an example of a trigger button – it fires once when you click it. The lights button is an example of a toggle button – it toggles the function state every time you click it. For an American style bell, you will want a toggle button. The type is set using the property of the ButtonType value. The text must be exactly “Trigger” or “Toggle” to work. When a trigger button is pressed, it sends a true value to the locomotive under the key. When a toggle button is pressed, it sends a true or false value to the locomotive that represents the new state of the function.

The next step is to make the module in the locomotive that controls the function. The locomotive script automatically requires all modules in the DCCFunctions folder. There are two functions that are used as hooks in the module:
- UpdateVelocity is passed a number representing the target speed of the locomotive
- Invoke is passed a table with any updates the locomotives receives as a dictionary with the properties as string keys
The easiest place to start is to copy and edit the LightsModule. It is set up to accept toggle input already. How you write the new function is up to you. If you are not familiar with scripting, try copying as much as you can understand from the existing scripts. Programming is a very useful skill!
Closing Statements
This concludes the article on almost everything there is to know about the DCC system. If you have any questions, feel free to mail me here on the dev forum. If there is enough interest in a question, I will add it to this article!