
Hello People! Today, after many days I thought to make a tutorial on Saving Player data from Roblox in MongoDB. If you want to know what MongoDB is read below ↓
About MongoDB
MongoDB is an open source database management system (DBMS) that uses a document-oriented database model which supports various forms of data. It is one of numerous nonrelational database technologies which arose in the mid-2000s under the NoSQL banner for use in big data applications and other processing jobs involving data that doesn’t fit well in a rigid relational model. Instead of using tables and rows as in relational databases, the MongoDB architecture is made up of collections and documents.
For this tutorial I won’t be going too deep on MongoDB information, but if you want to know more about MongoDB Atlas (Hosted Solution of mongoDb in the Cloud!) - here is the Link
Now coming into what we want to do with MongoDB, basically we will create a REST API with NodeJS, Express and Some Few Dependencies, which we will use to Query our database and Of course Roblox will be where the data will be sent from and saved in MongoDB.
So, below is a list of what all tasks we will need to take in order to establish a basic Rest API ↔ Roblox Game, to save and retrieve data in MongoDB.
Things We Will Do
-
Create a Running Web server In Express (I will be using Glitch for this, just for fun…but its better if you use Solutions like Heroku, as they give better scaling options and totally managed platforms.)
-
We will create our Database in MongoDB! MongoDB Atlas offers a free cluster, which we will be using. You can always scale to better clusters, like Multi Region if you have a large game or something.
-
Create some routes which will be used by our game in Roblox to send requests to save or retrieve data from Our Database. We will use mongoose (Mongoose is a MongoDB object modeling tool designed to work in an asynchronous environment) to query our Mongo database
-
We will now try to save data from our Roblox game into MongoDB!
-
We will use basic auth to secure our REST Api, there are alot of other ways to secure a REST API. But as this is a tutorial made for everyone, the other ways might be hard for some people – But if someone wants to know the security essentials for a nicely secured REST api use this link - REST API Security Essentials
Let’s Get Started!
As our first step says we need to get a basic web server started with Express! Lets do it! First of all head on to glitch.com and then sign in and all that, now you can create a new project and probably select Express Web Server (Glitch gives a pre-built default template so its easier to start!). Also you should make your glitch app private as someone else can also remix into the project if you don’t make the Project private, but its not a problem if you are developing in local environment. To make the app private click on the App Name on top-left and click on Make This Project Private
Now lets install some of the dependencies we will need during developing the API.
You should see a terminal option in glitch, go to Tools > Terminal as shown below.

Now when your terminal is up, type in:
npm install mongoose express-basic-auth
and hit the enter! Now npm should install the packages and ready to use them! Now click on the server.js file located in the files section in left side. Then replace the Code with the following code.
const express = require("express");
const app = express();
// First of all you require Express

app.get("/", (request, response) => {
  response.send("Hi, This Is A Tutorial Api . . .");
});
// Now you setup a GET route at / which is basically
// the Homepage of your app

const listener = app.listen(process.env.PORT, () => {
  console.log("Your app is listening on port " + listener.address().port);
});
// And Finally you make the app listen to a port.
Now because we had process.env.PORT defined in listener, we need to go ahead and put the port variable ~~ PORT=3000 in the .env file in the glitch files section.

Like that!
Now, you have your web Server ready! Head on to your app URL, which can be found at the Show tab like below

When you visit it, you should see the below response.

This response was sent because we had declared this route in our server.js file and sent that response, remember? If you had something else typed in the response.sent() part, you will see that!
And that is the start of your Basic Web Server!
Step 2: Creating Our Database in MongoDB Atlas!
To get started, head on to MongoDB Atlas Database | Multi-Cloud Database Service | MongoDB and sign in and you can use your Google account to login! Then you can create your Project and all that.
Now you need to press on the Green Button that says Build A Cluster
When you do, you will get redirected to a screen where it has 3 options, select the First one - Shared Clusters Option and then you get redirected again to a screen like this

You can select a cloud provider, I myself prefer Google Cloud as it has more regions I believe. After that you can select a region which is Free Tier, as we don’t want to spend so much money just for a introduction 
Then just click Create Cluster! It will take up to 10 minutes to initialize the cluster sometimes.
Till the cluster is created, Create a New Access User by clicking on Database Access Tab in MongoDB Navigation on the left side – We will need the Access User to query MongoDB from our Express Back end.
Then Add New Database User, Select password as Authentication method. Then below Password authentication title, enter Username in first box. Then Type in your password in the box or let MongoDB auto generate one for you! Then give the user Read and Write Access to Database. and click Add User, and you are done!

Now head back to clusters, and click on connect inside the Cluster box.

It will now open a popup window for you, select Connect Your Application and then copy the connection string and head back to the .env file we had in Glitch, remember?
Go to the .env and write the following variables
MONGO_USER=<UserYouCreated>
MONGO_PASS=<PassCodeYouGave>
After you are done with the .env stuff, go to Server.js and paste the following code after
the const app = express() line.
// MongoDB Configurations
    const mongoose = require('mongoose')
    mongoose.connect(`mongodb+srv://${process.env.MONGO_USER}:${process.env.MONGO_PASS}@cluster0.eo2wg.mongodb.net/playerData?retryWrites=true&w=majority`, {useNewUrlParser: true, useUnifiedTopology: true });

    var db = mongoose.connection;

    db.on("error", console.error.bind(console, "connection error:"));

    db.once("open", function() {
      console.log("Connection To MongoDB Atlas Successful!");
    });
What the above code does is, uses mongoose to connect to our MongoDB cluster so we can start querying stuff! If you used special characters in your name or pass, you can wrap the statement inside a encodeURIComponent like so:
encodeURIComponent(${process.env.MONGO_PASS})
Now to test if the connection was successful, open your logs from the Tools > Logs. Oh and BTW Glitch auto saves your files, so you don’t need to keep saving again and again!
If you see Connection To MongoDB Atlas Successful! in the latest logs, then Congratulations! You successfully connected MongoDB with your Back end! If you face any error during connection, you can leave a comment below and I will try to help with it!
So finally, we connected to MongoDB after we created our MongoDB atlas Cluster! As you might think we didn’t create a Database anywhere in MongoDB right? The answer is that when you start querying anything in MongoDB, it automatically creates one if there is not one present!
Step 3: Creating some Routes
Okay, so now we are going to be creating 2 Routes, one which will be used to fetch the player data and another one which will be used to Update/Save Player Data in the Database.
Route 1 - Fetching Player Data
Remember when we created a route in the server.js file, which simply sent a response to us when we visited our homepage? We are going to be using something similar except that it will just be doing stuff in the background!
Okay, so head on to the server.js file and below the first route define a new route with the below code:
app.get("/player-data", (request, response) => {
  response.send("First steps on Fetching Player Data!")
})
I guess you probably know what that simple route does by now! But what we need to do in the above route is to take the Player ID passed with the request and using that ID we check if a Player’s Data is already present in the Database, and if its not create a new one and return that new Data, if it is present return the data saved there.
You can probably get an idea how to do that, but you aren’t probably familiar with Querying using Mongoose! So lets start writing some code to do a search for the player data!
First of all we need to make a Mongoose Model ( a Mongoose model provides an interface to the database for creating, querying, updating, deleting records, etc.), so create a new folder known as models in glitch files, to create a new folder you just press on new file button and then specify a sub directory, like such: models/player.js. Then it automatically creates a new sub directory and the file. Now, enter the following code in the file:
const mongoose = require('mongoose')
//First we require mongoose in our player.js file

const Schema = mongoose.Schema
// Then we define Schema as the mongoose.Schema method
// mongoose Schemas define the structure of the data records (also known as documents // in MongoDB)


const schema = new Schema({
   userID: String,
   coins: Number
})
// We use the new operator to create a new Schema and we define the fields,
// For this one I am just going to use User Id and coins, you can add more.
// Also for valid data types you can check the mongoose docs (string, number etc)

const Player = mongoose.model('Player', schema)
// Now we create a new mongoose model with the name and the schema

module.exports = {Player , schema}
// Finally we export the Model and the Schema so we can use it in our other files!
Alright! We have just created our Mongoose Model, so now we are able to start querying the Mongo Database! Now, we head on to our server.js file and write the below code to check if there is already a player record in the database, if there is a player record we return that record, but if there is not (Means a New Player probably!) we create a new record for them!
Note: If you have a lot of routes, you should use a routes file and require it here, because if its too large file its hard for you to edit the codes later
Okay, so lets write the below code inside the last route we created!
First of all we edit the route to this
app.get("/player-data/:id", (request, response) => {
We did that because we will be using the :id parameter in the URL to replace it with player Id when we request from Roblox. We can get that parameter value in our route like this request.params.id
Also we need to place two require statements in our server.js file:
require('./models/player')
const playerModel = mongoose.model('Player')
You can probably place that after the mongoose connection function. Now we can move on to our main function! So we will refactor the /player-data/:id route to something like this now:
app.get("/player-data/:id", async (request, response) => {
// We define our async function, where we do most of our work!
  async function playerDataCheck() {
    const playerData = await playerModel.findOne({ userID: `${request.params.id}` })
    // We use the mongoose findOne method to check if a record exists
   // with the given ID

    if (playerData) {
     // If exists return the data
      return playerData
    } else {
      const newPlayerDataInstance = new playerModel({
        userID: `${request.params.id}`,
        coins: 0
      })

      const newPlayerData = await newPlayerDataInstance.save()

      // If not exists, we save a new record and return that
      return newPlayerData
    }
  }

  response.json(await playerDataCheck());
// Finally we return the response from the async function!
});
A more cleaner version of the above Code:
app.get("/player-data/:id", async (request, response) => {
  async function playerDataCheck() {
    const playerData = await playerModel.findOne({ userID: `${request.params.id}` })

    if (playerData) {
      return playerData
    } else {
      const newPlayerDataInstance = new playerModel({
        userID: `${request.params.id}`,
        coins: 0
      })

      const newPlayerData = await newPlayerDataInstance.save()

      return newPlayerData
    }
  }

  response.json(await playerDataCheck());
});
Let us test the route now, go to https://<yourGlitchAppUrlHere>/player-data/1251241251, you can use any ID in place of the numbers at the last. If you visit the route, it should return you with a response, then if you visit your mongoDB atlas cluster and click on Collections, and then inside playerData > players. You should now see a new record created!
Okay, so we are done with our first Route! Lets now move on to the updating route! Also, please install Postman as it helps in making requests without going to the browser and also pass in headers and post data easily!
https://www.postman.com/
Route 2 - Updating Player Data
First of all we create a POST method in the route /player-data/update-coins/:id,
But before the routes, paste this line – So that our backend parses the incoming body in requests.
const bodyParser = require('body-parser');

app.use(bodyParser.urlencoded({
  extended: true
}));

app.use(bodyParser.json());
Okay! Now we can start with the update route! So lets see how the code will look like:
// We create a POST route
app.post("/player-data/update-coins/:id", async (request, response) => {
  // We use a mongoose method to find A record and update!
  await playerModel.findOneAndUpdate(
    { userID: `${request.params.id}` },
    { $set: { coins: request.body.coins } }
    // We set the coins to the coins we received in the body of the request
  );
  response.send("Updated Database.");
  // Just a response.
});
Yeah, that is it! We used the mongoose findOneAndUpdate method to find a record with the given ID and update the coins property of it to be the coins we received in the request body!
Okay now lets test if the route is actually working, so I will be using postman for this. Go ahead and install it already if you haven’t.
Open postman and click on new request button, it looks like the plus button at here.

Then select post request and type in your glitch app url + the route we made, which will look something like this

Also you can use any number at the end for now, as we are just testing.
Then click on the Body tab, then click on Raw and from the dropdown on the right side click JSON and then paste this JSON data:
{
   "coins": 5
}
Now just press send! If everything you did was correct till now, it will send back the response which we defined earlier in the POST route.

And if you check that Mongo Database record for that ID now, it will be updated to 5 coins!

Yay! We finished making our 2nd route, now we can move on to the basic authentication step!
Step 4: Getting Data In/Out Of Roblox!
We reached here finally, now lets make some simple request functions in Roblox to get the player data or even update it at times!
So we will basically have two main tasks - Saving from MongoDB & Getting Data from MongoDB
Lets start with getting the data from MongoDB. I believe everyone probably knows how to open a new game in Roblox Studio, so go ahead and open one. But remember to allow HTTP Requests in settings, or our HTTP Requests will fail.
Now, we want to get the data when the player joins the game right? So lets create this simple function which will do it:
local HttpService = game:GetService("HttpService")

game.Players.PlayerAdded:Connect(function(plr)
	local response = HttpService:GetAsync("https://tutorial-api.glitch.me/player-data/"..plr.UserId)
        -- Replace the url in the GetAsync with your Backend Url!
	local data = HttpService:JSONDecode(response)

	if data then
		print(data.coins)
	end
end)
Put that piece of code in a script in Server Script Storage. Everyone probably knows what the above function does, but just going to explain that it does a Get Http Request to your Given Url and then checks if there is data and prints the coins value in the data table.
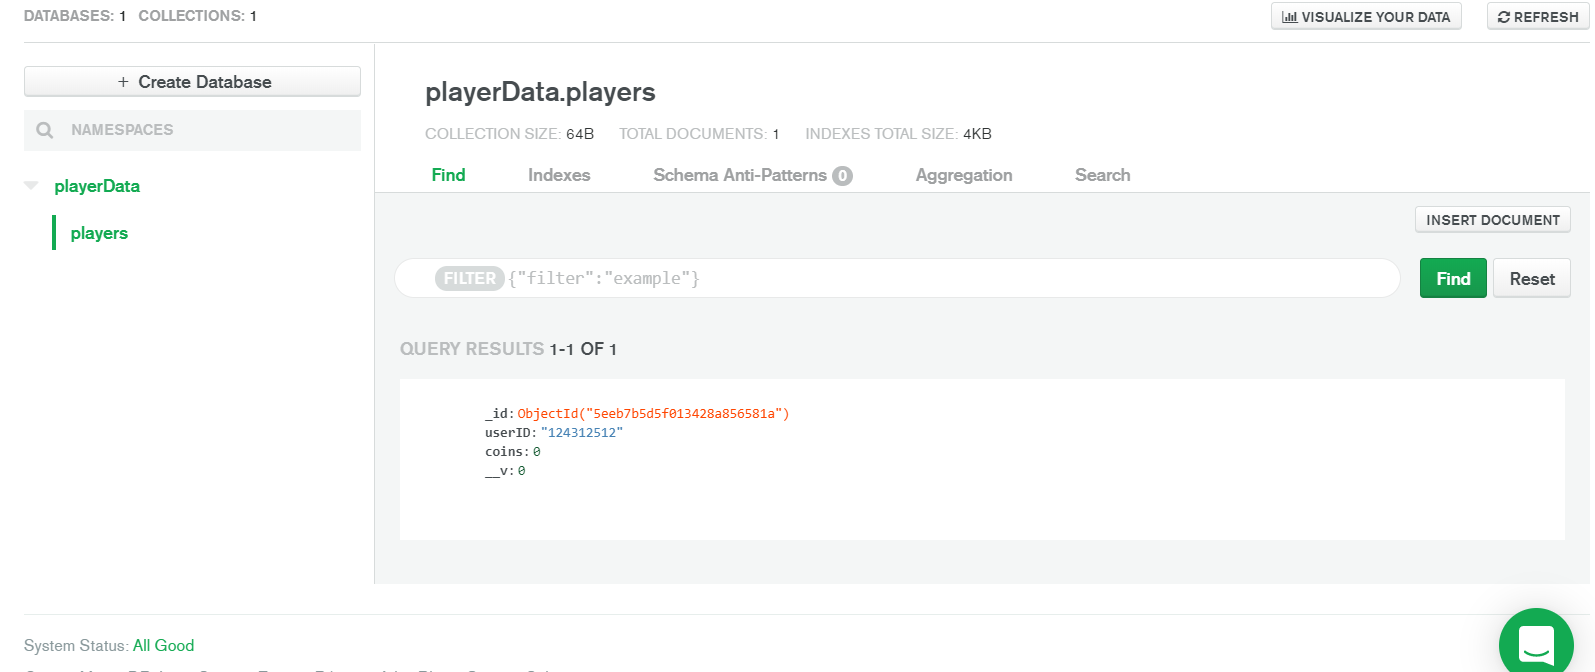
Okay! Lets test it now, join the game and you should see 0 printed, because the first time you join its always 0 as we defined in our route earlier! Let’s see if I am right, go to MongoDB collection of players. Then you should see a record with your UserID! If you don’t know your user Id just do a print(plr.UserId) in the PlayerAdded Block.

Here’s mine, now lets see if changes here take effect in Roblox (Of course it will.) One feature you will like about mongoDB is that you can edit any record in the admin, and they also have filters which make it easier to find records.
To change some data click on the pencil icon beside a record and then you can update any field, we are updating coins now, and then press on Update.
Here is a helper video for it.
Now go back to Roblox Studio, and then play the game again. If it printed the updated value in your Mongo Database, then congratulations! You successfully established a Data fetch from MongoDB into Roblox!
Now lets make a function to update our data from Roblox, for this tutorial, I am just going to make a interval function which will update the data in intervals, you can use remote functions or anything.
local plrCoins = 5
function updateData(playerID)
	print("Updating Data!")
	plrCoins = plrCoins + 5

	local data = {
		coins = plrCoins
	}

	local jsonData = HttpService:JSONEncode(data)

	HttpService:PostAsync("https://tutorial-api.glitch.me/player-data/update-coins/"..playerID, jsonData, Enum.HttpContentType.ApplicationJson, false)
	print("Finished Updating Data!")
end
What this function does is, it takes in playerID as an argument and then makes a data table which will be our request body in the POST route in our express backend, remember that? Then we JSONendcode the data so the Server will be able to read it, and then we POST the Data to our URL, with the playerID at the end of URL, so our backend is again able to check which User to update!
Now to run that function in an interval, what I did is placed this inside the PlayerAdded block at the end:
while wait(5) do
		updateData(plr.UserId)
end
As I said you can do anything, you can even make your own functions maybe which will also need another argument (maybe coins) and use that argument as the value in the request POST body.
Okay, now lets test this! Go in your game, first it should show your coins amount from the database and now it should print Updating & Finished Updating Data, then you can go to your MongoDB database and see if the value is updated! And for me, it was, It should be updated for you as well.

So, finally! We finished this part too! And moving to our final part, authentication, lets go!
Final Step: Basic Authentication!
So, as the name suggests its a very simple HTTP authentication. But I recommend if you want to use this in future you should use it with SSL and HTTPS only.
So? Let’s first make a authentication middleware in our backend:
app.use((req, res, next) => {

  // authentication middleware

  const auth = {login: 'username', password: 'somepassword'} // change this

  // parse login and password from headers
  const b64auth = (req.headers.authorization || '').split(' ')[1] || ''
  const [login, password] = Buffer.from(b64auth, 'base64').toString().split(':')

  // Verify login and password are set and correct
  if (login && password && login === auth.login && password === auth.password) {
    // Access granted...
    return next()
  }

  // Access denied lol...
  res.set('WWW-Authenticate', 'Basic realm="401"') // change this if you want to be a
  res.status(401).send('Authentication required.') // custom message

})
You can replace username and somepassword, with your choice of username & password! Okay, now lets test if its working or not. Go to your backend homepage, basically your glitch app.

It should show you a alert popup like that, to signup, if you use your password and username. It will grant access! If you give wrong user or pass, it will give Authentication Required.
Okay, so our API is now secure, but did anyone think how we are going to be doing this from the Roblox Game Server? Let’s see how we do it!
First we make a Base64 encoding function:
local b='ABCDEFGHIJKLMNOPQRSTUVWXYZabcdefghijklmnopqrstuvwxyz0123456789+/'
-- Required Character string above

function enc(data)
    return ((data:gsub('.', function(x)
        local r,b='',x:byte()
        for i=8,1,-1 do r=r..(b%2^i-b%2^(i-1)>0 and '1' or '0') end
        return r;
    end)..'0000'):gsub('%d%d%d?%d?%d?%d?', function(x)
        if (#x < 6) then return '' end
        local c=0
        for i=1,6 do c=c+(x:sub(i,i)=='1' and 2^(6-i) or 0) end
        return b:sub(c+1,c+1)
    end)..({ '', '==', '=' })[#data%3+1])
end

local AuthorizationBase64String = enc("user:password")
If you want to understand what the above function is doing, you first need to know how base64 encoding works: How Base64 Encoding Works
Okay so to pass authentication username and password, we need to pass an authorization header in our requests!
So, we refactor our Data fetch (GetAsync Function), to this:
local response = HttpService:GetAsync("https://tutorial-api.glitch.me/player-data/"..plr.UserId, true, { ["Authorization"] = "Basic "..AuthorizationBase64String})
and our Updating Function to something similar:
HttpService:PostAsync("https://tutorial-api.glitch.me/player-data/update-coins/"..playerID, jsonData, Enum.HttpContentType.ApplicationJson, false, { ["Authorization"] = "Basic "..AuthorizationBase64String })
Okay! Now lets test it, just press play and if you see the coins value printed again as it is in the database, then…Congratulations! You just authenticated your API + Finished this long tutorial!
Pros And Cons Of Using MongoDB Atlas:
Pros:
- It is reliable
- It is managed and a Hosted Database on The Cloud
- This is the most important – Its querying speed, its actually blazing fast.
- It allows you to store upto 16 MB per record
Cons:
- When you have a large game, the costs of MongoDB might increase.
- MongoDB is not relational so you lose all the capabilities of relational databases.
- It scales well in a narrow range but other NoSQL solutions are better at scaling. As I know, Cassandra is better in scaling.
Also here are the completed files, just if someone gets stuck somewhere:
server.js
const express = require("express");
const app = express();
const mongoose = require("mongoose");

mongoose.connect(
  `mongodb+srv://${process.env.MONGO_USER}:${process.env.MONGO_PASS}@cluster0.eo2wg.mongodb.net/playerData?retryWrites=true&w=majority`,
  { useNewUrlParser: true, useUnifiedTopology: true }
);

var db = mongoose.connection;

db.on("error", console.error.bind(console, "connection error:"));

db.once("open", function() {
  console.log("Connection To MongoDB Atlas Successful!");
});

require("./models/player");
const playerModel = mongoose.model("Player");

const bodyParser = require("body-parser");

app.use((req, res, next) => {

  // authentication middleware

  const auth = {login: 'someusername', password: 'somepassword'} // change this

  // parse login and password from headers
  const b64auth = (req.headers.authorization || '').split(' ')[1] || ''
  const [login, password] = Buffer.from(b64auth, 'base64').toString().split(':')

  // Verify login and password are set and correct
  if (login && password && login === auth.login && password === auth.password) {
    // Access granted...
    return next()
  }

  // Access denied lol...
  res.set('WWW-Authenticate', 'Basic realm="401"') // change this if you want to be a
  res.status(401).send('Authentication required.') // custom message

})

app.use(
  bodyParser.urlencoded({
    extended: true
  })
);

app.use(bodyParser.json());

app.get("/", (request, response) => {
  response.send("Hi, This Is A Tutorial Api . . .");
});

app.get("/player-data/:id", async (request, response) => {
  async function playerDataCheck() {
    const playerData = await playerModel.findOne({
      userID: `${request.params.id}`
    });

    if (playerData) {
      return playerData;
    } else {
      const newPlayerDataInstance = new playerModel({
        userID: `${request.params.id}`,
        coins: 0
      });

      const newPlayerData = await newPlayerDataInstance.save();

      return newPlayerData;
    }
  }

  response.json(await playerDataCheck());
});

app.post("/player-data/update-coins/:id", async (request, response) => {
  await playerModel.findOneAndUpdate(
    { userID: `${request.params.id}` },
    { $set: { coins: request.body.coins } }
  );
  response.send("Updated Database.");
});

const listener = app.listen(process.env.PORT, () => {
  console.log("Your app is listening on port " + listener.address().port);
});
Server Script -- In Roblox ServerScriptStorage
local HttpService = game:GetService("HttpService")

local b='ABCDEFGHIJKLMNOPQRSTUVWXYZabcdefghijklmnopqrstuvwxyz0123456789+/'
function enc(data)
    return ((data:gsub('.', function(x)
        local r,b='',x:byte()
        for i=8,1,-1 do r=r..(b%2^i-b%2^(i-1)>0 and '1' or '0') end
        return r;
    end)..'0000'):gsub('%d%d%d?%d?%d?%d?', function(x)
        if (#x < 6) then return '' end
        local c=0
        for i=1,6 do c=c+(x:sub(i,i)=='1' and 2^(6-i) or 0) end
        return b:sub(c+1,c+1)
    end)..({ '', '==', '=' })[#data%3+1])
end

local AuthorizationBase64String = enc("someusername:somepassword")

game.Players.PlayerAdded:Connect(function(plr)
	local response = HttpService:GetAsync("https://tutorial-api.glitch.me/player-data/"..plr.UserId, true, { ["Authorization"] =  "Basic "..AuthorizationBase64String})
	local data = HttpService:JSONDecode(response)

	if data then
		print(data.coins)
	end

	while wait(5) do
		updateData(plr.UserId)
	end
end)

local plrCoins = 5

function updateData(playerID)
	print("Updating Data!")
	plrCoins = plrCoins + 5

	local data = {
		coins = plrCoins
	}

	local jsonData = HttpService:JSONEncode(data)

	HttpService:PostAsync("https://tutorial-api.glitch.me/player-data/update-coins/"..playerID, jsonData, Enum.HttpContentType.ApplicationJson, false, { ["Authorization"] =  "Basic "..AuthorizationBase64String })
	print("Finished Updating Data!")
end
Web Servers even make Cross Server related functions easier, in my perspective.
Yeah, and thats it. I wish you will use this in your game! Good luck and Thank you! 
Note: Glitch shouldn’t be used for Product environments, as it doesn’t provide much scaling options. But instead you could explore hosted solutions like heroku.com which provide much more scaling options + it is fully managed.