Basic Admin Essentials 2.0 (BAE) is by far the most commonly used admin commands module amongst cafe/restaurant roleplay games. It’s a super robust and versatile module, but has one big problem: there is no public documentation. This means that the full potential and functionality of the module is rarely discovered as it is difficult to implement any form of customization without experimenting and figuring it out yourself.
I’ve worked with BAE for the past 3 years and leveraged its capabilities in some of the most popular games in the cafe/restaurant roleplay genre. The ultimate aim for this post is to be a reference for any BAE related problems. If there’s something I missed or that you’d like to see how to do, write a comment and I’ll be sure to update the guide.
Module Loading Issue
An issue has recently started occurring which causes people’s admin commands to be broken in-game. Read my post in the comments to learn how to resolve this quickly.
Filtering Bug
There is a recent issue (as of May 14th) where messages and PMs are returning as empty strings because the Basic Admin module is using an outdated text filtering method. See the post below for an explanation of how to fix this (it’s a quick fix!):
Prerequisites
-
This post assumes basic knowledge of Roblox programming, RemoteEvents, BindableEvents, and ModuleScripts. The rest will be easy to follow but it’s important to understand how to read and work with existing code to be able to follow this tutorial.
-
We’ll be working with both the Basic Admin Essentials LOADER and MODULE, so be sure to get both of these into your Roblox inventory before beginning.
Setup
Annoyingly, for a lot of this tutorial, we’ll have to fork and edit the BAE module. The loader script gives very limited ability to customize, but let’s get the module set up.
-
Import the Loader from your “My Models” section of the Toolbox. You should see it spawn in your game as below:
ㅤ
-
Open the model and take the Script into ServerScriptService. Then, discard the rest of the model. Your ServerScriptService should now have the script in it:
ㅤ

-
Import the Module from your “My Packages” section of the Toolbox. You should see it spawn into your Workspace:
ㅤ
-
Move your MainModule under the Basic Admin Essentials 2.0 script you just put into ServerScriptService. Your Explorer window should look like this:
ㅤ

-
Open the Basic Admin Essentials script and replace the “Loader ID” field on line 40 to the following:
ㅤ

-
For your game’s safety, and to prevent accidental admin command abuse, I also recommend changing the “Command Confirmation” on Line 111 to
true. I’m not sure why this is not turned on by default to be honest.
ㅤ


Now you’re all set up with Basic Admin Essentials! You can follow the documentation in the script to add yourself as an admin if you wish, but if you’re the game creator you’ll already be given admin by default.
For the rest of the tutorial, I’ll refer to the Basic Admin Essentials 2.0 script as the “Loader script” and the MainModule as the “MainModule” or “Module”.
For a more in-depth look into setting up the module, I recommend this video.
Custom Commands
The final extremely important piece of information to know is how to make custom commands. It is NOT recommended to implement custom commands directly into the MainModule as we will do with some other functionalities later on. Instead, Basic Admin has a built-in “Plugins” system which we will use to create custom commands.
To add a new plugin, simply duplicate the “Example Plugin” module under the Plugins folder inside your Basic Admin Essentials loader script. Give your new plugin a name that makes sense.

Then, open your new module. The lines labelled “Plugin Configuration” are important so pay attention to them. These will allow you to customize your plugin name, description, and set who can use it.

An example plugin configuration for “My First Plugin” that I created above would be:

For more explanation on the pluginLevel field, refer to the “Custom Admin Levels” section in the index below.
The important part of a plugin is the pluginFunction, which you’ll se on Line 44. You’ll see that it takes one argument (Args), which is a table. It is structured as follows:
{
    PlayerRunningCommand: Player, -- The player who ran the command
    CommandName: string, -- The name of the command (without the prefix) (used by internal scripts to identify the command)
    ...: string -- Any number of additional arguments that were passed in the command
}
Using that information, we can remove everything that is already in the pluginFunction and make a simple command:
local function pluginFunction(Args)
    local playerRunningCommand = Args[1]

    if Args[3] then -- see if the player passed any extra arguments
        local combinedMessage = table.concat(Args, " ", 3) -- combine all the arguments including and after position 3 into a string (this allows us to create a message)
        print(combinedMessage)
    end
end
You should see that if you now run the command in-game using the name you set, you’ll see it print out whatever you typed after the command. For example:
:myfirstplugin Hello, this is my first plugin!
-- Output: "Hello, this is my first plugin!"
Though this is a basic example, plugins will end up being the main thing you use to customize and run Basic Admin, so get familiar with them. Feel free to examine the existing “Example Plugin” module to see what more you can do with plugins.
Unless there is a valid reason, you should always try to implement custom commands in plugin modules rather than editing the MainModule directly. In the section below, you can view a ton of different examples of things you can use plugins for.
The Index
Below is an expandable index of things you might want to do with BAE and how to do it. This list will be updated frequently as more people comment valuable information, as I definitely have forgotten a ton of use cases and functionalities.
Changing Prefix, Kick/Ban Reasons & Color Theme
To change the prefix, default reasons and color theme of your admin UI, you can edit the properties in the Loader script. A description about each of these properties already exists in the code comment so I will not be explaining each of them here.
Take a look at the following properties (starting on Line 95 of the Loader script) and change them to whatever you want:

Customizing the User Interface
If the only thing you’d like to change about the look of your admin commands is the color theme, refer to the section above this one titled “Changing Prefix, Kick/Ban Reasons & Color Theme”.
The Basic Admin Essentials GUI is customizable if you know how to edit UI in Roblox Studio. If you don’t know how to edit UI in Studio, I recommend reading this article to learn how to do so.
I’m going to show an example of how to make the UI have rounded rather than square corners. Let’s see how we can do this:
-
Locate the ScreenGui titled “Basic Admin UI” under the Components folder of your MainModule.
ㅤ
-
Move the ScreenGui into
StarterGuiso that you are able to see the UI on your screen. Click “OK” on the window that pops up if you see it.
ㅤ
ㅤ

-
Inside the GUI, you’ll see a “Base Clip” frame. Open it and select any frame. For this example, I’m using the “Confirmation” frame. Change the Visible property of whatever frame you’ve selected to
true; this should make it appear on the screen.
ㅤ
-
Now, you can make any changes to the UI as you wish. For me, I’m going to add UICorner objects inside all the buttons/frames with square edges, to give me this rounded look:
ㅤ
ㅤ
You can change any visual properties of the frame, including the size, color, font, etc. You can also add other aspects like UICorners as I did above to get the looks you want. It is important NOT to change the Name or Parent properties of any of the frames. -
You can repeat the process above for any/all of the frames under the Base Clip frame to get a consistent theme on your UI. Make sure that when you’re done, you set the Visible property of the frame you were editing back to
false.
ㅤ
-
When you’re done editing all your frames, move the Basic Admin UI back under the Components folder of your MainModule in ServerScriptService:
ㅤ


Then you’re all done! If you’ve followed all the steps above you should see that your admin style in game is the same style you designed in Studio.
For a video walkthrough on how to edit the user interface of BAE, I recommend this video.
Setting Command Permissions
It is possible to restrict certain commands to certain admin levels, for example, making it so that only those with Super Admin can fly. You can do this directly inside the Loader script.
Under “Command Configuration” on Line 86, you can specify the permission level for different commands in the format below:

The permission level is a number that corresponds to the admin level you want. If you haven’t set up and Custom Admin Levels (as seen in the section below) then your default admin levels will be:
4 - Game Creator
3 - Super Admin
2 - Admin
1 - Moderator
0 - Everyone
Given this information, you can restrict commands to certain admin levels. It is important to note that all admin commands are automatically restricted to a certain level, as seen below:
Everyone (0):
- getadmin
- changelog
- donate
- cape
- rejoin
- clean
Moderator (1):
- respawn
- res
- kick
- unadmin
- admins
- ingameadmins
- chatlogs
- logs
- bans
- pm
- m
- slock
- unslock
- h
- tp
- to
- bring
- team
- info
- hat
- joinlogs
- gamepassinfo
- iteminfo
- pbans
- shutdownlogs
- jump
- sit
- view
- unview
- speed
- ws
- refresh
- ref
- god
- ungod
- ff
- unff
- music
- play
- volume
- pitch
- vol
- stopsound
- reverbs
- countdown
- tools
- give
- startergear
- time
- removetools
- clear
- clr
- joinserver
- privateservers
- name
- unname
- change
- heal
- setmaxhealth
- sethealth
- jumpheight
- light
- removelight
- fly
- unfly
- trellobans
- viewtools
Admin (2):
- ban
- unban
- sm
- mod
- shutdown
- gear
- pbanid
- unpban
- unpbanid
- pban
- btools
- f3x
- createserver
- deleteserver
- toreserved
Super Admin (3):
- uncape
- promptpurchase
- place
- insert
- crash
Game Creator (4):
- superadmin
- debuglogs
- addlog
- smtest
- awardcape
- segway
- debugstats
If there are any commands that you disagree with a certain level having (there probably are!) then you can use the method above to restrict them to a different level.
Custom Admin Levels
By default, there are 4 admin levels as part of Basic Admin Essentials: Moderator, Admin, Super Admin and Game Creator. However, in some cases, it may be necessary to create custom admin levels to restrict command permissions more strictly.
For example, most roleplay groups have more than 4 ranks but have to group ranks together to respect the default admin levels, which means a group of ranks will all have access to the same (potentially abusive) commands. You may not want 4 ranks in your group all having access to ban, for example, so this issue can be solved by creating custom levels.
For my example, I’m going to make two new admin levels, and change the names of the existing ones. I’m going to make the following:
6 - Legendary Admin
5 - Director
4 - Mega Admin
3 - Super Admin
2 - Admin
1 - Moderator
As a disclaimer, I do NOT recommend changing the names of any of the existing admin levels. They are referenced in the code so often that it will take a long time to update them everywhere if you do so.
Adding new levels or changing the permission numbers of existing levels is okay though, just try to avoid changing the names of the existing levels to avoid a headache later.
Here’s how:
-
We’re going to need to edit the MainModule for this, so open it up and head to line 84. Under “Permissions”, let’s add new levels in the following format:
ㅤ
ㅤ
As you can see, I’ve added my new levels and the numbers that correspond to them, and changed the existing “gameOwners” admin level to “megaAdmins”. -
Now we need to head to line 1171 and edit the if statement to return our new admin level titles:
ㅤ
Before:
ㅤ
After:
-
Now we need to head to Line 2472 of the “Basic Admin Client” LocalScript, which can be found under the Components folder of the MainModule. We need to change the if statement there how we did above:
ㅤ
Before:
ㅤ
After:
-
Now that the client knows the titles of our new admin levels, we need to update two more sections of our MainModule so that all our commands are in sync with our changes. Head to line 3349 of the MainModule and edit the if statement similarly to the two above:
ㅤ
Before:
ㅤ
After:
-
Now head to Line 580 and do the exact same thing (you’ll notice the if statement is identical, so feel free to copy and paste the one from before).
ㅤ
Before:
ㅤ
After:
-
Do the same as Step 5 above in the if statement directly below it:
ㅤ


You can now give yourself permissions to use certain commands, and add yourself to these admin levels using the “Group Configuration” section in the Loader script.
Sending Server Messages and Hints
It is often desired to use the Basic Admin Messages and Hints in plugins to give information easily to players. Let’s take a look at an example Basic Admin Essentials plugin to see how we can send a message to a player.
--[[

	 ____
	/\  _`\                    __
	\ \ \L\ \     __      ____/\_\    ___
	 \ \  _ <'  /'__`\   /',__\/\ \  /'___\
	  \ \ \L\ \/\ \L\.\_/\__, `\ \ \/\ \__/
	   \ \____/\ \__/.\_\/\____/\ \_\ \____\
	    \/___/  \/__/\/_/\/___/  \/_/\/____/


	Admin Essentials v2
	Plugin Documentation
	*coming soon^tm

	If you have any questions regarding Plugins, contact TheFurryFish.

--]]

local Plugin = function(...)
	local Data = {...}

	-- Included Functions and Info --
	local remoteEvent = Data[1][1]
	local remoteFunction = Data[1][2]
	local returnPermissions = Data[1][3]
	local Commands = Data[1][4]
	local Prefix = Data[1][5]
	local actionPrefix = Data[1][6]
	local returnPlayers = Data[1][7]
	local cleanData = Data[1][8] -- cleanData(Sender,Receiver,Data)
	-- Practical example, for a gui specifically for a player, from another player
	-- cleanData(Sender,Receiver,"hi") -- You need receiver because it's being sent to everyone
	-- Or for a broadcast (something everyone sees, from one person, to nobody specific)
	-- cleanData(Sender,nil,"hi") -- Receiver is nil because it is a broadcast

	-- Plugin Configuration --
	local pluginName = 'sendmessage'
	local pluginPrefix = Prefix
	local pluginLevel = 1
	local pluginUsage = "<Player> <Message>" -- leave blank if the command has no arguments
	local pluginDescription = "Sends a message to a player."

	-- Example Plugin Function --
	local function pluginFunction(Args) -- keep the name of the function as "pluginFunction"
		local playerRunningCommand = Args[1]
		if Args[3] then
			local playersToSendTo = returnPlayers(playerRunningCommand, Args[3])
			if playersToSendTo then
				if Args[4] then
					-- loop through all the players and send them the message
					for _,victimPlayer in playersToSendTo do
						-- filter the message (we can use the built-in Basic Admin cleanData function for this)
						local combinedMessage = table.concat(Args, " ", 4)
						local filtered, filteredMessage = cleanData(combinedMessage, playerRunningCommand, victimPlayer)

						-- send message
						if filtered and filteredMessage then
							remoteEvent:FireClient(victimPlayer, "Message", "Message Title Here", filteredMessage)
						end
					end
				else
					-- tell the player they need to specify a message
					remoteEvent:FireClient(playerRunningCommand, "Hint", "Command Error", "You must specify a valid message.")
				end
			else
				-- tell player the player they specified does not exist
				remoteEvent:FireClient(playerRunningCommand, "Hint", "Command Error", "That player does not exist.")
			end
		else
			-- tell player they need to specify a player
			remoteEvent:FireClient(playerRunningCommand, "Hint", "Command Error", "You must specify a valid player to send a message to.")
		end
	end

	-- Return Everything to the MainModule --
	local descToReturn
	if pluginUsage ~= "" then
		descToReturn = pluginPrefix..pluginName..' '..pluginUsage..'\n'..pluginDescription
	else
		descToReturn = pluginPrefix..pluginName..'\n'..pluginDescription
	end

	return pluginName,pluginFunction,pluginLevel,pluginPrefix,{pluginName,pluginUsage,pluginDescription}
end

return Plugin
As you can see, it’s pretty simple to send messages and hints to players. Just fire a remote with the title and the description, as seen below:
-- Send a Message
remoteEvent:FireClient(player, "Message", "Message Title Here", "The message content here")

-- Send a Hint
remoteEvent:FireClient(player, "Hint", "Hint Title Here", "The hint content here")
If you ever need to get the RemoteEvent to be able to fire Basic Admin messages/hints in other scripts outside of a Basic Admin plugin, you can reference it as:
local remoteEvent = game.ReplicatedStorage:WaitForChild("Basic Admin Essentials"):WaitForChild("Essentials Event")
-- make sure to use WaitForChild as the events are created at run-time and do not pre-exist
Showing Lists / Custom Logs Commands
You’ll notice that a common theme with BAE is that any UI-related functions are all managed through the single “Essentials Event” RemoteEvent. This is much the same for showing lists, though it is important to get the order of the arguments right.
When firing a remote for showing lists, the order of arguments are:
remoteEvent:FireClient(
    player, -- The player to show the list to
    "List",
    "List Title", -- The title that will show at the top of the list
    true/false, -- Whether or not the list should be REFRESHABLE
    true/false, -- Whether or not the list should be SEARCHABLE
    { } -- A table of strings that should be shown in the list
)
Given this information, let’s create a Basic Admin plugin to show the names and IDs of all the players in the game.
--[[

	 ____
	/\  _`\                    __
	\ \ \L\ \     __      ____/\_\    ___
	 \ \  _ <'  /'__`\   /',__\/\ \  /'___\
	  \ \ \L\ \/\ \L\.\_/\__, `\ \ \/\ \__/
	   \ \____/\ \__/.\_\/\____/\ \_\ \____\
	    \/___/  \/__/\/_/\/___/  \/_/\/____/


	Admin Essentials v2
	Plugin Documentation
	*coming soon^tm

	If you have any questions regarding Plugins, contact TheFurryFish.

--]]

local Plugin = function(...)
	local Data = {...}

	-- Included Functions and Info --
	local remoteEvent = Data[1][1]
	local remoteFunction = Data[1][2]
	local returnPermissions = Data[1][3]
	local Commands = Data[1][4]
	local Prefix = Data[1][5]
	local actionPrefix = Data[1][6]
	local returnPlayers = Data[1][7]
	local cleanData = Data[1][8] -- cleanData(Sender,Receiver,Data)
	-- Practical example, for a gui specifically for a player, from another player
	-- cleanData(Sender,Receiver,"hi") -- You need receiver because it's being sent to everyone
	-- Or for a broadcast (something everyone sees, from one person, to nobody specific)
	-- cleanData(Sender,nil,"hi") -- Receiver is nil because it is a broadcast

	-- Plugin Configuration --
	local pluginName = 'getplayers'
	local pluginPrefix = Prefix
	local pluginLevel = 1
	local pluginUsage = "" -- leave blank if the command has no arguments
	local pluginDescription = "Gets the names and IDs of all the players in the game."

	-- Example Plugin Function --
	local function pluginFunction(Args) -- keep the name of the function as "pluginFunction"
		local playerRunningCommand = Args[1]

		local players = {}
		for _,p in game.Players:GetPlayers() do
			table.insert(players, `{p.Name} ({p.UserId})`)
		end

		remoteEvent:FireClient(playerRunningCommand, "List", "Players In-game", false, true, players)
	end

	-- Return Everything to the MainModule --
	local descToReturn
	if pluginUsage ~= "" then
		descToReturn = pluginPrefix..pluginName..' '..pluginUsage..'\n'..pluginDescription
	else
		descToReturn = pluginPrefix..pluginName..'\n'..pluginDescription
	end

	return pluginName,pluginFunction,pluginLevel,pluginPrefix,{pluginName,pluginUsage,pluginDescription}
end

return Plugin
When running this command in-game, we see the following output:

Note that I’ve specified the list of players to be non-refreshable - this is for a reason. Handling refreshing on lists in BAE is complicated and I think the creator should’ve put more thought into handling it in a better way, but there are a lot of criticisms I have about this module that we have to work around. In order to learn how to make lists refreshable, refer to the section below this one.
Another thing to note is that when making a list for custom logs, the order of the table DOES matter. If you’re adding new logs to a custom table, make sure to put them at the first index rather than at the end of the array.
table.insert(logsTable, "Hello!") -- puts it at the end
table.insert(logsTable, 1, "Hello!") -- puts it at the start
By default, the logs limit in BAE is 1000. You can implement custom log limits by clearing the last item in the table if it is too long, as seen below.
table.insert(logsTable, 1, "Hello!") -- add new log

if #logsTable > 100 then -- check how many items are in the table
    table.remove(logsTable, #logsTable) -- remove last item in the logs table
end
Making Lists Refreshable
There is a video walkthrough to compliment this section.
To make a list refreshable, you need to handle the refreshing function within the MainModule. Let’s use the same plugin that we coded above to get a list of players in the game:
local function pluginFunction(Args) -- keep the name of the function as "pluginFunction"
	local playerRunningCommand = Args[1]

	local players = {}
	for _,p in game.Players:GetPlayers() do
		table.insert(players, `{p.Name} ({p.UserId})`)
	end
	remoteEvent:FireClient(playerRunningCommand, "List", "Players In-game", true, true, players)
end
This time, we’ve changed the argument in the RemoteEvent to make the list Refreshable to true. However, you’ll notice that it does nothing when you click the Refresh button on the list when it appears.
To handle refreshing of custom lists, we first need to go to Line 3441. The line number may vary based on what you’ve added to your MainModule but it should look like the image below.

To add your custom refresh function, simply add the title of your list as an elseif and return a table of strings again.

Now you’ll see that when you click the Refresh button on your List, it will be updated with your updated information. If you update the title of your list, make sure to change your elseif statement to reflect it.

You’ll also see that we’re essentially repeating the code from the plugin in the MainModule now. It’s good practice to avoid repetition of code, so it may be appropriate to put this function inside a module and just call the function within the refresh function and the plugin function. This tutorial is not about ModuleScripts so I will not go over how to do that, but if you do know how to use ModuleScripts you’ll see the benefit of using them here.
Sending PMs through a custom command
Sending BAE PMs to multiple players is possible using the Commands table that is automatically passed into Basic Admin Plugins. Let’s take a look at how to get that function, and how to use it to send PMs.
For my example, I’m going to make a command to send a PM to all the admins in the game. I know that this is obsolete as you can just do “:pm admins”, though for proof of concept let’s figure out how to make this command.
This is slightly more complex because we want the PMs to act as real Basic Admin PMs that can be replied to. If you don’t want your PMs to be able to be replied to, you can simply fire the RemoteEvent as we do in step 1 but exclude the “ID” argument.
- The existing PM command in the MainModule is not suitable for our needs here, so let’s create our own. We’re going to add the following code directly below the function that starts around Line 900 called “Funcs.PM”.
function Funcs.CustomPM(Args)
	local playerSending = Args[1]
	local players = Args[2]
	local message = Args[3]

	if playerSending and players and message then
		for _,v in players do
			local sending = true
			local filtered, filterResult = cleanUserData(message, playerSending, v)

			if filtered and filterResult then
				local newId = generateID()
				sysTable.outboundMessages[newId] = v
				remoteEvent:FireClient(v, "PM", playerSending.Name, filterResult, nil, newId)
			end
		end
	end
end
Your MainModule will now have this function directly underneath the real PM function:

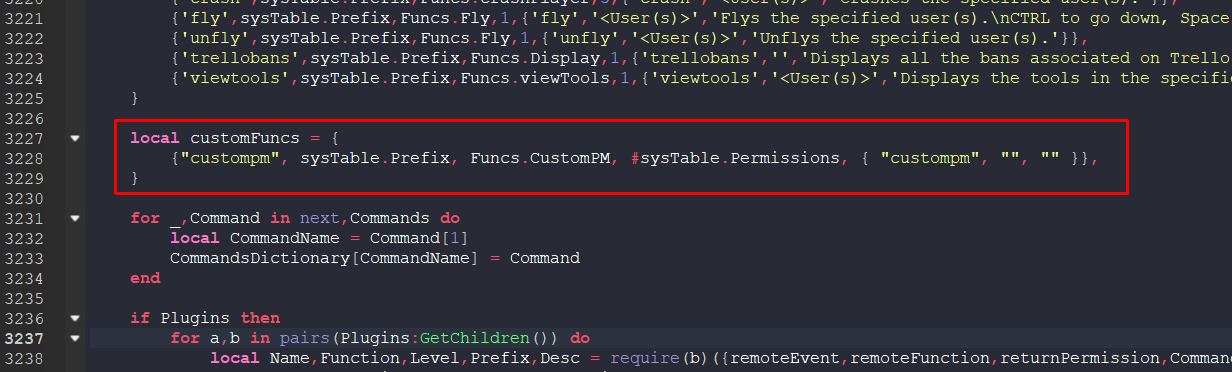
- Near the bottom of the MainModule in the commands table, add the following code underneath the Commands table:
local customFuncs = {
	{"custompm", sysTable.Prefix, Funcs.CustomPM, #sysTable.Permissions, { "custompm", "", "" }},
}
The reason we’re putting this in a separate table is because we don’t want this command to be able to be ran through the command bar, though it should be able to be used by other scripts. You should now see your custom PM function at the bottom of the commands table:
- Finally, let’s add our new
customFuncstable to our list of arguments when requiring the Plugin script. With this done, we can then use the custom PM function in a plugin.
- Now all we have to do in our plugin is use that function. See the code below for a basic “PM admins” plugin.
--[[

	 ____
	/\  _`\                    __
	\ \ \L\ \     __      ____/\_\    ___
	 \ \  _ <'  /'__`\   /',__\/\ \  /'___\
	  \ \ \L\ \/\ \L\.\_/\__, `\ \ \/\ \__/
	   \ \____/\ \__/.\_\/\____/\ \_\ \____\
	    \/___/  \/__/\/_/\/___/  \/_/\/____/


	Admin Essentials v2
	Plugin Documentation
	*coming soon^tm

	If you have any questions regarding Plugins, contact TheFurryFish.

--]]

local Plugin = function(...)
	local Data = {...}

	-- Included Functions and Info --
	local remoteEvent = Data[1][1]
	local remoteFunction = Data[1][2]
	local returnPermissions = Data[1][3]
	local Commands = Data[1][4]
	local Prefix = Data[1][5]
	local actionPrefix = Data[1][6]
	local returnPlayers = Data[1][7]
	local cleanData = Data[1][8] -- cleanData(Sender,Receiver,Data)
	-- Practical example, for a gui specifically for a player, from another player
	-- cleanData(Sender,Receiver,"hi") -- You need receiver because it's being sent to everyone
	-- Or for a broadcast (something everyone sees, from one person, to nobody specific)
	-- cleanData(Sender,nil,"hi") -- Receiver is nil because it is a broadcast

	-- Plugin Configuration --
	local pluginName = 'pmadmins'
	local pluginPrefix = Prefix
	local pluginLevel = 1
	local pluginUsage = "" -- leave blank if the command has no arguments
	local pluginDescription = "Sends a PM to all admins."

	-- Example Plugin Function --
	local function pluginFunction(Args) -- keep the name of the function as "pluginFunction"
		local playerRunningCommand = Args[1]

		-- get custom PM command
		local customCommands = Data[1][10]
		local pmCommand
		for _,info in customCommands do
			if info[1] == "custompm" then
				pmCommand = info[3]
				break
			end
		end

		-- filter admins
		local admins = {}
		for _,v in game.Players:GetPlayers() do
			if returnPermissions(v) >= 2 then -- check if they have the "Administrator" perm level
				table.insert(admins, v)
			end
		end

		-- try to send pm to players
		return pmCommand({ playerRunningCommand, admins, table.concat(Args, " ", 3) })
	end

	-- Return Everything to the MainModule --
	local descToReturn
	if pluginUsage ~= "" then
		descToReturn = pluginPrefix..pluginName..' '..pluginUsage..'\n'..pluginDescription
	else
		descToReturn = pluginPrefix..pluginName..'\n'..pluginDescription
	end

	return pluginName,pluginFunction,pluginLevel,pluginPrefix,{pluginName,pluginUsage,pluginDescription}
end

return Plugin
Members who receive the PM can now reply to it like a real PM, which is much better than other solutions that members have suggested previously. As stated before, if you want people not to be able to reply to PMs, you can just fire the PM remote to create a “fake PM” with the ID parameter left out.
Changing the Donor Shirt ID
There is a video walkthrough to compliment this section.
The Donor Perks feature of BAE exists so that the original creator, r_r, can monetize the module. It is for this reason that I do not condone changing the ID of the donor shirt, as it takes away from the potential earnings of the original creator. However, since this is an educational post, here’s how:
-
Find the “donorID” field in your MainModule. It should be relatively close to the top.
ㅤ
-
Change this to any CLOTHING ID of your choosing. Note that this can not be a gamepass ID by default, unless you change the prompt function to use
PromptGamePassPurchaseinstead ofPromptPurchase.

Opening the Command Bar
There is a video walkthrough to compliment this section.
In the majority of cases, the reason you’ll want to do this is to open the command bar by pressing a UI button, for example on mobile devices. We can do this fairly easily by adding the following code at the very bottom of the “Basic Admin Client” LocalScript.
local commandBarBindable = Instance.new("BindableEvent")
commandBarBindable.Name = "ToggleCommandBar"
commandBarBindable.Parent = basicAdminFolder

commandBarBindable.Event:Connect(Console) -- open the command bar when the bindable event is fired
Then, we can fire this BindableEvent whenever we want to open the command bar. Let’s say we have a LocalScript inside a GuiButton with the following code:
local commandBarBindable = game.ReplicatedStorage:WaitForChild("Basic Admin"):WaitForChild("ToggleCommandBar")
local button = script.Parent

button.MouseButton1Click:Connect(function()
    commandBarBindable:Fire() -- this will open the command bar when the button is clicked
end)
Watch my video tutorial on how to set this up in under 2 minutes! https://www.youtube.com/watch?v=0B430GTdkDQ
Cancelling a Countdown
Though there is no scripting required for this at all, it is somewhat unknown that the :countdown command can be cancelled at any time. Let’s say you run the command :countdown 100 in chat. You’ll see a countdown happening for 100 seconds at the top of the screen.
To cancel this countdown, all you have to do is run the command :countdown off when in-game.
Allowing Copy & Paste In Lists
There is a video walkthrough to compliment this section.
In many games, BAE is used for moderation, so it can be useful to be able to copy and paste from lists instead of having to type usernames manually.
We can do this by making some minor UI changes, though it should be noted that due to the nature of TextBoxes, it is impossible to allow copy and paste from lists for users on mobile devices. This is due to the fact that we are making the TextBoxes non-editable, which is not respected on mobile, though I’ll welcome any potential solutions to this issue in the comments!
Before we start this section, a small shoutout to one of my favorite plugins - Reclass! I recommend purchasing this plugin as it will make our job way easier here, but there are also so many things about UI design that this plugin makes easier. If you don’t have Reclass, you can still follow this section, but it will take a bit longer.
-
Firstly, let’s move the Basic Admin UI into the StarterGui. If you don’t know how to do this, read the “Customizing the User Interface” section above.
-
Select the “List Template” under the Base Clip frame, and make it Visible.
ㅤ
-
Find the TextLabel named “Template” inside the ScrollingFrame of the List Template.
ㅤ

-
Here’s where Reclass comes in helpful. We need to change this TextLabel into a TextBox object. You can either do this manually by creating a TextBox and copying all the properties, or just use Reclass to convert it. Whatever option you choose, you should end up with the UI looking identical to how it did with a TextLabel.
ㅤ
ㅤ
 ㅤ<-- TextLabel is now a TextBox
-
With our new TextBox, we need to change a couple of properties. Set TextEditable and ClearTextOnFocus to false. When you’ve done that, you’re done with the UI changes. Make sure to make the List Template invisible again, then you can move the ScreenGui back to the Components folder under the MainModule in ServerScriptService.
ㅤ


-
Now that the UI has been changed, we need to edit some of the code in the Basic Admin Client LocalScript. Open this LocalScript and press Ctrl + F to open the “Find” menu. In the window that opens, search “TextLabel”.
ㅤ

-
You should see 6 results. On results 1 and 3, we need to change the line to:
ㅤ

-
Once you’ve changed results 1 and 3 to match the statement above, you’re done! When testing in-game, we can now see that any form of logs (e.g. chat logs) can be highlighted and copied!
ㅤ


 ㅤ<-- TextLabel is now a TextBox


Disclaimer: When I said it was “impossible” to make this work on mobile devices, it is technically possible to make this work on mobile devices too, however there is currently a bug where mobile users can edit the contents of TextBoxes even when the TextEditable property is false.
For this reason, it is not recommended to enable this feature on mobile because they could easily falsify the logs. But to enable it on mobile anyway, simply set the “Active” property of your Template TextBox to true. It will then allow mobile users to edit the contents of the logs, though at least they can copy them.
Sticky Message Command
There is a video walkthrough to compliment this section.
The video guide above shows exactly how to set up a sticky note command. It is 18 minutes long, so to save you time, I’ve provided the files you’ll need for setting up the command below.
You can follow the timestamps in the video description to skip past parts you don’t need. If you take the files below, the only parts you’ll need to watch are the initial setup and editing the basic admin script to make the command work.
Sticky Note GUI.rbxm (10.0 KB)
Sticky Note Basic Admin Plugin.rbxm (1.7 KB)
Temporary Bans & Migration to the new Ban API
Coming soon!
Extra: Fixing Command Bar Bug
This is a bit of a “bonus” section, but nonetheless, a bug has appeared with BAE lately that affects autocomplete within the command bar. Usually, you’d press Tab to autocomplete your command bar, but in the newest version of BAE, this functionality is broken.
To fix it, go to your “Basic Admin Client” LocalScript and hit Ctrl+F. This will open up the “Find” search bar. In it, type “consoleBox:ReleaseFocus()”.

Click the arrow on the right to go to match #2, which should be the following:

Change this code to:

By commenting that line and adding one new line, we’ve fixed the autocomplete! I assume this part of the post will become obsolete over time as this bug will no doubt be fixed in future BAE updates. However, the module is rarely updated so sometimes it’s appropriate to take matters into your own hands to solve issues with the BAE module.
Thanks for reading! I hope this post was helpful. If it didn’t answer your question, drop a comment and I’ll work to add it to expand this guide to answer more questions.
